标签归档:分布式

基于Swoole和Zookeeper的分布式ID生成器

大部分业务都需要一个唯一标识ID,比如订单ID、消息ID,通常使用的ID就是数据库的自增ID,比如MySQL的AUTO_INCREMENT;有时候这个ID还需要在不同系统里面传递、保存,又要保证唯一性。单机MySQL在高并发请求下面又可能存在锁/性能问题,于是Flicker使用两台MySQL来生成ID,一台从0开始,一台从1开始,步长为2,这样两台生成的ID不会互相重复,这个方案也可以扩展成N台,自增步长为N即可。
作为一个分布式ID应当避免在不同节点同步ID信息,通常都是基于时间戳和机器信息来生成。比如MongoDB的ObjectId是提前生成的为12字节=4字节UNIX时间戳+3字节机器码+2字节进程ID+2字节计数序列。
如果不需要访问数据库即能生成ID,性能可以更高。比如UUID V1,基于时间戳和网卡,采用128位,可以生成范围非常广的ID,但是生成的16进制值的36位字符串不好排序。在MySQL里面可以通过调整机器码(MAC)和时间戳位置顺序,并采用binary来存储以提高性能
Twitter开源的Snowflake则生成64位数字ID,包括41时间戳,10位机器码/节点码,12位计数序列,另外1位保留。采用基于时间戳的数字ID的好处是这个ID可以当作主键,并且已经粗略按时间排好序,可以直接分页读取,省去在时间字段上建立索引。
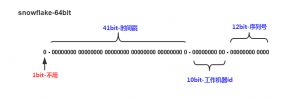
分布式ID通常需要用到机器信息(节点ID或MAC),一个机器通常只运行一个服务进程,所以通常不采用Nginx/Apache + PHP。参考这里实现一个基于Swoole和Zookpeer的64位ID生成器。基于Swoole可以快速开发一个Web/Socket server,不同于Apache/Nginx,它的PHP进程启动后是常驻运行的,资源初始化后可以重复使用,使用Zookpeer来获取当前进程的节点ID,一旦PHP进程退出后便会销毁对应的节点ID。
首先是生成ID

<?php

declare(strict_types=1);

namespace Dig\Ticket;

use Dig\Ticket\Exception\IllegalTimeException;

class Number
{
    public const TOTAL_BIT = 64;
    public const EPOCH_BIT = 42;
    public const NODE_BIT = 10;
    public const SEQUENCE_BIT = 12;

    public const MAX_NODE_ID = 2 ** self::NODE_BIT - 1;
    public const MAX_SEQUENCE_NUMBER = 2 ** self::SEQUENCE_BIT - 1;
    public const CUSTOM_EPOCH = 1262332800000;

    private $lastTimestamp = 0;
    private $sequence = 0;

    private $nodeId = 0;

    public function __construct(int $nodeId)
    {
        $this->nodeId = $nodeId;
    }

    public function getNodeId(): int
    {
        return $this->nodeId;
    }

    public function getTimestamp(): int
    {
        return (int) (\microtime(true) * 1000) - self::CUSTOM_EPOCH;
    }

    public function generate(): int
    {
        $current = $this->getTimestamp();
        if ($current < $this->lastTimestamp) {
            throw new IllegalTimeException('current timestamp cannot less than before');
        }
        if ($current === $this->lastTimestamp) {
            $this->sequence = ($this->sequence + 1) & self::MAX_SEQUENCE_NUMBER;
            if (0 === $this->sequence) {
                $current = $this->_waitNextTimestamp($current);
            }
        } else {
            $this->sequence = 0;
        }
        $this->lastTimestamp = $current;
        $id = $current << (self::TOTAL_BIT - self::EPOCH_BIT);
        $id = $id | ($this->getNodeId() << (self::TOTAL_BIT - self::EPOCH_BIT - self::NODE_BIT));
        $id = $id | $this->sequence;

        return $id;
    }

    private function _waitNextTimestamp($current)
    {
        while ($current === $this->lastTimestamp) {
            $current = $this->getTimestamp();
        }

        return $current;
    }
}

这里只涉及到ID生成,包括时间戳,序列号获取,而节点ID由其他对象生成并传入。2的42次方减1等于4398046511103,大概就是2109年5月15日,可以使用(2^42-1)/(365*24*60*60*1000)≈139年,距离现在还有90年可以用,仍然是一个非常大的可使用范围。CUSTOM_EPOC是自定义的时间戳偏移量,以便选取合适的ID生成下限和上限。距离现在节点生成的接口定义

<?php

declare(strict_types=1);

namespace Dig\Ticket;

interface NodeInterface
{
    public const MAX_NODE_ID = 2 ** Number::NODE_BIT - 1;

    public function getId(): int;
}

这里定义了最大节点序号不能超过1023,可以依据自己的需求更改范围。节点ID的实现可以是基于网卡/进程ID/文件配置等等实现,但是不同机器或多进程之间需要不一样的ID或者需要锁保证上面的generate函数。

<?php

declare(strict_types=1);

namespace Dig\Zookeeper;

class Client extends \Zookeeper
{
    public function makePath(string $path, string $value = ''): bool
    {
        $arrPath = \explode('/', $path);
        if (!empty($arrPath)) {
            $arrPath = \array_filter($arrPath);
            $subpath = '';
            $flag = true;
            foreach ($arrPath as $p) {
                $subpath .= '/'.$p;
                if (!$this->exists($subpath)) {
                    if (!$this->makeNode($subpath, $value)) {
                        $flag = false;
                        break;
                    }
                }
            }

            return $flag;
        }

        return false;
    }

    public function makeNode(string $path, string $value, array $acls = [], int $flag = 0): bool
    {
        if (empty($acls)) {
            $acls = [
                [
                    'perms' => \Zookeeper::PERM_ALL,
                    'scheme' => 'world',
                    'id' => 'anyone',
                ],
            ];
        }
        if ($this->create($path, $value, $acls, $flag)) {
            return true;
        }

        return false;
    }

    public function deletePath(string $path): bool
    {
        $children = $this->getChildren($path);
        if (!empty($children)) {
            foreach ($children as $child) {
                $subpath = $path.'/'.$child;
                $this->deletePath($subpath);
            }
        }

        return $this->delete($path);
    }
}

这里使用Zookeeper实现

<?php

declare(strict_types=1);

namespace Dig\Ticket\Node;

use Dig\Ticket\Exception\UnavailableNodeIdException;
use Dig\Ticket\NodeInterface;
use Dig\Zookeeper\Client;

class Zookeeper implements NodeInterface
{
    private $zk;
    private $dsn;
    private $pool;
    private $basePath = '/dig/ticket';
    private $acls = [
        [
            'perms' => \Zookeeper::PERM_ALL,
            'scheme' => 'world',
            'id' => 'anyone',
        ],
    ];
    private $id;

    public function __construct(string $dsn, string $path = '/sim/ticket')
    {
        $this->dsn = $dsn;
        $this->pool = new \SplQueue();
        if (!empty($path)) {
            $this->basePath = $path;
        }
    }

    public function getZookeeper(): Client
    {
        if (null === $this->zk) {
            $this->zk = new Client($this->dsn);
        }

        return $this->zk;
    }

    public function getId(): int
    {
        if (null === $this->id) {
            if (!$this->getZookeeper()->exists($this->basePath)) {
                $this->getZookeeper()->makePath($this->basePath);
            }
            $i = 1;
            $length = \mb_strlen((string) self::MAX_NODE_ID);
            $nodeId = \sprintf('%0'.$length.'d', $i);
            $children = $this->getZookeeper()->getChildren($this->basePath);
            $children = empty($children) ? [] : $children;
            for (; $i <= self::MAX_NODE_ID; ++$i) {
                $nodeId = \sprintf('%0'.$length.'d', $i);
                if (!\in_array($nodeId, $children)) {
                    $path = $this->basePath.'/'.$nodeId;
                    if ($this->getZookeeper()->exists($path)) {
                        //throw new UnavailableNodeIdException('node already exist: '.$path);
                        continue;
                    }
                    try {
                        $this->getZookeeper()->makeNode($path, $nodeId, $this->acls, \Zookeeper::EPHEMERAL);
                        break;
                    } catch (\ZookeeperException $e) {
                        //throw new UnavailableNodeIdException('cannot create node in zookeeper: '.$e->getMessage());
                        continue;
                    }
                }
            }
            if (self::MAX_NODE_ID === $i) {
                throw new UnavailableNodeIdException('cannot create node in zookeeper: reach max node limit '.self::MAX_NODE_ID);
            }
            $this->id = $i;
        }

        return $this->id;
    }
}

这里遍历查询1-1023之间的节点是否都已在Zookeeper上注册,如果没有则注册,Zookeeper会保证只有一个客户端注册成功。注册的节点类型位Zookeeper::EPHEMERAL,在客户端退出时,该节点会被自动删除,方便其他机器/进程申请。在这篇文章里面我们也使用Zookeeper::EPHEMERAL配合Zookeeper::EPHEMERAL,生成序列号,用来确定进程的master/slave。
初始化并运行Swoole Web server,需要传入Zookeeper的连接字符串,可以使用docker快速部署

<?php
include __DIR__.'/../vendor/autoload.php';
use Dig\Ticket\Number;
use Dig\Ticket\Node\Zookeeper as ZookeeperNode;


/** 
 * swoole - zookeeper tick dispatch issue: https://github.com/php-zookeeper/php-zookeeper
*/
$host = getenv("ZOOKEEPER_CONNECTION");
$host = empty($host) ? "192.168.33.1:2181" : $host;
$node = new ZookeeperNode($host);

$http = new \Swoole\Http\Server("0.0.0.0", 9501);

$http->on("start", function ($server) {
    echo "Swoole http server is started at http://0.0.0.0:9501\n";
});

$http->on("WorkerStart", function ($server, $workerId) use($node) {
    // https://wiki.swoole.com/wiki/page/325.html
    // https://wiki.swoole.com/wiki/page/852.html
    // https://wiki.swoole.com/wiki/page/865.html
    // use lazy initial zk here, so that each worker can hold its own zk resource
    // if we only run swoole http server in 1 worker process (1 CPU), then no need to consider this
    $id = $node->getId();
    $server->nodeId = $id;
    $server->number = new Number($server->nodeId);
});

$http->on("request", function ($request, $response) use ($http) {
    $data = $http->number->generate();
    $response->end($data);
});

$http->start();

访问本机的9501端口即可以得到ID了,完整代码在这里。Swoole默认运行与CPU核数量相同的worker进程数,注意这里需要WorkerStart里初始化获取Node节点ID,如果只是运行一个Swoole worker进程,也可以在外面获取节点ID。可以将Swool\Htpp\Server替换成React\Http\Server或者Amp\Http\Server,它们在单个进程里面loop,每个进程分别持有自己的节点序号,可以保证生成的ID不冲突,性能方面Swoole > Amp > ReactPHP。
可以采用Swoole\Server + thrift/gRPC改造这些代码,提供RPC服务。
注意ID的生成是随时间递增的,依赖于时间戳,如果出现了时间回拨,将会抛出异常。一般解决方案包括:

  • 等待重试
  • 使用Int64原子自增量代替时间戳,跳过时间戳判断
  • 使用预留的节点ID
  • 关闭时钟同步
  • 使用备选自增量方案

生成的ID并不是严格递增的,只是千分一秒递增,对于微博、Twiter的Timeline够用;但也有好处,比如别人不能通过ID相减了解美团的订单量。

参考链接:
如何设计一个分布式ID生成器(Distributed ID Generator),并保证ID按时间粗略有序?
生成全局唯一ID的3个思路,来自一个资深架构师的总结
Distributed unique id generation
Unique ID generation in distributed systems
Optimised UUIDs in mysql
Storing UUID Values in MySQL Tables
Mysql 8.0: UUID support
How to store a 128 bit number in a single column in MySQL?
Generating unique IDs in a distributed environment at high scale
Leaf——美团点评分布式ID生成系统
分布式ID增强篇–优化时钟回拨问题
Ticket Servers: Distributed Unique Primary Keys on the Cheap
Sharding & IDs at Instagram
PHP ZeroMQ开发

ZeroMQ的名字有点巧妙,看起来是个MQ却加了个0,变得不是MQ。ZeroMQ是一个面向消息传递的网络通信框架,支持程序在进程内部部通信,进程之间通信,网络间通信,多播等。ZeroMQ对Socket进行了封装,支持多种网络结构范式如Request/Reply,Pub/Sub,Pull/Push,中介,路由等,还可以在这些模式再次扩展,动态扩容程序和分布式任务开发,能够轻易搭建服务程序集群。

ZeroMQ与支持AMQP的消息中间件不一样,ZeroMQ是一个网络通信库,需要自行实现中间节点和消息的管理。

在CentOS安装ZeroMQ4

git clone https://github.com/zeromq/zeromq4-x.git
cd zeromq4-x
./autogent.sh
./configure
sudo make
sudo make install

#声明libzmq库的位置
sudo vim /etc/ld.so.conf.d/libzmq.conf
#内容:/usr/local/lib

sudo ldconfig

ZeroMQ支持多种编程语言,也包括PHP。php-zmq安装

git clone https://github.com/mkoppanen/php-zmq.git
cd php-zmq
phpize
./configure
sudo make
sudo make install

sudo vim /etc/php.ini

编辑PHP.ini增加扩展信息

[zeromq]
extension = zmq.so

查看扩展是否加载成功:php -m | grep php。
先写一个简单请求-应答,首先是服务端reply.php

<?php
$pContext = new ZMQContext();
$pServer  = new ZMQSocket($pContext, ZMQ::SOCKET_REP);
$pServer->bind("tcp://*:5559");
while (true){
	$strMessage = $pServer->recv();
	echo $strMessage."\r\n";
	$pServer->send("From Server1:".$strMessage);
}

然后是客户端request.php

<?php
$pContext = new ZMQContext();
$pClient  = new ZMQSocket($pContext, ZMQ::SOCKET_REQ);
$pClient->connect("tcp://localhost:5559");
$pClient->send("Hello From Client:".uniqid());
var_dump($pClient->recv());

分别在不同终端预先一下程序

#请求者可以先启动
php request.php
#另一个终端
php reply.php

使用ZeroMQ进行通信的步骤

  • 使用ZMQContext创建一个上下文
  • 使用上下文初始化ZMQSocket,这里需要指明socket类型(ZMQ::SOCKET_开头),组合模式包括
    • PUB,SUB
    • REQ,REP
    • REQ,ROUTER (take care, REQ inserts an extra null frame)
    • DEALER,REP (take care, REP assumes a null frame)
    • DEALER,ROUTER
    • DEALER,DEALER
    • ROUTER,ROUTER
    • PUSH,PULL
    • PAIR,PAIR

    分类包括

    • 轮询,REQ,PUSH,DEALER
    • 多播,PUB
    • 公平排队,REP,SUB,PULL,DEALER
    • 明确寻址,ROUTER
    • 单播,PAIR
  • 如果是服务端就bind,如果是客户端就conncet,这里的连接信息支持
    • 进程内部通信,inproc://
    • 进程间通信,ipc://
    • 网络间通信,tcp://
    • 多播,pgm://
  • 使用send/recv发送/接收消息

使用ZeroMQ创建通信比socket简单多了,与stream_socket差不多。但是使用ZeroMQ,客户端可以先启动而不用管服务端是否已经启动了,等服务端连接上了便会自动传递消息,还可以维持节点之间的心跳。

ZeroMQ与socket通信是不一样的。ZeroMQ是无状态的,对socket的细节进行了封装,不能知道彼此的socket连接信息,仅能接收和发送消息;ZeroMQ能够使用一个socket与多个节点进行通信,具有极高的性能。

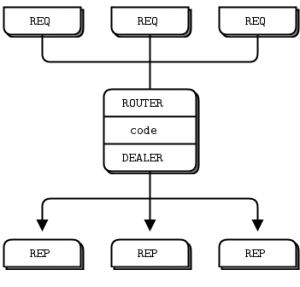
再回头看一下服务端程序,这里采用while循环来处理,亦即同一时刻只能处理一个请求,多个请求排队直到被轮询到,客户端的发送和接收都是同步等待。由于不知道客户端信息,也不能在子进程内处理完成再返回。这里就需要用到ZeroMQ各种范式的组合,比如下面这个
fig16
这里使用ROUTER和DEALER作为中介,转发请求,客户端可以异步发送求,不用等待服务端响应。

<?php
$pContext = new ZMQContext();
$pFrontend = new ZMQSocket($pContext, ZMQ::SOCKET_ROUTER);
$pBackend = new ZMQSocket($pContext, ZMQ::SOCKET_DEALER);
$pFrontend->bind("tcp://*:5559");
$pBackend->bind("tcp://*:5560");

$pPoll = new ZMQPoll();
$pPoll->add($pFrontend, ZMQ::POLL_IN);
$pPoll->add($pBackend, ZMQ::POLL_IN);


$arrRead = $arrWrite = array();
while(true){
	$nEvent = $pPoll->poll($arrRead, $arrWrite);
    if ($nEvent > 0) {
		foreach($arrRead as $pSocket){
			if($pSocket === $pFrontend){
				while (true){
					$strMessage = $pSocket->recv();
					$nMore = $pSocket->getSockOpt(ZMQ::SOCKOPT_RCVMORE);
					$pBackend->send($strMessage,$nMore ? ZMQ::MODE_SNDMORE : null);
					if(!$nMore){
						break;
					}
				}
			}
			else if ($pSocket === $pBackend){
				while (true){
					$strMessage = $pSocket->recv();
					$nMore = $pSocket->getSockOpt(ZMQ::SOCKOPT_RCVMORE);
					$pFrontend->send($strMessage,$nMore ? ZMQ::MODE_SNDMORE : null);
					if(!$nMore){
						break;
					}
				}
			}
		}
    }
}

然后更改服务端reply.php,不再绑定监听,而不是连接到DEALER上

<?php
$pContext = new ZMQContext();
$pServer  = new ZMQSocket($pContext, ZMQ::SOCKET_REP);
//$pServer->bind("tcp://*:5555");
$pServer->connect("tcp://localhost:5560");
while (true){
	$strMessage = $pServer->recv();
	echo $strMessage."\r\n";
	$pServer->send("From Server1:".$strMessage);
}

这里使用ZMQPoll对ZMQSOcket的输入输出事件进行轮询,将ROUTER收到的REQ转发给服务端,将DEALER收到的REP转发给客户端。事实上,还有更简便的方法:使用ZMQDevice将ROUTER和DEALER组合起来

<?php
$pContext = new ZMQContext();
$pFrontend = new ZMQSocket($pContext, ZMQ::SOCKET_ROUTER);
$pBackend = new ZMQSocket($pContext, ZMQ::SOCKET_DEALER);
$pFrontend->bind("tcp://*:5559");
$pBackend->bind("tcp://*:5560");

$pDevice = new ZMQDevice($pFrontend, $pBackend);
$pDevice->run();

ZeroMQ的Pub/Sub的通信模型支持一个发布者发布消息给多个订阅者,也支持一个订阅者从多个发布者订阅消息。首先写一个发布者

<?php
$pContext = new ZMQContext();
$pPublisher = new ZMQSocket($pContext, ZMQ::SOCKET_PUB);
$pPublisher->bind("tcp://*:5563");

while (true) {
    $pPublisher->send("A", ZMQ::MODE_SNDMORE);
    $pPublisher->send("1:We don't want to see this");
    $pPublisher->send("B", ZMQ::MODE_SNDMORE);
    $pPublisher->send("1:We would like to see this");
    sleep (1);
}

然后是订阅者

$pContext = new ZMQContext();
$pSubscriber = new ZMQSocket($pContext, ZMQ::SOCKET_SUB);
$pSubscriber->connect("tcp://localhost:5563");
#可以连接多个发布者
$pSubscriber->connect("tcp://localhost:5564");
$pSubscriber->setSockOpt(ZMQ::SOCKOPT_SUBSCRIBE, "B");

while (true) {
    //  Read envelope with address
    $address = $pSubscriber->recv();
    //  Read message contents
    $contents = $pSubscriber->recv();
    printf ("[%s] %s%s", $address, $contents, PHP_EOL);
}

Pub/Sub模型,发布者只能发布消息,要求发布消息前,先声明主题(地址),然后发布消息内容;订阅者只能接收消息,先设置订阅主题,然后两次接收,第一次为消息主题,第二次为消息内容。
Pub/Sub模型通消息为单向流动,可以结合其他模型让订阅者与发布者互动,比如REQ\REP。

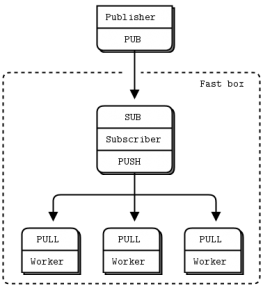
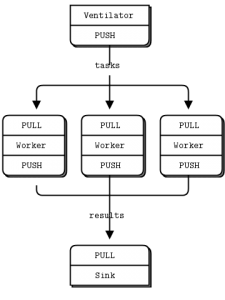
ZeroMQ的Push/Pull模型,生产者负责推送消息,消费者负责拉取消息。初看之下Pull/Push模型与Pub/sub模型类似,但是Pull/Push下生产者产生的消息只会投递给一个消费者,并不会发布给全部消费者,适合用于任务投递分配
fig5
Push和Pull都既可作为服务端,也可作为客户端。服务端Push.php

<?php
$pContext = new ZMQContext();
$pPush = new ZMQSocket($pContext, ZMQ::SOCKET_PUSH);

$pPush->bind("tcp://*:5558");
//$pPush->connect("tcp://localhost:5558");
//$pPush->connect("tcp://localhost:5559");

$pPush->send("Hello Client 1");

客户端Pull.php

<?php
$pContext = new ZMQContext();
$pPull = new ZMQSocket($pContext, ZMQ::SOCKET_PULL);

//$pPull->bind("tcp://*:5558");
$pPull->connect("tcp://localhost:5558");
$pPull->connect("tcp://localhost:5559");

var_dump($pPull->recv());

如果同时启动了两个客户端Pull.php,而只启动一个服务端Push.php,那么一次只会有一个客户端接收到消息。也可以以Pull作为主动监听,Push作为被动连接。可以同时接可以Pub/Sub和Pull/Push来处理任务
fig56
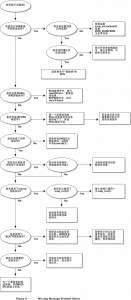
如果是用ZeroMQ传递消息收不到,可以按下面这个流程查问题
chapter1_9
除了客户端可以连接多个服务端,服务端同样可以绑定多个地址。在REQ/REP模型里,让服务端同时使用IPC(进程间通信)来处理本机的连接

<?php
$pContext = new ZMQContext();
$pServer  = new ZMQSocket($pContext, ZMQ::SOCKET_REP);
$pServer->bind("tcp://*:5556");
$pServer->bind("ipc:///tmp/req.ipc");
while(true){
	$message = $pServer->recv();
	echo $message . PHP_EOL;
	$pServer->send("Hello from server1:".$message);
}

客户端可以选择走TCP或者IPC进行消息通信

<?php
$pContext = new ZMQContext();
$pClient  = new ZMQSocket($pContext, ZMQ::SOCKET_REQ);
$pClient->connect("ipc:///tmp/req.ipc");
//$pClient->connect("tcp://localhost:5556");
$pClient->send("Hello From Client1:".uniqid());
$strMessage = $pClient->recv();
echo $strMessage,PHP_EOL;

使用ZeroMQ的进程内部消息通信也很简单

$pServer  = new ZMQSocket(new ZMQContext(), ZMQ::SOCKET_REP);
$pServer->bind("inproc://reply");


$pClient  = new ZMQSocket(new ZMQContext(), ZMQ::SOCKET_REQ);
$pClient->connect("inproc://reply");;
$pClient->send("Hello From Client1:".uniqid());

var_dump($pServer->recv());

ZeroMQ为消息传递的提供极简的方法,提供了各种连接模型,可以自由扩展。zguide更像是一个网络编程指南,指导大家如何利用ZeroMQ搭建各种网络通信模式,提高程序扩展性和健壮性。虽然ZeroMQ解决了进程间和网络间的通信问题,但是各个组件本身进程控制仍然需要自行实现。

更新:ZeroMQ的作者用C语言创建了另外一个支持多种通用通信范式的socket库:nanomsg,可以用来代替ZeroMQ做的那些事,提供了更好的伸缩性,也有对应的PHP扩展

参考链接:
ZMQ 指南
ZeroMQ in PHP
zeromq is the answer
ZeroMQ + libevent in PHP
Europycon2011: Implementing distributed application using ZeroMQ
Getting Started with ‘nanomsg’
A Look at Nanomsg and Scalability Protocols (Why ZeroMQ Shouldn’t Be Your First Choice)

PHP ZooKeeper分布式应用开发

ZooKeeper是一个中心化服务,用于分布式应用下的配置同步和协调,提供统一配置服务,统一命名服务,分布式同步,集群管理等。Zookeeper 从设计模式角度来看,是一个基于观察者模式设计的分布式服务管理框架,它负责存储和管理大家都关心的数据,然后接受观察者的注册,一旦这些数据的状态发生变化,Zookeeper 就将负责通知已经在 Zookeeper 上注册的那些观察者做出相应的反应。ZooKeeper的应用场景包括:统一命名服务;配置管理;集群管理;队列管理等。

ZooKeeper作为一个Java应用程序,有大神开发了PHP的扩展:php-zookeeper。利用ZooKeeper,我们可以让分布式的PHP应用程序协调产生leader,为woker分配任务,当leader崩溃时,自动选举产生leader;也可以作分布式的锁和队列。

ZooKeeper本身是一个集群,至少需要表示3台,只要超过半数节点正常就可以工作,避免单点故障。首先需要安装JDK环境

yum search java | grep 'java-'
sudo yum install java-1.8.0-openjdk-devel

然后安装ZooKeeper,从官网下载

tar zxfv zookeeper-3.4.6.tar.gz
cd zookeeper-3.4.6/src/c
./configure --prefix=/usr/
make
sudo make install

#创建libzookeeper.conf,内容为/usr/lib,以便编译扩展使用
sudo vim /etc/ld.so.conf.d/libzookeeper.conf
#使配置生效
sudo ldconfig

然后安装PHP的扩展

cd
git clone https://github.com/andreiz/php-zookeeper.git
cd php-zookeeper
phpize
./configure
make
sudo make install

更改php.ini配置,增加以下内容

[zookeeper]
extension = zookeeper.so

查看是否加载成功

php -m | grep zookeeper

更改ZooKeeper配置,可以改变里面的DataDir熟悉,默认在/tmp下面

cp conf/zoo_sample.cfg conf/zoo.cfg
vim conf/zoo.cfg

然后终端A里面运行ZooKeeper,通过shell进行交互

cd zookeeper-3.4.6/bin
./zkServer.sh start
./zkCli.sh -server 127.0.0.1:2181
create /test hello
;Created /test
ls /
;[test, zookeeper]

这时便已成功连到了ZooKeeper,并创建了一个名为“/test”的znode。ZooKeeper以树形结构保存数据。这很类似于文件系统,但“文件夹”又和文件很像。znode是ZooKeeper保存的实体。

新建一个PHP脚本来测试一下

<?php
 
class ZookeeperDemo extends Zookeeper {
 
  public function watcher( $i, $type, $key ) {
    echo "Insider Watcher\n";
 
    // Watcher gets consumed so we need to set a new one
    $this->get( '/test', array($this, 'watcher' ) );
  }
 
}
 
$zoo = new ZookeeperDemo('127.0.0.1:2181');
$zoo->get( '/test', array($zoo, 'watcher' ) );
 
while( true ) {
  echo '.';
  sleep(2);
}

在新的终端B里面运行这个脚本

$ php zookeeperdemo1.php

返回刚才的那个终端A里面,改变节点“/test”存储的数据

set /test world

这时候在终端B里面变化打印“Insider Watcher”。注意:这里注册的回到函数仅支持对象的方法,不支持普通的函数。

前面说过,ZooKeeper是一个基于观察者模式设计的分布式服务管理框架。Zookeeper提供了绑定在znode上的监听器,一旦监听到znode数据发生变化,便会通知所有注册的客户端。所以也可以应用于发布订阅模式。

这篇文章还举例,如何让多个PHP脚本自动选举leader,分配工作。

<?php
 
class Worker extends Zookeeper {
 
  const CONTAINER = '/cluster';
 
  protected $acl = array(
                    array(
                      'perms' => Zookeeper::PERM_ALL,
                      'scheme' => 'world',
                      'id' => 'anyone' ) );
 
  private $isLeader = false;
 
  private $znode;
 
  public function __construct( $host = '', $watcher_cb = null, $recv_timeout = 10000 ) {
    parent::__construct( $host, $watcher_cb, $recv_timeout );
  }
 
  public function register() {
    if( ! $this->exists( self::CONTAINER ) ) {
      $this->create( self::CONTAINER, null, $this->acl );
    }
 
    //Zookeeper::EPHEMERAL - auto remove if client session goes away
    //Zookeeper::EPHEMERAL - auto increasing sequence number
    $this->znode = $this->create( self::CONTAINER . '/w-',
                                  null,
                                  $this->acl,
                                  Zookeeper::EPHEMERAL | Zookeeper::SEQUENCE );
 
    $this->znode = str_replace( self::CONTAINER .'/', '', $this->znode );
 
    printf( "I'm registred as: %s\n", $this->znode );
 
    $watching = $this->watchPrevious();
 
    if( $watching == $this->znode ) {
      printf( "Nobody here, I'm the leader\n" );
      $this->setLeader( true );
    }
    else {
      printf( "I'm watching %s\n", $watching );
    }
  }
 
  public function watchPrevious() {
    $workers = $this->getChildren( self::CONTAINER );
    sort( $workers );
    $size = sizeof( $workers );
    for( $i = 0 ; $i < $size ; $i++ ) {
      if( $this->znode == $workers[ $i ] ) {
        if( $i > 0 ) {
          //for node path change event
          $this->get( self::CONTAINER . '/' . $workers[ $i - 1 ], array( $this, 'watchNode' ) );
          //for node path exist event
          $this->exists( self::CONTAINER . '/' . $workers[ $i - 1 ], array( $this, 'watchNode' ) );
          return $workers[ $i - 1 ];
        }
 
        return $workers[ $i ];
      }
    }
 
    throw new Exception(  sprintf( "Something went very wrong! I can't find myself: %s/%s",
                          self::CONTAINER,
                          $this->znode ) );
  }
 
  public function watchNode( $i, $type, $name ) {
    $watching = $this->watchPrevious();
    if( $watching == $this->znode ) {
      printf( "I'm the new leader!\n" );
      $this->setLeader( true );
    }
    else {
      printf( "Now I'm watching %s\n", $watching );
    }
  }
 
  public function isLeader() {
    return $this->isLeader;
  }
 
  public function setLeader($flag) {
    $this->isLeader = $flag;
  }
 
  public function run() {
    $this->register();
 
    while( true ) {
      if( $this->isLeader() ) {
        $this->doLeaderJob();
    }
    else {
      $this->doWorkerJob();
    }
 
      sleep( 2 );
    }
  }
 
  public function doLeaderJob() {
    echo "Leading\n";
  }
 
  public function doWorkerJob() {
    echo "Working\n";
  }
 
}
//host can be multiple, e.g '127.0.0.1:2181,127.0.0.1:2182,127.0.0.1:2183' 
$worker = new Worker( '127.0.0.1:2181' );
$worker->run();

打开多个终端运行这个脚本。使用Ctrl+c或其他方法退出第一个脚本。刚开始不会有任何变化,worker可以继续工作。后来,ZooKeeper会发现超时,并选举出新的leader。

除此之外,利用这个扩展还可以实现一下其他的应用场景,比如排他锁和共享锁:php-zookeeper-recipes

参考链接:
Distributed application in PHP with Apache Zookeeper
分布式服务框架 Zookeeper — 管理分布式环境中的数据
使用Apache Zookeeper分布式部署PHP应用程序
分布式服务框架:Zookeeper