标签归档:swoole

基于Swoole和Zookeeper的分布式ID生成器

大部分业务都需要一个唯一标识ID,比如订单ID、消息ID,通常使用的ID就是数据库的自增ID,比如MySQL的AUTO_INCREMENT;有时候这个ID还需要在不同系统里面传递、保存,又要保证唯一性。单机MySQL在高并发请求下面又可能存在锁/性能问题,于是Flicker使用两台MySQL来生成ID,一台从0开始,一台从1开始,步长为2,这样两台生成的ID不会互相重复,这个方案也可以扩展成N台,自增步长为N即可。
作为一个分布式ID应当避免在不同节点同步ID信息,通常都是基于时间戳和机器信息来生成。比如MongoDB的ObjectId是提前生成的为12字节=4字节UNIX时间戳+3字节机器码+2字节进程ID+2字节计数序列。
如果不需要访问数据库即能生成ID,性能可以更高。比如UUID V1,基于时间戳和网卡,采用128位,可以生成范围非常广的ID,但是生成的16进制值的36位字符串不好排序。在MySQL里面可以通过调整机器码(MAC)和时间戳位置顺序,并采用binary来存储以提高性能
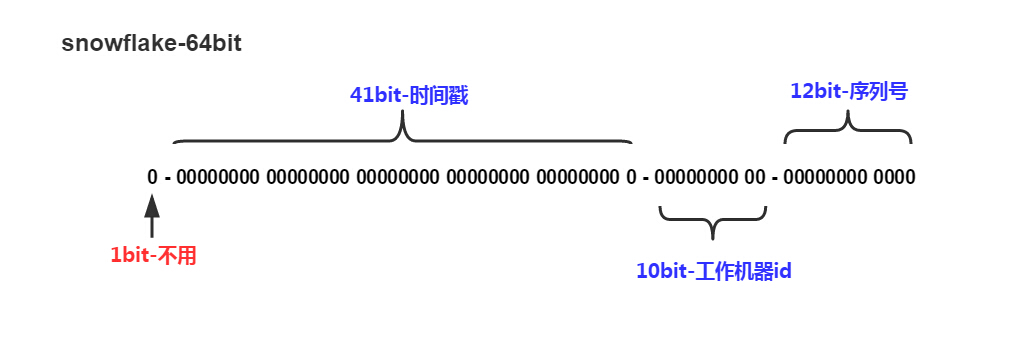
Twitter开源的Snowflake则生成64位数字ID,包括41时间戳,10位机器码/节点码,12位计数序列,另外1位保留。采用基于时间戳的数字ID的好处是这个ID可以当作主键,并且已经粗略按时间排好序,可以直接分页读取,省去在时间字段上建立索引。

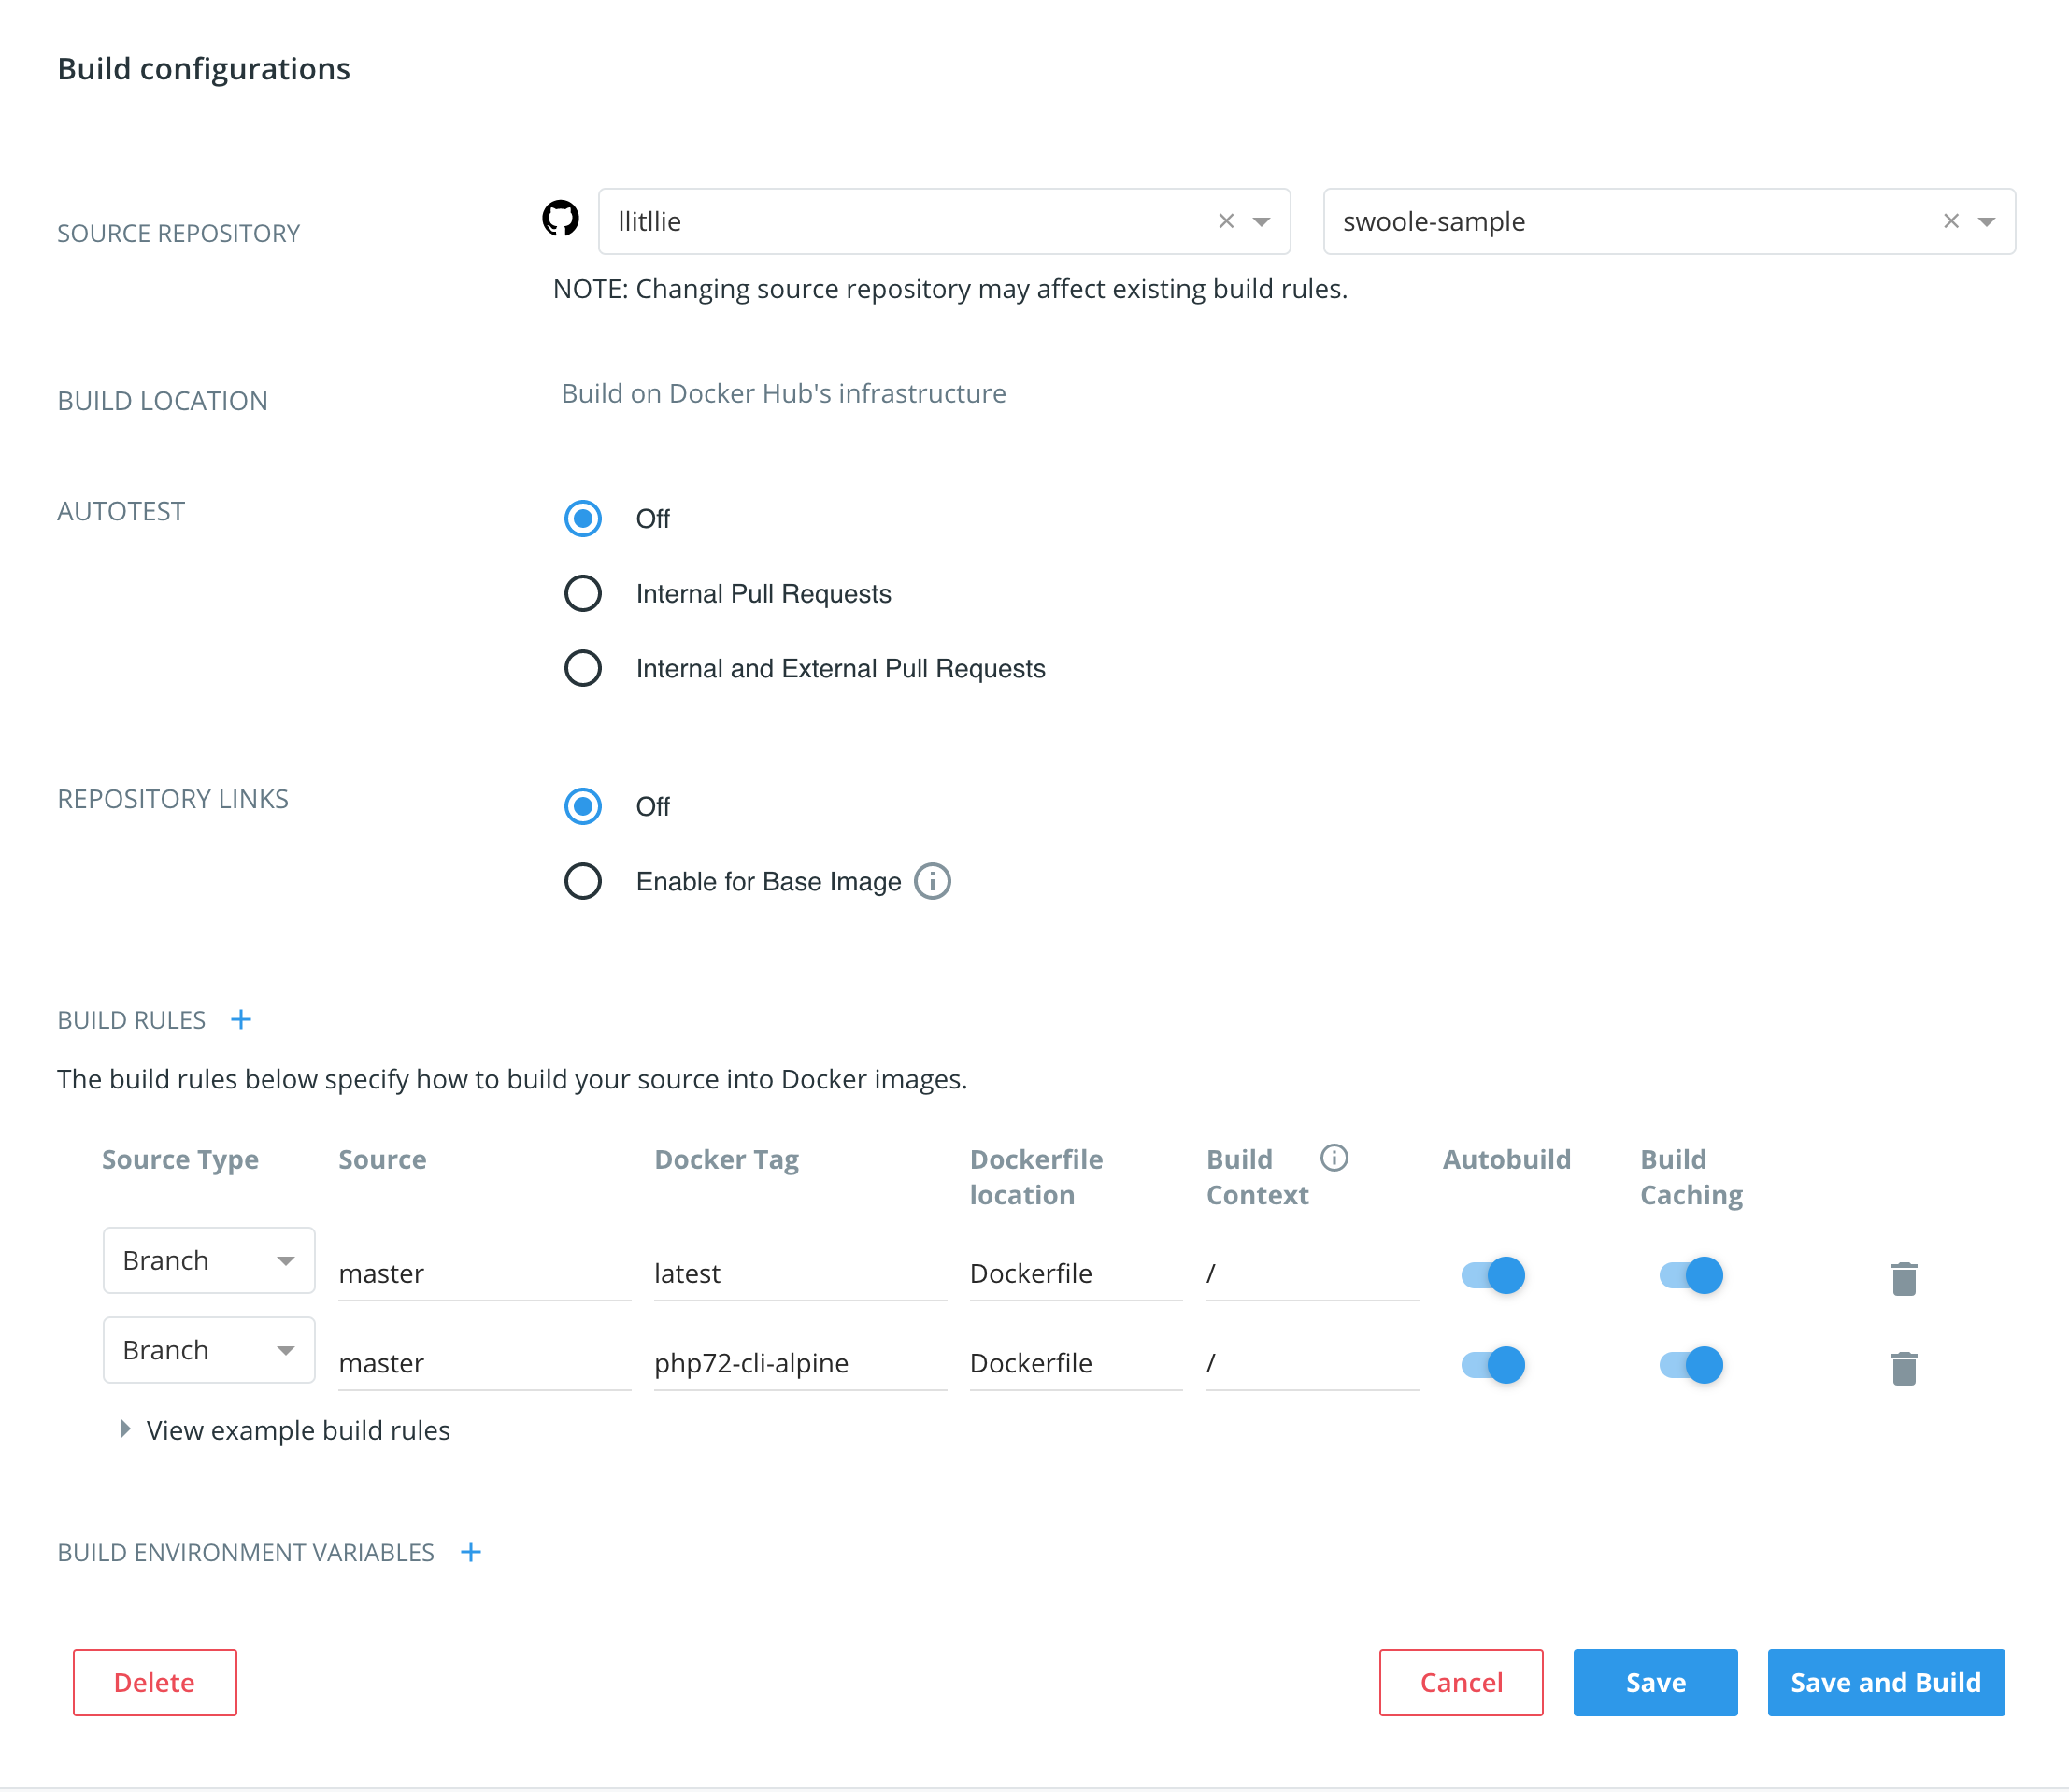
分布式ID通常需要用到机器信息(节点ID或MAC),一个机器通常只运行一个服务进程,所以通常不采用Nginx/Apache + PHP。参考这里实现一个基于Swoole和Zookpeer的64位ID生成器。基于Swoole可以快速开发一个Web/Socket server,不同于Apache/Nginx,它的PHP进程启动后是常驻运行的,资源初始化后可以重复使用,使用Zookpeer来获取当前进程的节点ID,一旦PHP进程退出后便会销毁对应的节点ID。
首先是生成ID

<?php

declare(strict_types=1);

namespace Dig\Ticket;

use Dig\Ticket\Exception\IllegalTimeException;

class Number
{
    public const TOTAL_BIT = 64;
    public const EPOCH_BIT = 42;
    public const NODE_BIT = 10;
    public const SEQUENCE_BIT = 12;

    public const MAX_NODE_ID = 2 ** self::NODE_BIT - 1;
    public const MAX_SEQUENCE_NUMBER = 2 ** self::SEQUENCE_BIT - 1;
    public const CUSTOM_EPOCH = 1262332800000;

    private $lastTimestamp = 0;
    private $sequence = 0;

    private $nodeId = 0;

    public function __construct(int $nodeId)
    {
        $this->nodeId = $nodeId;
    }

    public function getNodeId(): int
    {
        return $this->nodeId;
    }

    public function getTimestamp(): int
    {
        return (int) (\microtime(true) * 1000) - self::CUSTOM_EPOCH;
    }

    public function generate(): int
    {
        $current = $this->getTimestamp();
        if ($current < $this->lastTimestamp) {
            throw new IllegalTimeException('current timestamp cannot less than before');
        }
        if ($current === $this->lastTimestamp) {
            $this->sequence = ($this->sequence + 1) & self::MAX_SEQUENCE_NUMBER;
            if (0 === $this->sequence) {
                $current = $this->_waitNextTimestamp($current);
            }
        } else {
            $this->sequence = 0;
        }
        $this->lastTimestamp = $current;
        $id = $current << (self::TOTAL_BIT - self::EPOCH_BIT);
        $id = $id | ($this->getNodeId() << (self::TOTAL_BIT - self::EPOCH_BIT - self::NODE_BIT));
        $id = $id | $this->sequence;

        return $id;
    }

    private function _waitNextTimestamp($current)
    {
        while ($current === $this->lastTimestamp) {
            $current = $this->getTimestamp();
        }

        return $current;
    }
}

这里只涉及到ID生成,包括时间戳,序列号获取,而节点ID由其他对象生成并传入。2的42次方减1等于4398046511103,大概就是2109年5月15日,可以使用(2^42-1)/(365*24*60*60*1000)≈139年,距离现在还有90年可以用,仍然是一个非常大的可使用范围。CUSTOM_EPOC是自定义的时间戳偏移量,以便选取合适的ID生成下限和上限。距离现在节点生成的接口定义

<?php

declare(strict_types=1);

namespace Dig\Ticket;

interface NodeInterface
{
    public const MAX_NODE_ID = 2 ** Number::NODE_BIT - 1;

    public function getId(): int;
}

这里定义了最大节点序号不能超过1023,可以依据自己的需求更改范围。节点ID的实现可以是基于网卡/进程ID/文件配置等等实现,但是不同机器或多进程之间需要不一样的ID或者需要锁保证上面的generate函数。

<?php

declare(strict_types=1);

namespace Dig\Zookeeper;

class Client extends \Zookeeper
{
    public function makePath(string $path, string $value = ''): bool
    {
        $arrPath = \explode('/', $path);
        if (!empty($arrPath)) {
            $arrPath = \array_filter($arrPath);
            $subpath = '';
            $flag = true;
            foreach ($arrPath as $p) {
                $subpath .= '/'.$p;
                if (!$this->exists($subpath)) {
                    if (!$this->makeNode($subpath, $value)) {
                        $flag = false;
                        break;
                    }
                }
            }

            return $flag;
        }

        return false;
    }

    public function makeNode(string $path, string $value, array $acls = [], int $flag = 0): bool
    {
        if (empty($acls)) {
            $acls = [
                [
                    'perms' => \Zookeeper::PERM_ALL,
                    'scheme' => 'world',
                    'id' => 'anyone',
                ],
            ];
        }
        if ($this->create($path, $value, $acls, $flag)) {
            return true;
        }

        return false;
    }

    public function deletePath(string $path): bool
    {
        $children = $this->getChildren($path);
        if (!empty($children)) {
            foreach ($children as $child) {
                $subpath = $path.'/'.$child;
                $this->deletePath($subpath);
            }
        }

        return $this->delete($path);
    }
}

这里使用Zookeeper实现

<?php

declare(strict_types=1);

namespace Dig\Ticket\Node;

use Dig\Ticket\Exception\UnavailableNodeIdException;
use Dig\Ticket\NodeInterface;
use Dig\Zookeeper\Client;

class Zookeeper implements NodeInterface
{
    private $zk;
    private $dsn;
    private $pool;
    private $basePath = '/dig/ticket';
    private $acls = [
        [
            'perms' => \Zookeeper::PERM_ALL,
            'scheme' => 'world',
            'id' => 'anyone',
        ],
    ];
    private $id;

    public function __construct(string $dsn, string $path = '/sim/ticket')
    {
        $this->dsn = $dsn;
        $this->pool = new \SplQueue();
        if (!empty($path)) {
            $this->basePath = $path;
        }
    }

    public function getZookeeper(): Client
    {
        if (null === $this->zk) {
            $this->zk = new Client($this->dsn);
        }

        return $this->zk;
    }

    public function getId(): int
    {
        if (null === $this->id) {
            if (!$this->getZookeeper()->exists($this->basePath)) {
                $this->getZookeeper()->makePath($this->basePath);
            }
            $i = 1;
            $length = \mb_strlen((string) self::MAX_NODE_ID);
            $nodeId = \sprintf('%0'.$length.'d', $i);
            $children = $this->getZookeeper()->getChildren($this->basePath);
            $children = empty($children) ? [] : $children;
            for (; $i <= self::MAX_NODE_ID; ++$i) {
                $nodeId = \sprintf('%0'.$length.'d', $i);
                if (!\in_array($nodeId, $children)) {
                    $path = $this->basePath.'/'.$nodeId;
                    if ($this->getZookeeper()->exists($path)) {
                        //throw new UnavailableNodeIdException('node already exist: '.$path);
                        continue;
                    }
                    try {
                        $this->getZookeeper()->makeNode($path, $nodeId, $this->acls, \Zookeeper::EPHEMERAL);
                        break;
                    } catch (\ZookeeperException $e) {
                        //throw new UnavailableNodeIdException('cannot create node in zookeeper: '.$e->getMessage());
                        continue;
                    }
                }
            }
            if (self::MAX_NODE_ID === $i) {
                throw new UnavailableNodeIdException('cannot create node in zookeeper: reach max node limit '.self::MAX_NODE_ID);
            }
            $this->id = $i;
        }

        return $this->id;
    }
}

这里遍历查询1-1023之间的节点是否都已在Zookeeper上注册,如果没有则注册,Zookeeper会保证只有一个客户端注册成功。注册的节点类型位Zookeeper::EPHEMERAL,在客户端退出时,该节点会被自动删除,方便其他机器/进程申请。在这篇文章里面我们也使用Zookeeper::EPHEMERAL配合Zookeeper::EPHEMERAL,生成序列号,用来确定进程的master/slave。
初始化并运行Swoole Web server,需要传入Zookeeper的连接字符串,可以使用docker快速部署

<?php
include __DIR__.'/../vendor/autoload.php';
use Dig\Ticket\Number;
use Dig\Ticket\Node\Zookeeper as ZookeeperNode;


/** 
 * swoole - zookeeper tick dispatch issue: https://github.com/php-zookeeper/php-zookeeper
*/
$host = getenv("ZOOKEEPER_CONNECTION");
$host = empty($host) ? "192.168.33.1:2181" : $host;
$node = new ZookeeperNode($host);

$http = new \Swoole\Http\Server("0.0.0.0", 9501);

$http->on("start", function ($server) {
    echo "Swoole http server is started at http://0.0.0.0:9501\n";
});

$http->on("WorkerStart", function ($server, $workerId) use($node) {
    // https://wiki.swoole.com/wiki/page/325.html
    // https://wiki.swoole.com/wiki/page/852.html
    // https://wiki.swoole.com/wiki/page/865.html
    // use lazy initial zk here, so that each worker can hold its own zk resource
    // if we only run swoole http server in 1 worker process (1 CPU), then no need to consider this
    $id = $node->getId();
    $server->nodeId = $id;
    $server->number = new Number($server->nodeId);
});

$http->on("request", function ($request, $response) use ($http) {
    $data = $http->number->generate();
    $response->end($data);
});

$http->start();

访问本机的9501端口即可以得到ID了,完整代码在这里。Swoole默认运行与CPU核数量相同的worker进程数,注意这里需要WorkerStart里初始化获取Node节点ID,如果只是运行一个Swoole worker进程,也可以在外面获取节点ID。可以将Swool\Htpp\Server替换成React\Http\Server或者Amp\Http\Server,它们在单个进程里面loop,每个进程分别持有自己的节点序号,可以保证生成的ID不冲突,性能方面Swoole > Amp > ReactPHP。
可以采用Swoole\Server + thrift/gRPC改造这些代码,提供RPC服务。
注意ID的生成是随时间递增的,依赖于时间戳,如果出现了时间回拨,将会抛出异常。一般解决方案包括:

  • 等待重试
  • 使用Int64原子自增量代替时间戳,跳过时间戳判断
  • 使用预留的节点ID
  • 关闭时钟同步
  • 使用备选自增量方案

生成的ID并不是严格递增的,只是千分一秒递增,对于微博、Twiter的Timeline够用;但也有好处,比如别人不能通过ID相减了解美团的订单量。

参考链接:
如何设计一个分布式ID生成器(Distributed ID Generator),并保证ID按时间粗略有序?
生成全局唯一ID的3个思路,来自一个资深架构师的总结
Distributed unique id generation
Unique ID generation in distributed systems
Optimised UUIDs in mysql
Storing UUID Values in MySQL Tables
Mysql 8.0: UUID support
How to store a 128 bit number in a single column in MySQL?
Generating unique IDs in a distributed environment at high scale
Leaf——美团点评分布式ID生成系统
分布式ID增强篇–优化时钟回拨问题
Ticket Servers: Distributed Unique Primary Keys on the Cheap
Sharding & IDs at Instagram

使用Composer和Docker创建Swoole项目

最近有一个小功能使用swoole扩展来开发,并没有使用框架,从零开始。这里采用类用似Symfony的目录结构:

.
├── bin
├── config
├── src
├── tests
├── vendor
├── phpunit.xml
├── composer.json
├── .gitignore
├── Dockerfile
├── LICENSE
├── phpunit.xml
└── README.md

项目代码放置在src下面,测试代码则在tests里面,config目录存放配置文件,bin文件夹则是一些命令行工具,vendor目录则是composer安装第三方依赖库的目录。composer.json是借鉴k911/swoole-bundle,内容如下

{
    "name": "llitllie/swoole-sample",
    "type": "library",
    "description": "Swoole Sample",
    "keywords": [
        "Swoole"
    ],
    "license": "MIT",
    "homepage": "https://github.com/llitllie/swoole-sample.git",
    "authors": [{
        "name": "llitllie",
        "email": "[email protected]",
        "homepage": "https://github.com/llitllie/swoole-sample.git"
    }],
    "require": {
        "php": "^7.2",
        "ext-swoole": "^4.3.4"
    },
    "require-dev": {
        "phpunit/phpunit": "^8",
        "phpstan/phpstan": "^0.11.8",
        "friendsofphp/php-cs-fixer": "^2.15",
        "swoole/ide-helper": "@dev"
    },
    "scripts": {
        "static-analyse-src": [
            "phpstan analyze src -l 7 --ansi"
        ],
        "cs-analyse": [
            "php-cs-fixer fix -v --dry-run --diff --stop-on-violation --ansi"
        ],
        "analyse": [
            "@static-analyse-src",
            "@cs-analyse"
        ],
        "test": [
            "@analyse",
            "@unit-tests"
        ],
        "unit-tests": [
            "phpunit tests --testdox --colors=always"
        ],
        "fix": "php-cs-fixer fix -v --ansi"
    },
    "suggest": {
        "ext-uv": "^0.2.4",
        "ext-ev": "^1.0.6"
    }
}

这里require里面指定了PHP版本>=7.2和Swoole扩展,composer安装时会自动检查。require-dev里面指定了单元测试工具phpunit、代码分析工具phpstan和代码风格检查php-cx-fixer。phpstan可以帮助分析代码,检测语法,在代码运行前发现问题。php-cx-fixer则可以帮忙格式化代码,保持代码统一风格。scripts里面定义了调用它们的命令,可以使用composer运行

$ ls -la vendor/bin/
total 4
drwxrwxr-x.  2 vagrant vagrant   69 Jul  1 07:24 .
drwxrwxr-x. 24 vagrant vagrant 4096 Jul  1 07:25 ..
lrwxrwxrwx.  1 vagrant vagrant   41 Jul  1 07:24 php-cs-fixer -> ../friendsofphp/php-cs-fixer/php-cs-fixer
lrwxrwxrwx.  1 vagrant vagrant   33 Jul  1 07:24 php-parse -> ../nikic/php-parser/bin/php-parse
lrwxrwxrwx.  1 vagrant vagrant   30 Jul  1 07:24 phpstan -> ../phpstan/phpstan/bin/phpstan
lrwxrwxrwx.  1 vagrant vagrant   26 Jul  1 07:24 phpunit -> ../phpunit/phpunit/phpunit
$ ./vendor/bin/phpunit --testdox tests

$ composer test
> phpstan analyze src -l 7 --ansi
 7/8 [▓▓▓▓▓▓▓▓▓▓▓▓▓▓▓▓▓▓▓▓▓▓▓▓░░░░]  87%

 8/8 [▓▓▓▓▓▓▓▓▓▓▓▓▓▓▓▓▓▓▓▓▓▓▓▓▓▓▓▓] 100%                                                                                
 [OK] No errors                                                                 
                                                                                

> php-cs-fixer fix -v --dry-run --diff --stop-on-violation --ansi
Loaded config default from "/home/ticket/.php_cs.dist".
Using cache file ".php_cs.cache".
SSSSSSSSSSS
Legend: ?-unknown, I-invalid file syntax, file ignored, S-Skipped, .-no changes, F-fixed, E-error

Checked all files in 0.070 seconds, 6.000 MB memory used
> phpunit tests --testdox --colors=always
PHPUnit 8.2.4 by Sebastian Bergmann and contributors.

Sim\Ticket\Node\Zookeeper
 ✓ Get id

Sim\Ticket\Number
 ✓ Load
 ✓ Get timestamp
 ✓ Get node id
 ✓ Generate
 ✓ Generate with zookeeper node

Sim\Zookeeper\Client
 ✓ Zookeeper
 ✓ Zookeeper extension

Time: 841 ms, Memory: 4.00 MB

OK (8 tests, 23 assertions)

phpuit.xml里面则是一些测试配置,可以在里面定义自动加载和变量

<?xml version="1.0" encoding="UTF-8"?>

<!-- https://phpunit.readthedocs.io/en/7.3/configuration.html -->
<phpunit xmlns:xsi="http://www.w3.org/2001/XMLSchema-instance"
         xsi:noNamespaceSchemaLocation="https://schema.phpunit.de/7.3/phpunit.xsd"
         colors="true"
         bootstrap="vendor/autoload.php"
>
    <filter>
        <whitelist processUncoveredFilesFromWhitelist="true">
            <directory suffix=".php">src/</directory>
        </whitelist>
    </filter>
    <testsuites>
        <testsuite name="Unit tests suite">
            <directory>tests</directory>
        </testsuite>
    </testsuites>
    <php>
        <includePath>.</includePath>
        <const name="SERVICE" value="192.168.33.1"/>
        <env name="SERVICE" value="192.168.33.1"/>
    </php>
</phpunit>

PHP Composer支持使用已有的代码作为模板,快速克隆创建一个新项目,方便重复使用。将代码保存到GitHub上面然后在packagist.org上面提交就可以了。使用composer create-project:

composer create-project llitllie/swoole-sample example dev-master

这里使用Docker来构建运行代码,Dockerfile内容如下

ARG PHP_TAG="7.2-cli-alpine3.9"

FROM php:$PHP_TAG

ENV COMPOSER_ALLOW_SUPERUSER 1

RUN set -ex \
  	&& apk update \
    && apk add --no-cache --virtual .build-deps curl gcc g++ make build-base autoconf \
    && apk add libstdc++ openssl-dev libffi-dev \
    && docker-php-ext-install sockets \
    && docker-php-source extract \
    && printf "yes\nyes\nno\nyes\nno\n" | pecl install swoole \
    && docker-php-ext-enable swoole \
    && docker-php-source delete \
    && curl -sS https://getcomposer.org/installer | php -- --install-dir=/usr/local/bin --filename=composer \
    && apk del .build-deps \
    && rm -rf /tmp/* 

WORKDIR /usr/src/app
COPY . ./
ARG COMPOSER_ARGS="install"
RUN composer ${COMPOSER_ARGS} --prefer-dist --ignore-platform-reqs --no-progress --no-suggest --no-scripts --ansi

EXPOSE 9501
CMD ["php", "bin/server.php"]

这里声明了swoole将会监听9501端口,默认运行bin目录下面的serverphp文件。使用pecl安装swoole会要求回答几个问题,比如是否启用socket/http2/mysqlnd等等,这里使用printf输出答案。构建,然后运行

docker build  -t llitllie/swoole-project .
docker run --name swoole -d -p 9501:9501 llitllie/swoole-project
#docker run --name web -dit -p 9501:9501 --mount type=bind,source=/Users/vagrant/example,target=/opt/app llitllie/swoole-project /bin/sh

这样一个swoole项目模板算是好了,可以继续往composer文件里面添加需要的库或脚本;也可以继承在已经构建好的docker镜像基础上继续添加所需的软件,更改监听端口等等。
可以在Docker Cloud上面配置对应的git,并配置对应自动化构建规则,这样就可以方便的自动构建了。

使用Phar打包发布PHP程序

上一遍介绍PHPUnit时,下载的PHPUnit是个Phar格式的文件并且可以独立运行。Phar归档是PHP 5.3增加的新特性,借鉴了JAVA中的JAR归档,可以将整个目录下的文件打包成单个可执行文件。虽然单个PHP文件也是可执行(Composer的install就是单个PHP文件执行创建对应的Phar),但是显得不方便。
Phar的创建、引用、解压、转换均可以在PHP中完成。要创建Phar需要更改php.ini如下

;phar.readonly = On
phar.readonly = Off

首先在swoole\server目录下创建一个需要打包的文件swoole.php

<?php
$serv = new swoole_server("127.0.0.1", 9002);
$serv->set(array(
    'worker_num' => 8,   //工作进程数量
    'daemonize' => true, //是否作为守护进程
));
$serv->on('connect', function ($serv, $fd){
    echo "Client:Connect.\n";
});
$serv->on('receive', function ($serv, $fd, $from_id, $data) {
    $serv->send($fd, 'Swoole: '.$data);
    $serv->close($fd);
});
$serv->on('close', function ($serv, $fd) {
    echo "Client: Close.\n";
});
$serv->start();

在swoole目录下面创建index.php

<?php
require 'server/swoole.php';

测试一下是否能正常运行

[root@vagrant-centos64 swoole]php index.php
[root@vagrant-centos64 swoole]# netstat  -apn | grep 9002
tcp        0      0 127.0.0.1:9002              0.0.0.0:*                   LISTEN      8436/php

在swoole目录下创建执行打包操作的文件build.php

<?php
$dir = __DIR__;             // 需要打包的目录
$file = 'swoole.phar';      // 包的名称, 注意它不仅仅是一个文件名, 在stub中也会作为入口前缀
$phar = new Phar(__DIR__ . '/' . $file, FilesystemIterator::CURRENT_AS_FILEINFO | FilesystemIterator::KEY_AS_FILENAME, $file);
// 开始打包
$phar->startBuffering();
$phar->buildFromDirectory($dir);
$phar->delete('build.php');
// 设置入口
$phar->setStub("<?php
Phar::mapPhar('{$file}');
require 'phar://{$file}/index.php';
__HALT_COMPILER();
?>");
$phar->stopBuffering();
// 打包完成
echo "Finished {$file}\n";

进行打包

[root@vagrant-centos64 swoole]$ php build.php
Finished swoole.phar

测试执行一下

[root@vagrant-centos64 swoole]$ php swoole.phar
[root@vagrant-centos64 swoole]# netstat  -apn | grep 9002
tcp        0      0 127.0.0.1:9002              0.0.0.0:*                   LISTEN      8635/php

到这里swoole.phar可以单独发布执行力。也可以在其他项目(比如WEB)里面引用,例如

<?php
include 'swoole.phar';
//引用里面的文件
//include 'phar://swoole.phar/server/swoole.php';

SegmentFault便是将PHP打包成Phar进行发布的。
打包完成后,也可以将Phar转成Zip格式或解压出来,比如解压PHPUnit

<?php
$phar = new Phar('phpunit.phar');
$phar->convertToExecutable(Phar::ZIP);
//$phar->extractTo('phpunit'); 

刚才我们这样运行的:php swoole.phar,就是还需要在PharP包前面还要加一个php。如果想做成直接可运行的Phar包,可以像单个PHP可执行文件那样在文件开头加上:#!/usr/bin/env php

$phar->setStub("#!/usr/bin/env php
<?php
Phar::mapPhar('{$file}');
require 'phar://{$file}/index.php';
__HALT_COMPILER();
?>");

运行一下

./swoole.phar

注意如果你在window下面编辑刚才段代码的话,可能会报错:-bash: ./swoole.phar: /usr/bin/env: bad interpreter: No such file or directory。解决办法便是更改换行符为Unix格式,参见这里

GitHub上有个项目:phar-composer可以利用Composer来打包相应的项目为单个可执行文件。

参考链接:
使用phar上线你的代码包
PHP的Phar简介
使用Phar来打包发布PHP程序
Packaging Your Apps with Phar
PHP V5.3 中的新特性,第 4 部分: 创建并使用 Phar 归档
rpm打包利器rpm_create简介

PHP测试框架初探:PHPUnit

最近开始一个新的项目,涉及到了网络通信的客户/端服务端,刚开始都是边写边调试,完成之后觉得有必要留下相关的测试示例,以便日后使用调试。一些PHP项目会把示例写在文件开头的注释里面,但这样又没办法验证是否能正确运行。
workerman是在文件最后留下的运行代码,如RpcClient.php

// ==以下调用示例==
if(PHP_SAPI == 'cli' && isset($argv[0]) && $argv[0] == basename(__FILE__))
{
    //这里是RpcClient的测试用例
}

PHPUnit则是这样的

#!/usr/bin/env php
<?php
if (__FILE__ == realpath($GLOBALS['_SERVER']['SCRIPT_NAME'])) {
    $phar    = realpath($GLOBALS['_SERVER']['SCRIPT_NAME']);
    $execute = true;
} else {
    $files   = get_included_files();
    $phar    = $files[0];
    $execute = false;
}

这有点像python

if __name__ == "__main__":
    //这里运行相关调用

这样就可以对单个文件的代码边看边测试,但是这会在相关的代码里面混入不必要的测试用例代码,当有依赖于外部文件又不是很方便,于是便想把这部分测例代码独立出来。
PHPUnit是xUnit测试家族的一员,可以方便对测试代码进行管理,还可以结合其他扩展。依照官网步骤开始:

wget https://phar.phpunit.de/phpunit.phar
chmod +x phpunit.phar
sudo mv phpunit.phar /usr/local/bin/phpunit
phpunit --version
#PHPUnit 4.7.7 by Sebastian Bergmann and contributors.

写一个测试代码(PHPUnit也可以自动生成对应的测试代码)

<?php
namespace Test\Client;
use Client\RPC;
class RPCTest extends \PHPUnit_Framework_TestCase{
	public $pClient = null;
	public $nMatchID = 567;
	public function __construct(){
		parent::__construct();
		
		$arrAddress = array(
				'tcp://127.0.0.1:9001'
		);
		// 配置服务端列表
		RPC::config($arrAddress);
		$this->nMatchID = 567;
		$this->pClient = RPC::instance('\Prize\Service');
	}
	public function testGet(){
		$mxRes = $this->pClient->get($this->nMatchID);
		$this->assertTrue(is_array($mxRes));
		$this->assertGreaterThan(0, count($mxRes));
	}
	public function testSendGet(){
		$this->assertTrue($this->pClient->send_get($this->nMatchID));
	}
	/**
	 * 使用依赖,以便保证在同一个socket链接之内
	 * @depends testSendGet
	 */
	public function testRecvGet(){
		$mxRes = $this->pClient->recv_get($this->nMatchID);
		$this->assertTrue(is_array($mxRes));
		$this->assertGreaterThan(0, count($mxRes));
	}
}

这边的使用了外部类RPC,于是在Bootstrap.php里面定义相关的自动加载规则,以便测试时自动加载

<?php
define('STIE_PATH', getcwd().'/');
define('ROOT_PATH', STIE_PATH);
define('LIB_PATH', ROOT_PATH.'Lib/');
define('TEST_PATH',	ROOT_PATH.'Test/');

spl_autoload_register(function($p_strClassName){
	$arrClassName = explode('\\', trim($p_strClassName, '\\'));
	if(!empty($arrClassName)){
		if($arrClassName[0] == 'Test'){
			$strPath = ROOT_PATH.implode(DIRECTORY_SEPARATOR, $arrClassName).'.php';
		}
		else{
			$strPath = LIB_PATH.implode(DIRECTORY_SEPARATOR, $arrClassName).'.php';
		}
	}
	if(is_file($strPath)){
		include $strPath;
	}
	else{
		throw new Exception("File not find : ".$strPath);
	}
});

现在运行测试代码

phpunit --bootstrap Test/Bootstrap.php Test/

出现了一些警报和错误。其中一个提示找不到PHPUnit_Extensions_Story_TestCase文件:

PHP Warning:  include(/usr/share/nginx/html/tutorial/mars/Lib/PHPUnit_Extensions_Story_TestCase.php): failed to open stream: No such file or directory in /usr/share/nginx/html/tutorial/mars/Test/Bootstrap.php on line 20

这文件是一个PHPUnit的基于故事的行为驱动开发(BDD)扩展,于是上网找了下想安装。

PHPUnit现在只支持Composer安装,如果用PEAR安装会提示失败

sudo pear channel-discover pear.phpunit.de
Discovering channel pear.phpunit.de over http:// failed with message: channel-add: Cannot open "http://pear.phpunit.de/channel.xml" (File http://pear.phpunit.de:80/channel.xml not valid (received: HTTP/1.1 410 Gone
))
Trying to discover channel pear.phpunit.de over https:// instead
Discovery of channel "pear.phpunit.de" failed (channel-add: Cannot open "https://pear.phpunit.de/channel.xml" (File https://pear.phpunit.de:443/channel.xml not valid (received: HTTP/1.1 410 Gone
)))

先安装Composer

curl -sS https://getcomposer.org/installer | php
mv composer.phar /usr/local/bin/composer
composer -V

创建一个composer.json,以便自动下载相关的库

{
    "require-dev": {
        "phpunit/phpunit": "4.7.*",
        "phpunit/phpunit-selenium": ">=1.4",
        "phpunit/dbunit": ">=1.3",
        "phpunit/phpunit-story": "*",
        "phpunit/php-invoker": "*"
    },
    "autoload": {
        "psr-0": {"": "src"}
    },
    "config": {
        "bin-dir": "bin/"
    }
}

运行composer,注意:composer在国内慢的要死,可以参照这里

composer install --dev

便会在同级目录下面生成一个vendor目录,各自的依赖库都下载在里面,并且生成了autolaod.php,用于加载相关的类库。编辑Bootstarp.php增加一行

include ROOT_PATH."vendor/autoload.php";

再次运行PHPUnit

[vagrant@vagrant-centos64 mars]$ phpunit --bootstrap Test/Bootstrap.php Test/KM/Client/RPCTest
PHPUnit 4.7.7 by Sebastian Bergmann and contributors.

EES

Time: 540 ms, Memory: 14.25Mb

There were 2 errors:

1) Test\KM\Client\RPCTest::testGet
stream_socket_client(): unable to connect to tcp://127.0.0.1:9001 (Connection refused)

/usr/share/nginx/html/tutorial/mars/Lib/Client/Stream.php:19
/usr/share/nginx/html/tutorial/mars/Lib/Client/Stream.php:16
/usr/share/nginx/html/tutorial/mars/Lib/Client/RPC.php:174
/usr/share/nginx/html/tutorial/mars/Lib/Client/RPC.php:141
/usr/share/nginx/html/tutorial/mars/Lib/Client/RPC.php:130
/usr/share/nginx/html/tutorial/mars/Test/Client/RPCTest.php:21

2) Test\KM\Client\RPCTest::testSendGet
stream_socket_client(): unable to connect to tcp://127.0.0.1:9001 (Connection refused)

/usr/share/nginx/html/tutorial/mars/Lib/Client/Stream.php:19
/usr/share/nginx/html/tutorial/mars/Lib/Client/Stream.php:16
/usr/share/nginx/html/tutorial/mars/Lib/Client/RPC.php:174
/usr/share/nginx/html/tutorial/mars/Lib/Client/RPC.php:141
/usr/share/nginx/html/tutorial/mars/Lib/Client/RPC.php:116
/usr/share/nginx/html/tutorial/mars/Test/Client/RPCTest.php:26

FAILURES!
Tests: 2, Assertions: 0, Errors: 2, Skipped: 1.

这下子没有警报了,只有详细的测试错误报告。刚才的测试代码里面testRecvGet方法依赖于testSendGet,一旦后者失败了,前者便会被跳过。
启动服务端再次运行测试代码

[vagrant@vagrant-centos64 mars]$ phpunit --colors --bootstrap Test/Bootstrap.php Test/
PHPUnit 4.7.7 by Sebastian Bergmann and contributors.

...

Time: 496 ms, Memory: 14.25Mb

OK (3 tests, 5 assertions)

这下子全部测试通过了。

前面运行测试是这样的:phpunit –bootstrap Test/Bootstrap.php Test/。–bootstrap是指在运行测试时首先加载的文件可以在这里面定义一些配置,自动加载规则,最后一个参数Test/是指要测试的目录,也可以指明运行某个测试用例,比如Test/Client/RPCTest,指运行RPCTest这个测试用例。

PHPUnit还有许多其他的命令行参数选项,如果每次这么输入也挺麻烦的,可以做成配置文件,加载运行就好了,比如phpunit.xml.dist

<?xml version="1.0" encoding="UTF-8"?>
<phpunit backupGlobals="false"
         backupStaticAttributes="false"
         colors="true"
         convertErrorsToExceptions="true"
         convertNoticesToExceptions="true"
         convertWarningsToExceptions="true"
         processIsolation="false"
         stopOnFailure="false"
         syntaxCheck="false"
         bootstrap="Test/Bootstrap.php"
>
    <testsuites>
        <testsuite name="Lib Test Suite">
            <directory>./Test/</directory>
        </testsuite>
    </testsuites>
</phpunit>

然后运行:phpunit -c phpunit.xml.dist 就可以了,更多XML配置参考这里。还可以在这基础上更改执行配置,比如phpunit -c phpunit.xml.dist Test/Client/RPCTest,便是依照配置仅运行RPCTest。

以前挺纠结要不要写测试代码,一方面有测试代码的话,每次变更可以自动检测是否通过,另一方面,详细的测试用例需要大量时间去考虑,并且多数情况下都是服务模块之间的互相调用,难以预估结果,超出单元测试范围。现在看来写的这部门测试代码除了验证程序是否准确外,还可以作为示例文档。

参考链接:
PHPUnit: Failed opening required `PHPUnit_Extensions_Story_TestCase.php`
Issues while installing pear.phpunit.de/PHPUnit
单元测试
“单元测试要做多细?”
我讨厌单元测试:滕振宇谈如何进行单元测试
自动化单元测试实践之路
Unit Testing Tutorial Part I: Introduction to PHPUnit

MySQL秒杀优化

今天学习了楼方鑫先生《基于SQL的秒杀解决方案》,讲解了如何定位和优化秒杀业务中问题。
首先介绍了库存业务,库存可以分为前端库存,后端库存,实体库存。秒杀时,存在的主要问题

  • 库存数据不准确,下单、付款后,得知零库存;超卖或少卖
  • 废单较多,只下单不付款,转化率低
  • 热点商品,拖垮整个站

秒杀过程中,需要解决的技术点包括

  • 余额减一
  • 操作明细,方便追溯对账,防止一个帐号多次参与
  • 完整事务,保障记录明细与扣减库存同时完成
  • 数据落地,内存数据不可靠

针对库存技术要求,做了多个库存解决方案,比如Mysql + Read /Write Cache 。Read Cache方案不足是读有延迟影响用户体验;Write Cache方案存在多个APP写数据不一致性。Mysql + Cache + NoSQL方案则太复杂未实现。

于是又重新回到优化Mysql上。Mysql优势在于事务机制成熟,程序稳定。存在技术难点:单行并发,热点商品,瞬间压力,前一分钟,千万用户,容易堵塞,拖垮网站。于是从以下几个方面进行优化

  • 事务优化,单行更新
  • 并发优化,最大并发数
  • 排队优化,抢同一商品

分析秒杀时的处理逻辑,扫描系统代码,发现大部分程序都在等待确认Update记录数,才提交事务。

  • 开启事务
  • Insert库存明细
  • Update库存余额
  • 提交事务

在良好设计下,Mysql的Insert操作,不使用自增列是不会阻塞请求。但是Mysql的Update同一条记录是串行的,需要等远程客户端发送提交命令后才能释放锁,让其他会话继续。简单的更新操作,不考虑IO和锁冲突,一条语句执行的时间大约是0.1ms,一般条件下的网络时延为0.4-0.8ms,即等待事务提交通知的时间比真正SQL执行的时间长数倍。
于是扩展了SQL语法(OneSQL),指定在Update执行完后自动提交,不需要等待客户端发送提交命令,从而节约这一个网络来回的事务等待时间,提升网络性能。

秒杀时如果遇到大量请求需要进行排队,以免太多的请求拖垮Mysql

  • 在应用层排队的缺点,应用需要改造,使用统一框架(需要考虑跨语言),应用集群扩容时,控制不准确(连接数分配)
  • 在Mysql排队的优点,应用改造极少,只需修改少量SQL语句,无需统一框架,排队精确,发挥InnoDB性能。

于是开发了兼容Mysql的分布式数据访问层(OneProxy),为并发请求进行排队。

另外,还对热点商品进行独立数据库拆分和优化。目前,双十一前商品便已挂出,用户可以收藏或预购,对于商家而言可以准备更多商品;对于平台而言可以预先发现热点商品做优化。

总结,对于业务优化,需要循序渐进,深入了解业务逻辑和技术点,比较不同的解决方案,就算是平常的update操作也有优化空间;同时需要从其他方面进行特定优化,如高并发排队,热点数据分离等。

除了后端数据库优化,对于秒杀抽奖业务,问题的解决核心就是控制单位时间内的流量,使其不超过后端的处理能力。前端的做法包括

  • 分批次(少量多次)进行秒杀
  • 先玩游戏再抢购,如抽奖
  • 随机过滤掉部分请求,仅部分进入系统,如1/10
  • 阈值控制,一旦达到阈值,不再接收新请求
  • 预约排号,未排号用户返回失败(用户分类)
  • 验证码验证

另外,OneProxy 提供的连接池功能对于PHP非常有用。PHP运行在CGI下面,每一个请求到来便需要重新创建一个数据库连接与Mysql进行交互,并发量大量的情况下便会出现:too many connetion,乃至拖垮数据库:mysql server has gone away,影响其他业务。因此Mysql连接池,对于PHP显得非常重要。

更新:小米网在开发抢购系统的时候,最早使用PHP + Mysql碰到了一些问题,例如并发性能,数据一致性,在OneSQL上面都已经做了改进优化,只是小米自己使用Go语言重构,开发大秒系统(BigTap)。

参考链接:
限量秒杀等高并发活动的正确性如何保证?
MySQL 5.6.17/Percona5.6.16/MariaDB 10.0.11/OneSQL 5.6.16 TpmC测试
由12306.cn谈谈网站性能技术
“米粉节”背后的故事——小米网抢购系统开发实践
Web系统大规模并发——电商秒杀与抢购
OneProxy : 如何给PHP页面以及其他Ruby/Python/Go程序添加连接池功能?
基于Swoole实现的Mysql连接池