分类目录归档:python

Jupyter Notebook

对于编程初学者,如果有一个开箱即用的环境,比如web页面,就可以进行编程交互,那是极友好。有时候我们想在远程服务器上执行一些脚本,输出一些结果,比如科学计算;有时候又想在服务器上执行一些命令但又不能直接登录服务器,如果能够在web界面上操作或作为跳板机,那也是极友好的。Jupyter Notebook是基于IPython的一个基于web交互执行的在线环境,支持Python,也支持其他编程语言,比如Julia和R。所创建Notebook文档可以自动保存执行过的代码、结果,方便进行回放。
Jupyter Notebok的安装很方便,可以使用Anaconda来安装,或者手动安装。Python3下手动安装,

pip3 install jupyter
export PATH=$PATH:/usr/local/python3/bin

查看一下

[root@localhost local]# pip3 show jupyter
Name: jupyter
Version: 1.0.0
Summary: Jupyter metapackage. Install all the Jupyter components in one go.
Home-page: http://jupyter.org
Author: Jupyter Development Team
Author-email: [email protected]
License: BSD
Location: /usr/local/python3/lib/python3.7/site-packages
Requires: jupyter-console, notebook, ipywidgets, nbconvert, qtconsole, ipykernel
Required-by: 

如果直接运行jupyter notebook,那么会生成一个本地可以访问的带token的url,每次都不一样,不是很方便。设置密码,以便登录

[root@localhost opt]# jupyter notebook password
Enter password: 
Verify password: 
[NotebookPasswordApp] Wrote hashed password to /root/.jupyter/jupyter_notebook_config.json
[root@localhost bin]# cat /root/.jupyter/jupyter_notebook_config.json 
{
  "NotebookApp": {
    "password": "sha1:e04153005102:961b12eef91987a06b497f915fc3f18c62d8f714"
  }

由于是在虚拟机里面,我们并不需要Jupyter自动打开浏览器,但需要监听来自任意IP的请求,指定端口9030。这里使用root用户运行Jupyter,默认是不允许的:

[root@localhost opt]# jupyter notebook --no-browser --allow-root --ip 0.0.0.0 --port 9030
[I 02:13:44.320 NotebookApp] Serving notebooks from local directory: /opt
[I 02:13:44.320 NotebookApp] The Jupyter Notebook is running at:
[I 02:13:44.320 NotebookApp] http://(localhost.localdomain or 127.0.0.1):9030/
[I 02:13:44.320 NotebookApp] Use Control-C to stop this server and shut down all kernels (twice to skip confirmation).
[I 02:13:59.664 NotebookApp] 302 GET / (192.168.33.1) 1.22ms
[I 02:14:23.597 NotebookApp] Kernel started: 7ad63717-7a65-4dec-9d5a-9af654c28f75
[I 02:14:25.204 NotebookApp] Adapting to protocol v5.1 for kernel 7ad63717-7a65-4dec-9d5a-9af654c28f75
[I 02:14:37.350 NotebookApp] Starting buffering for 7ad63717-7a65-4dec-9d5a-9af654c28f75:ea68853b742c40f8bcf8745529ea95de
[I 02:14:43.735 NotebookApp] Kernel started: 5b569c8d-6936-4bd2-9674-0317c46948f6
[I 02:14:44.124 NotebookApp] Adapting to protocol v5.0 for kernel 5b569c8d-6936-4bd2-9674-0317c46948f6
[2019-06-03 02:14:43] kernel.DEBUG: Connection settings {"processId":6751,"connSettings":{"shell_port":39990,"iopub_port":48184,"stdin_port":40113,"control_port":43426,"hb_port":49075,"ip":"127.0.0.1","key":"d5f89bba-890ecf15e6b20718411170ad","transport":"tcp","signature_scheme":"hmac-sha256","kernel_name":"jupyter-php"},"connUris":{"stdin":"tcp://127.0.0.1:40113","control":"tcp://127.0.0.1:43426","hb":"tcp://127.0.0.1:49075","shell":"tcp://127.0.0.1:39990","iopub":"tcp://127.0.0.1:48184"}} []
[2019-06-03 02:14:44] KernelCore.DEBUG: Initialized sockets {"processId":6751} []

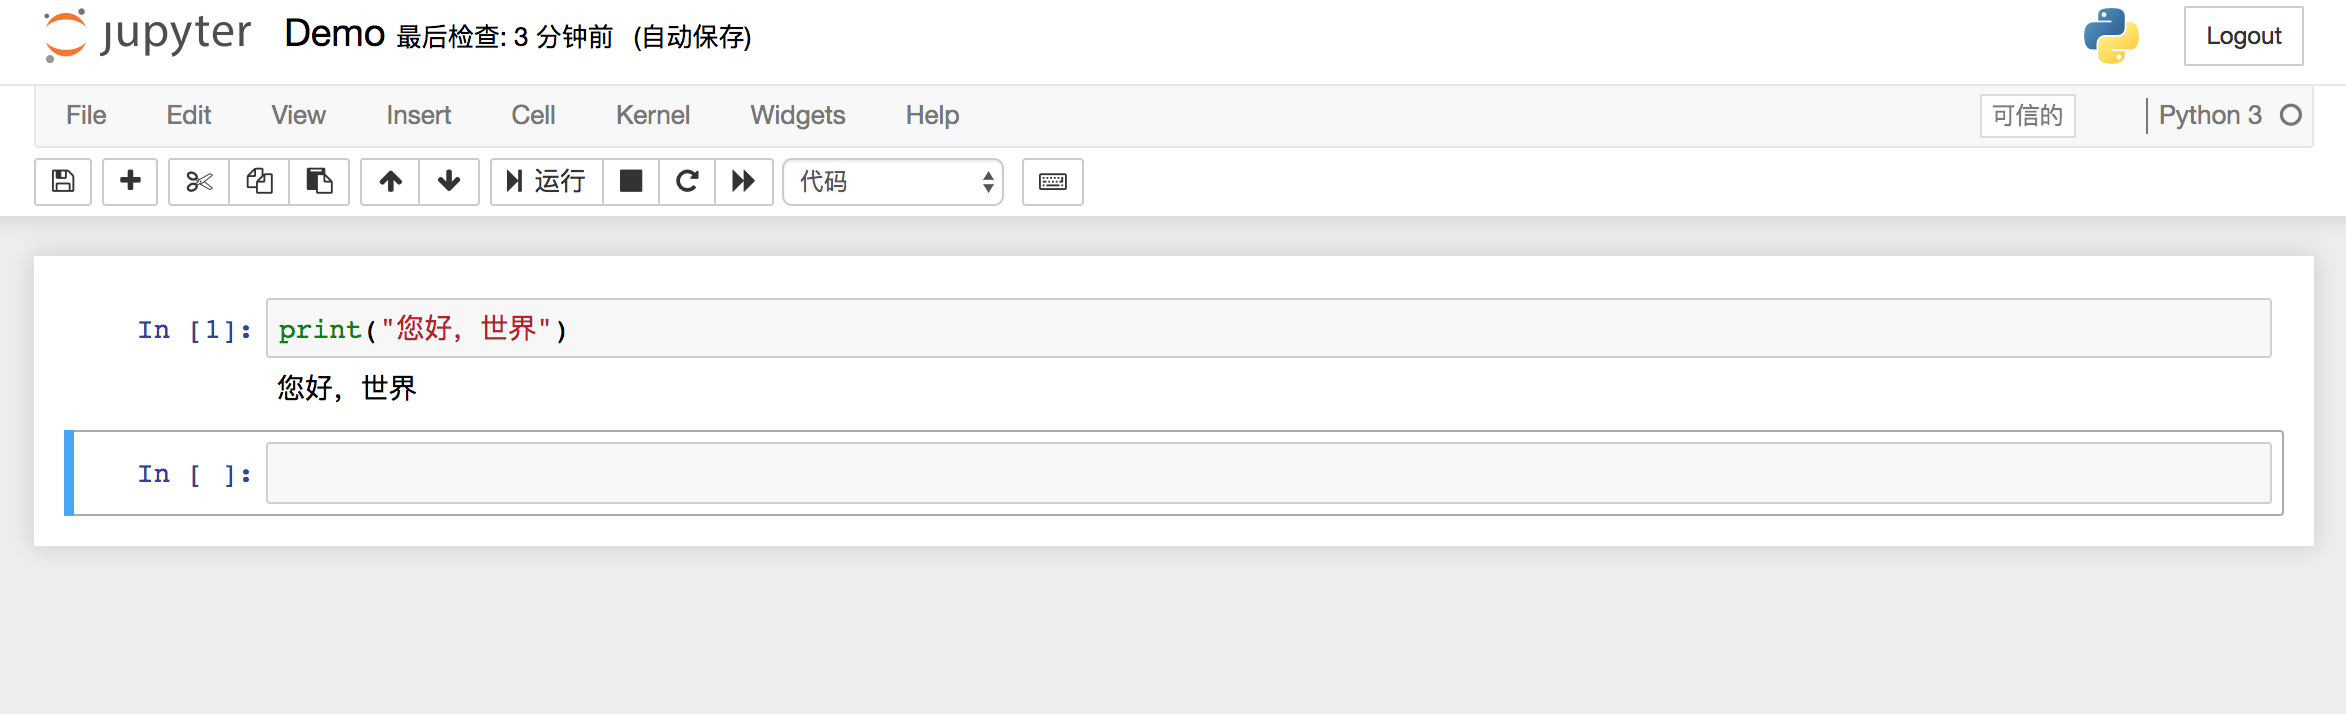
然后打开浏览器,访问http://192.168.33.70:9030,输入账号密码,就可以在web里面运行Python了

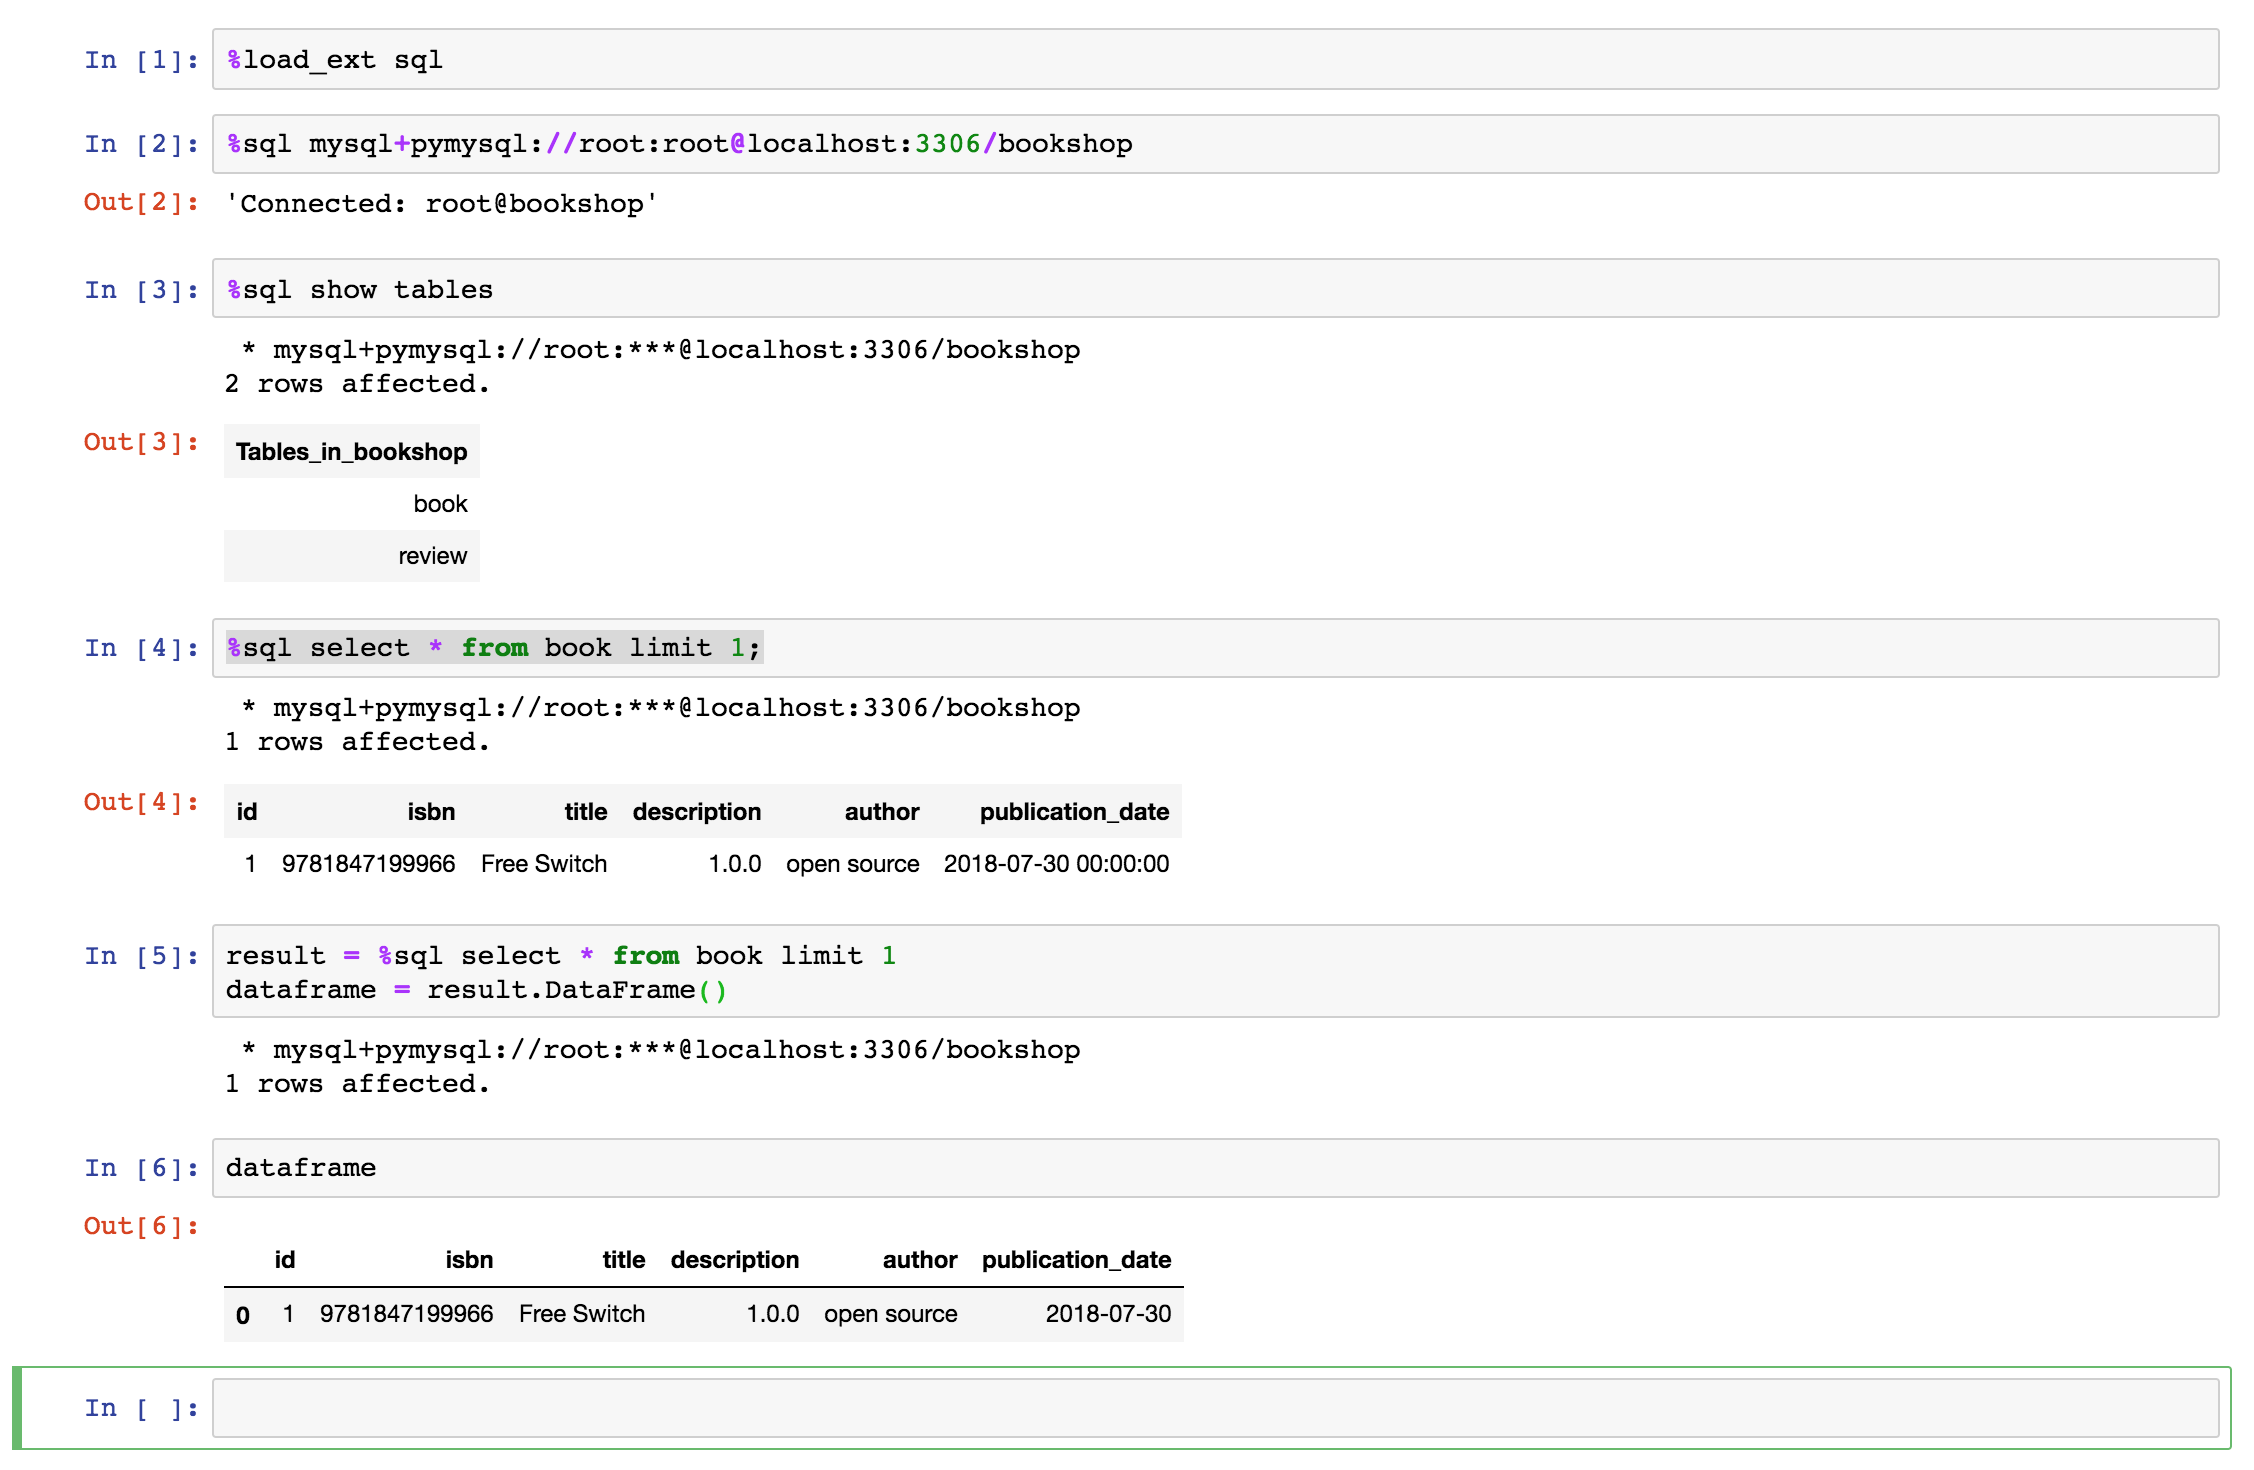
Jupyter默认带了SQL扩展,使用ipython-sql来执行,只需要安装对应的驱动,这里使用PyMySQL

python3 -m pip install PyMySQL

然后在Web里面执行就可以了

Jupyter还有其他扩展,参考这里
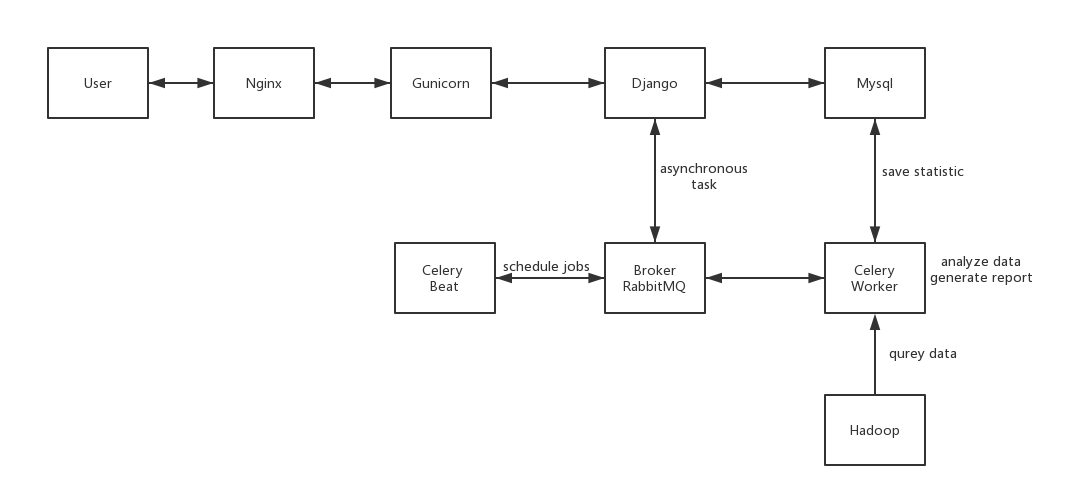
除了可以执行Python和SQL,Jupyter Notebook也可以支持其他语言,在这里列出了。通常执行方式是通过Bash执行,或者通过ZeroMQ来通信,参考这里实现。一个Jupyter的kernal将需要监听以下几个socket:

  • Shell:执行命令
  • IOPub:推送执行结果
  • Stdin:接收输入
  • Control:接收控制命令,比如关闭、终端
  • Heartbeat:心跳检测
  • 这个思路也可以用来做IOT设备的远程监控,交互执行。
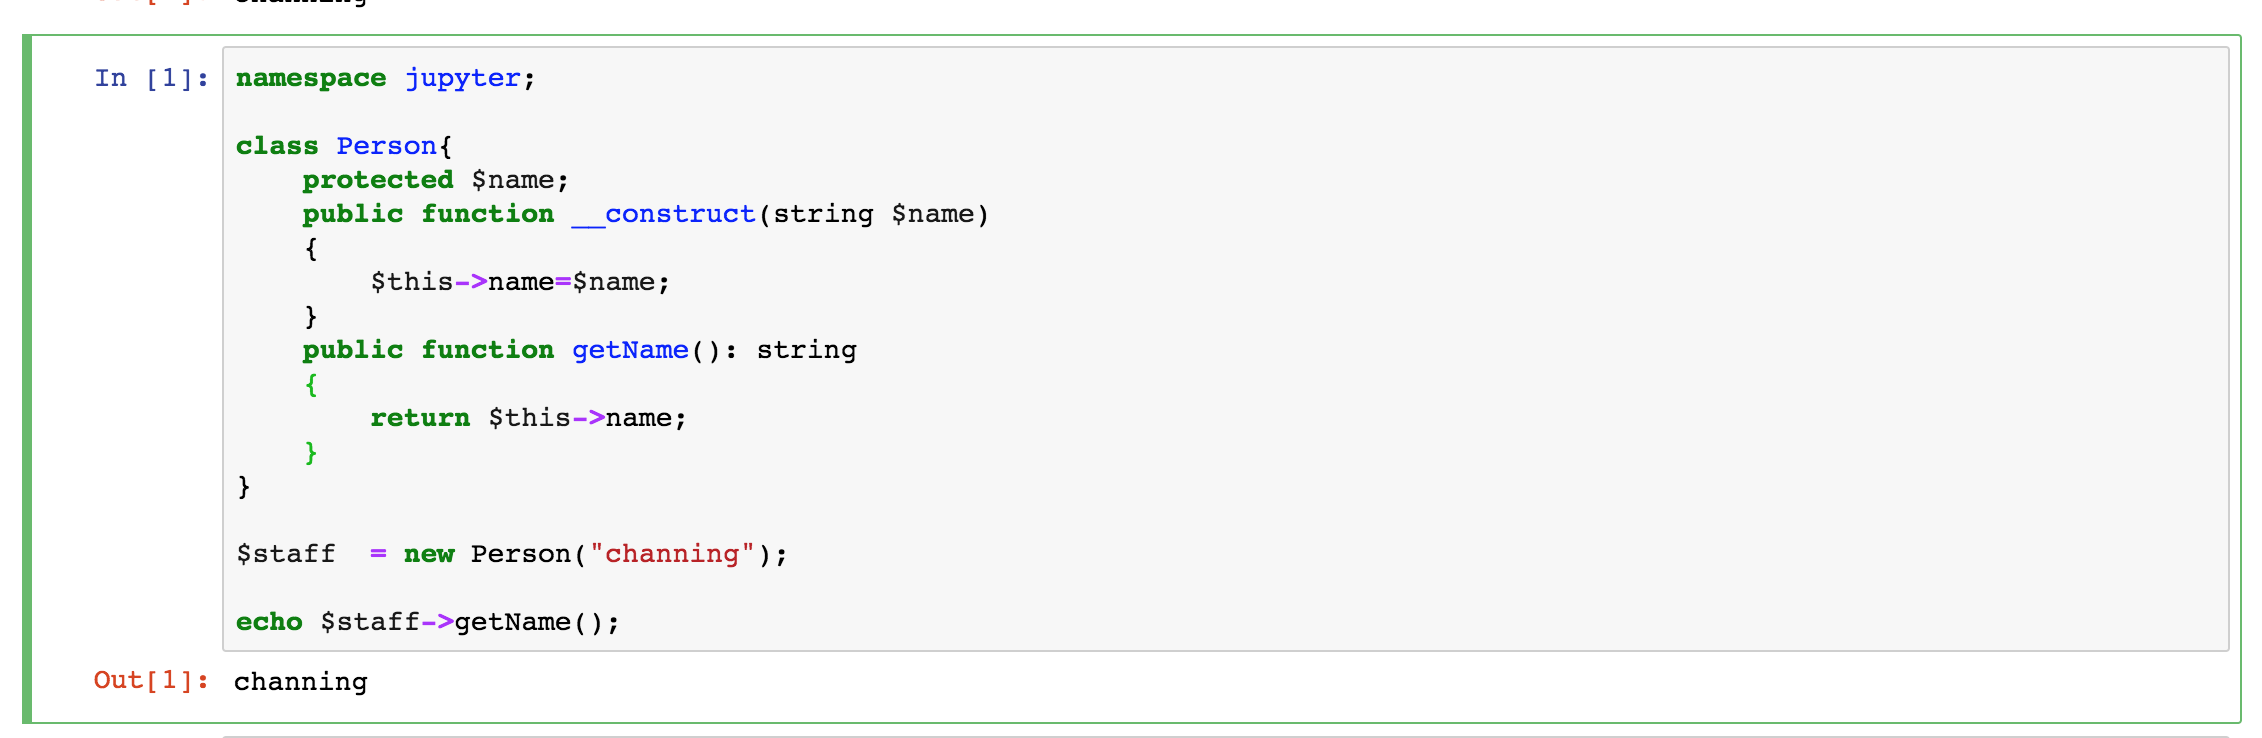
    这里安装一下PHP 7这个kernel,作者甚至还提供了installer,但是首先要安装ZeroMQ以便与Jupyter服务通信

    yum install php-pecl-zmq
    wget https://litipk.github.io/Jupyter-PHP-Installer/dist/jupyter-php-installer.phar
    ./jupyter-php-installer.phar install
    

    查看安装文件

    [root@localhost opt]# ls -la /usr/local/share/jupyter/kernels/
    total 0
    drwxr-xr-x. 4 root root 34 May 10 06:10 .
    drwxr-xr-x. 3 root root 20 May  9 07:30 ..
    drwxr-xr-x. 2 root root 24 May  9 07:30 jupyter-php
    drwxr-xr-x. 2 root root 40 May 10 06:10 lgo
    
    [root@localhost opt]# cat /usr/local/share/jupyter/kernels/jupyter-php/kernel.json 
    {"argv":["php","\/opt\/jupyter-php\/pkgs\/vendor\/litipk\/jupyter-php\/src\/kernel.php","{connection_file}"],"display_name":"PHP","language":"php","env":{}}
    

    这个扩展使用了react/zmq来监听Jupyter请求,使用psysh来交互执行PHP代码。

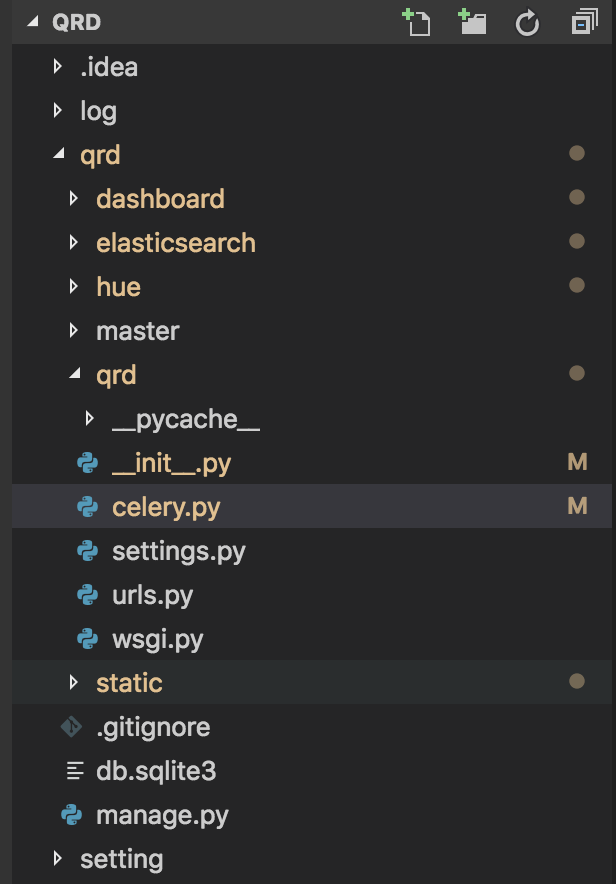
    如果想要更改Jupyter的web模板,可以在以下目录找到

    [root@localhost vagrant]# ls -la /usr/local/python3/lib/python3.7/site-packages/notebook/templates
    total 92
    drwxr-xr-x.  2 root root  4096 May  9 06:33 .
    drwxr-xr-x. 19 root root  4096 May  9 06:33 ..
    -rw-r--r--.  1 root root   147 May  9 06:33 404.html
    -rw-r--r--.  1 root root   499 May  9 06:33 browser-open.html
    -rw-r--r--.  1 root root  4258 May  9 06:33 edit.html
    -rw-r--r--.  1 root root   856 May  9 06:33 error.html
    -rw-r--r--.  1 root root  4256 May  9 06:33 login.html
    -rw-r--r--.  1 root root  1179 May  9 06:33 logout.html
    -rw-r--r--.  1 root root 23162 May  9 06:33 notebook.html
    -rw-r--r--.  1 root root  6559 May  9 06:33 page.html
    -rw-r--r--.  1 root root  1089 May  9 06:33 terminal.html
    -rw-r--r--.  1 root root 12130 May  9 06:33 tree.html
    -rw-r--r--.  1 root root   544 May  9 06:33 view.html
    

    Jupyter Notebook Web前端采用WebSocket与服务器交互,服务器接收消息并转发给对应的kernel执行或控制,并将结果推送给前端。Jupyter Notebook也可以直接打开Terminal,在远程服务器上执行命令。注意这里的用户就是刚才运行jupyter的用户

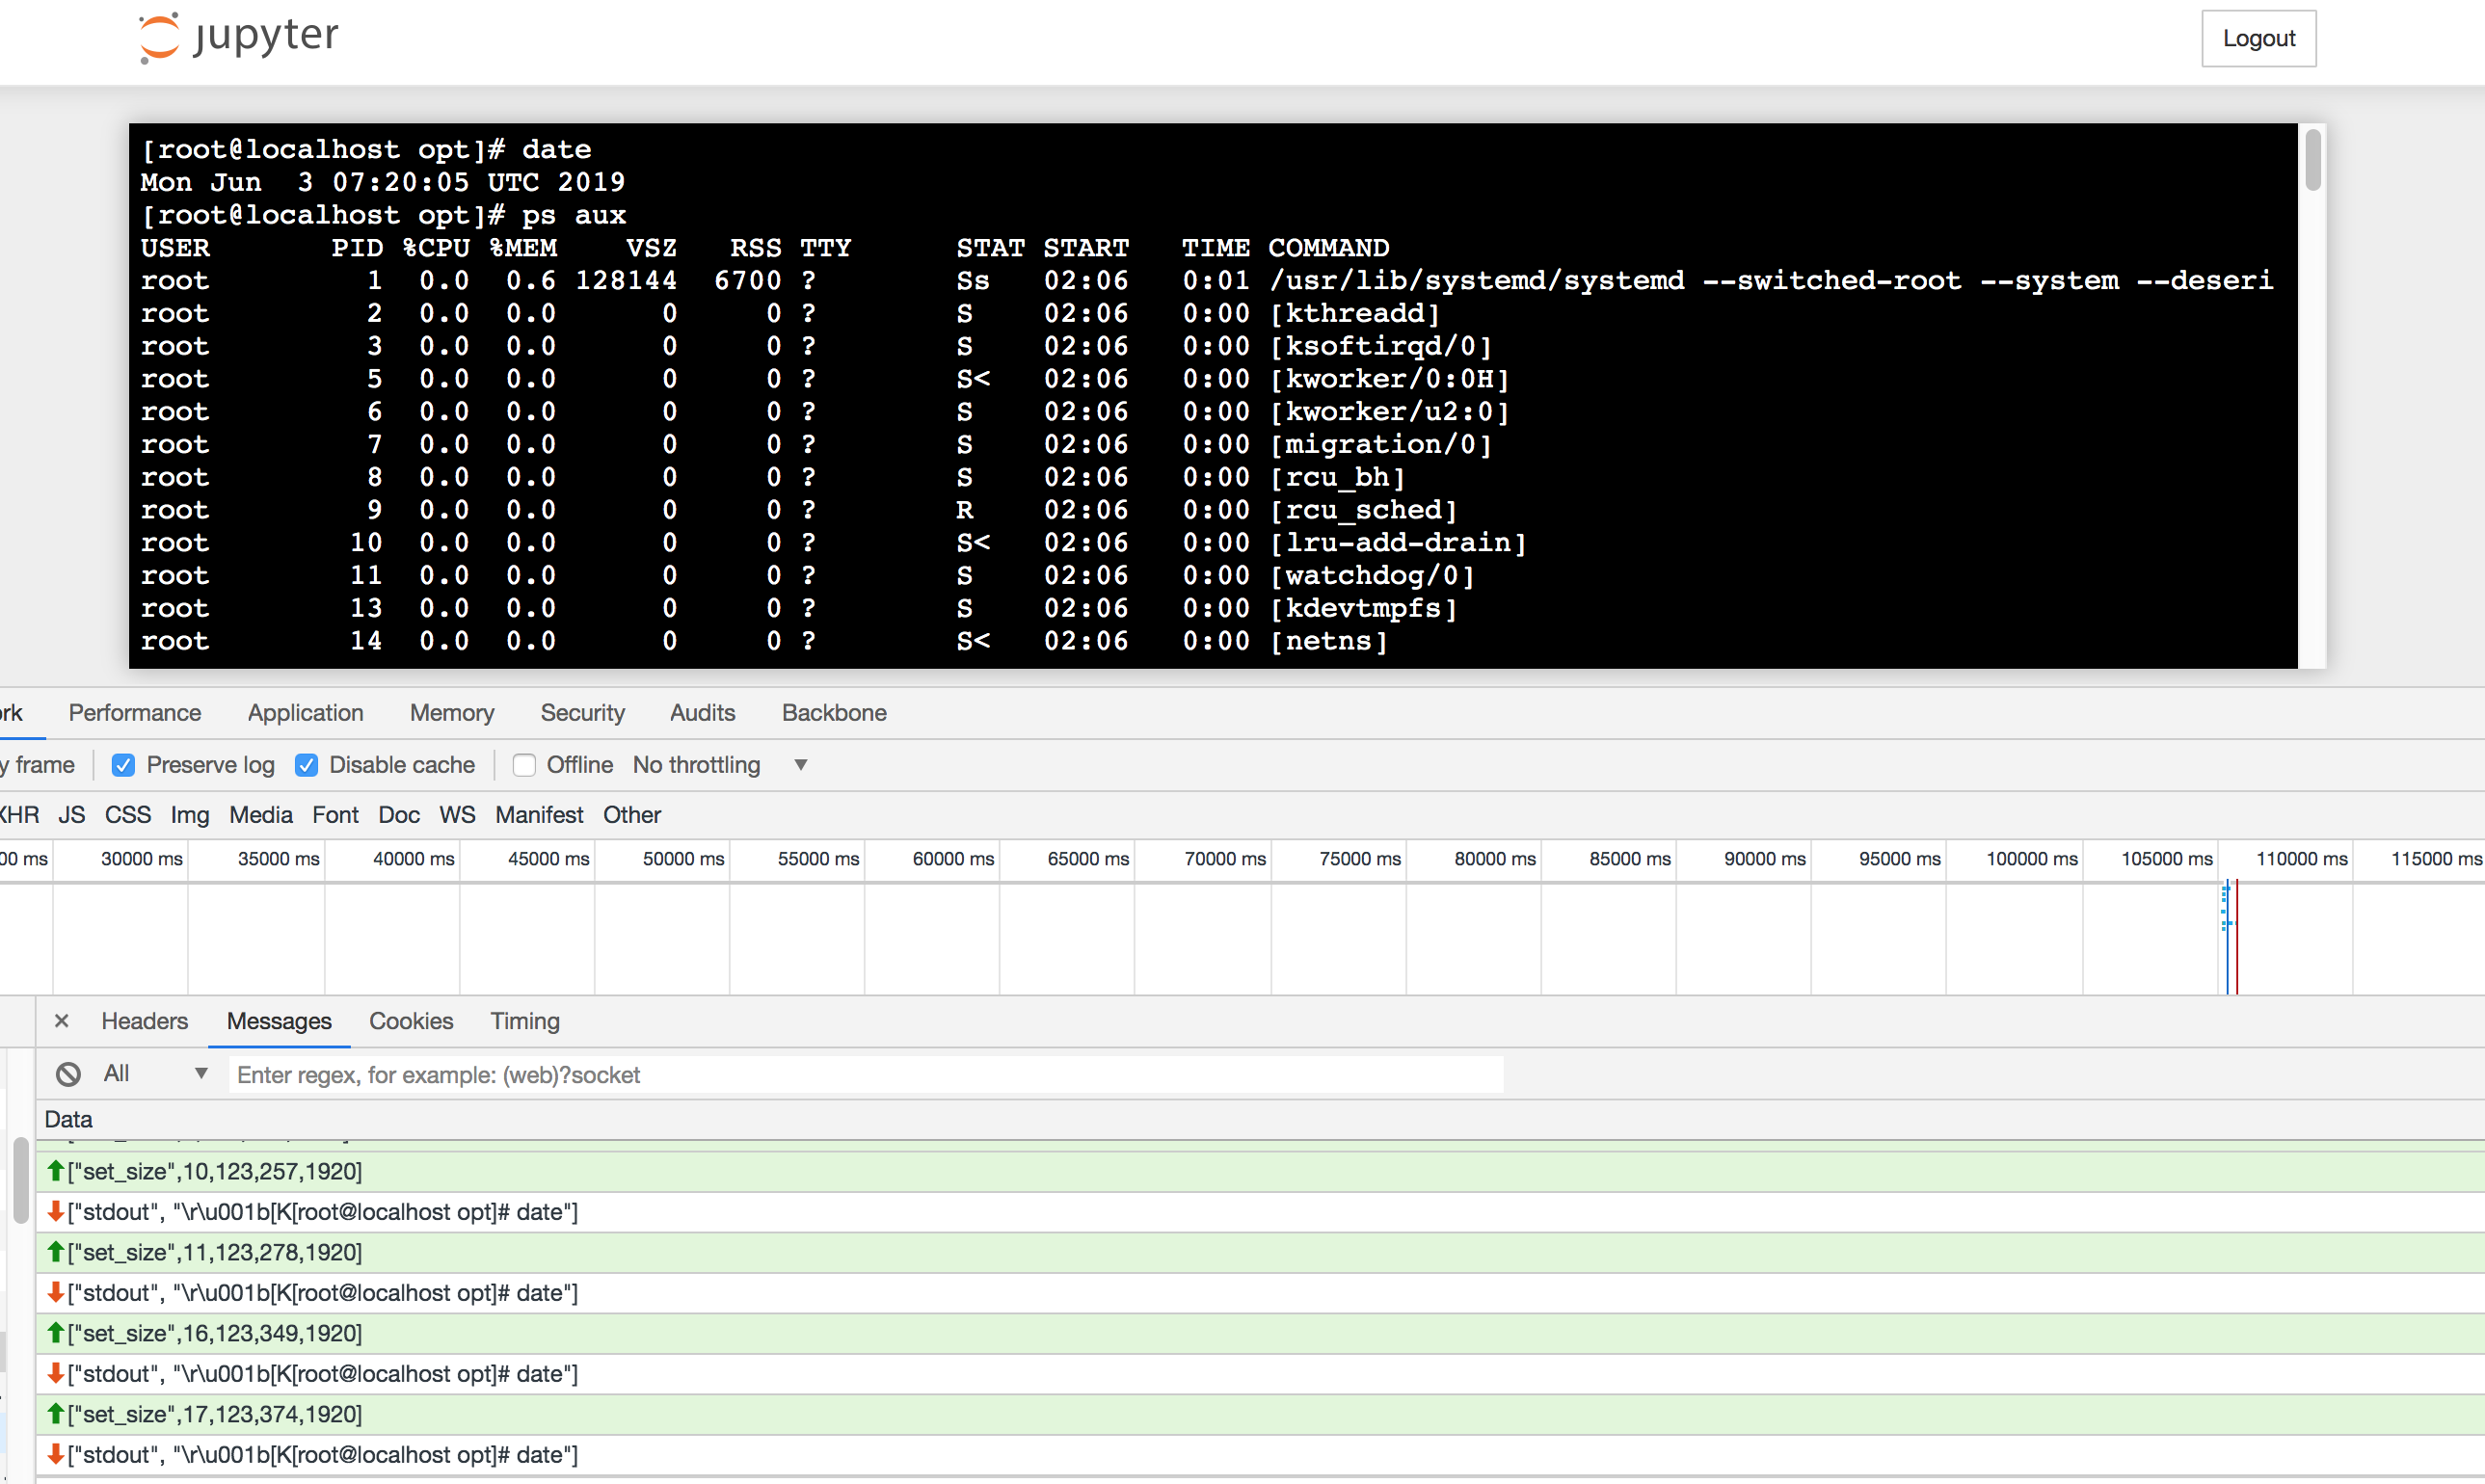
    许多web terminal也都是采用WebSocket来做交互,比如xterm.jswebtty
    Juypter Notebook适合单用户(单机)使用,如果提供多用户使用(比如教学),可以使用Jupyter Hub,可以使用docker快捷部署。

    参考链接:
    Jupyter Notebook Extensions
    Jupyter – How do I decide which packages I need?
    PsySH——PHP交互式控制台
    Jupyter项目
    WebSocket 教程

    使用SkPy创建Skype群组会话

    每一次产品发布或故障支持,都需要将相关人员拉到同一个Skype群聊会话,以便讨论、测试、支持。如果每次都需要手动做这些动作是比较累;如果复用已有会话,又会影响本次无关人员。于是有了这样一个需求:在Web后台定义相关组员及关联关系,在Web前台点击即可以创建或加入相关会话。这要求提供一个HTTP的接口,接收会话人员及主题,创建聊天室。搜了一圈,发现SkPy这个库最简单,支持创建会话,发送/接收消息,事件监听等等,其他的库要么功能太简单不满足,要么需要安装Skype客户端,要么不支持最新(live)注册的Skype用户,决定使用这个来开发。由于只是一个简单的HTTP接口,决定使用web.py
    首先安装SkPy和web.py,注意如果是CentOS 6,Python certifi版本只能是2015.04.28,否则会报错

    sudo pip install SkPy
    sudo pip install web.py
    #you need to do follow steps on Centos 6.x, to make requests works
    sudo pip uninstall -y certifi
    sudo pip install certifi==2015.04.28
    

    web.py只要单个文件就可以工作了,创建chat.py如下

    import web
    from skpy import Skype
    from skpy import SkypeAuthException
    import logging
    import hashlib
    import os.path
    import io
     
     
    urls = (
        '/', 'index',
        '/chat', 'chat'
    )
    '''
    try:
        import http.client as http_client
    except ImportError:
        # Python 2
        import httplib as http_client
    http_client.HTTPConnection.debuglevel = 1
    logging.basicConfig()
    logging.getLogger().setLevel(logging.DEBUG)
    requests_log = logging.getLogger("requests.packages.urllib3")
    requests_log.setLevel(logging.DEBUG)
    requests_log.propagate = True
    '''
     
     
    class SkypeService:
        def __init__(self):
            self.username = '<skype account>'
            self.password = '<skype password>'
            self.token_file="/tmp/tokens-app"
            self.skype = Skype(connect=False)
            self.skype.conn.setTokenFile(self.getTokenFile())
     
        def getTokenFile(self):
            if not os.path.isfile(self.token_file):
                with io.open(self.token_file, 'a') as file:
                    file.close()
            return self.token_file
     
        def connect(self):
            try:
                self.skype.conn.readToken()
            except SkypeAuthException:
                self.skype.conn.setUserPwd(self.username, self.password)
                self.skype.conn.getSkypeToken()
     
        def creatChatRoom(self, member, topic):
            ch = self.skype.chats.create(members=member)
            ch.setTopic(topic)
            return ch
     
        def getShardLink(self, channel):
            return channel.joinUrl
     
        def createAndGetSharedLink(self, member, topic):
            self.connect()
            ch = self.creatChatRoom(member, topic)
            # ch.sendMsg("welcome")
            # return {"id": ch.id, "url": self.getShardLink(ch)}
            return self.getShardLink(ch)
    
        def getConversationIdByUrl(self, url):
            id = self.skype.chats.urlToIds(url)["Resource"]
            return id
        
        def getChatroomByUrl(self, url):
            id = self.getConversationIdByUrl(url)
            ch = getChatroomByConversationId(id)
            return ch
    
        def getChatroomByConversationId(self, id):
            ch = self.skype.chats.chat(id)
            return ch
    
        def sendMessageByConversationId(self, id, message):
            ch = self.getChatroomByConversationId(id)
            return ch.sendMsg("Hello world!")
    
        def getMessagesByConversationId(self, id):
            ch = self.getChatroomByConversationId(id)
            return ch.getMsgs()
     
     
    class Storage:
        def __init__(self):
            self.cache_path = '/tmp/'
     
        def set(self, key, value):
            cache_file = self.cache_path + key
            try:
                with io.open(cache_file, 'w') as file:
                    file.write(value)
            except:
                raise Exception('file: {0} write failure'.format(cache_file))
            return True
     
        def get(self, key):
            cache_file = self.cache_path + key
            try:
                with io.open(cache_file) as file:
                    value = file.read()
            except:
                raise Exception('file: {0} not exists'.format(cache_file))
            return value
     
     
    class index:
        def GET(self):
            return "Hello, world!"
     
     
    class chat:
        def GET(self):
            url = web.ctx.home + web.ctx.path + web.ctx.query
            key = hashlib.md5(url).hexdigest()
            storage = Storage()
            try:
                join_url = storage.get(key)
            except:
                param = web.input()
                users = param.user
                member = tuple(users.split(','))
                topic = param.topic
                sk = SkypeService()
                join_url = sk.createAndGetSharedLink(member, topic)
                storage.set(key, join_url)
     
            return join_url
     
     
    if __name__ == "__main__":
        app = web.application(urls, globals())
        app.run()
    

    然后运行chat.py,默认监听8080端口

    python chat.py [port]
    

    在浏览器访问,

    http://127.0.0.1:8080/chat?user=user1,user2&topic=19.5Release
    

    即可以创建一个聊天会话,并且返回join url,点击这个URL会尝试打开Skype应用。注意这个会话默认是开放的,允许任何人加入

    https://join.skype.com/LRRUuan7kNH3
    

    去掉logging注释,可以看到API调用的过程,作者也作了详细的协议文档,可以看出登录流程相当复杂,也可以根据这个开放出其他语言的SDK。
    注意这个bot运行的是个人账号,使用的是与web.skype.com相同的HTTP API,最好是在Skype 开发者平台上注册,官方也提供了NodeJS的SDK
    之前许多QQ机器人使用都是Web QQ的接口,目前已关闭。同时官方的API,发现并没有创建任意群聊的API。对比国外软件,国内的API真的是不开放。国外公司甚至有专门的API Platform团队,负责API开发开放,以及与第三方平台的集成。

    参考连接:
    SkPy

    Django + Celery处理异步任务/计划任务

    在Web开发的过程中,难免有一些操作是耗时任务,有时候我们不想阻塞Web进程,希望提交到后台处理,有结果了再通知前端;有时候用户不需要实时结果,可以异步处理的,比如发送邮件通知;有时候我们希望定时执行某些任务,复用已有的一些Web代码。对于第一种情况,可以是RPC或调用其他接口处理;第二种情况则是放入队列,由后台进程异步处理;第三种情况可以是在定时任务内处理,也可以是触发消息放入队列,由后台进程任务处理,同第二种情况。对于第一种情况,也可以是放入队列由后台进程处理,Web前端,定时轮询队列/接口是否有结果。这样三种情况都可以统一为一种情况,即不同来源事件(用户/定时器)触发消息,放入队列由后台任务进程异步处理,异步查询结果。
    之前的一个Python项目即类似。不管代码是PHP还是Python思想都是类似,只是不同语言有不同工具/优势来处理。Web前端展示统计报表,后台进程定时查询Impala,分析统计数据;Web前端也可以触发事件比如统计、发送邮件报告等,后台进程监听并处理。Web前端选择Django,是Python写的一个MVT框架,提供了登录认证、管理后台模块,还有命令行助手工具可以生成项目,易于快速搭建并扩展Web站点。后台任务处理选择Celery,是Python写的一个分布式的任务处理平台,支持各种消息队列,比如RabbbitMQ、Redis,并提供Flower监控工具。Django本身是一个Web框架,生产环境最好使用性能更好的HTTP服务器,Gunicorn是Python写的一个WSGI HTTP服务器,用来监听HTTP请求,调用Django。Gunicorn前端最好使用Nginx来做代理,分发请求,结构如下:

    安装Python 3和Django,并生成项目框架代码。注意:由于机器上面本来就有Pyton 2.7,所以要重命名下。

    yum -y update
    yum -y install yum-utils
    yum -y groupinstall development
    yum install zlib-devel bzip2-devel openssl-devel ncurese-devel expat-devel gdbm-devel readline-devel sqlite-devel libffi-devel
    wget https://www.python.org/ftp/python/3.6.2/Python-3.6.2.tar.xz
    tar Jxvf Python-3.6.2.tar.xz
    mv Python-3.6.2 /opt/Python-3.6.2
    cd /opt/Python-3.6.2
    ./configure --enable-shared --prefix=/usr/local/python3
    make && make install
    vim /etc/ld.so.conf
    /usr/local/python3/lib/
    /sbin/ldconfig -v
    ln -s /usr/local/python3/bin/python3.6 /usr/bin/python3.6
    ln -s /usr/bin/python3.6 /usr/bin/python3
    #ln -s /usr/local/python3/bin/python3.6 /usr/bin/python
    ln -s /usr/local/python3/bin/pip3 /usr/bin/pip3
    python3 -V
    pip3 -V
    pip3 install Django
    python3 -m django --version
    ln -s /usr/local/python3/bin/django-admin /usr/bin/django-admin/
    cd /home/rc
    django-admin startproject qrd
    cd qrd
    python3 manage.py startapp master
    vim qrd/settings.py
    

    编辑settings.py,监听相应域名、IP的请求

    ALLOWED_HOSTS = ['dev.example.com','localhost','127.0.0.1','10.1.*.*]
    INSTALLED_APPS = [
        'django.contrib.admin',
        'django.contrib.auth',
        'master',
        'django.contrib.contenttypes',
        'django.contrib.sessions',
        'django.contrib.messages',
        'django.contrib.staticfiles',
    ]
    

    测试一下

    python3 manage.py runserver 0:80
    

    然后安装Gunicorn

    $ pip3 install gunicorn
    $ pip3 install greenlet
    $ pip3 install ConfigParser
    $ ln -s /usr/local/python3/bin/gunicorn /usr/bin/gunicorn
    

    测试运行

    $ cd ~/qrd/qrd
    $ gunicorn -w 4 qrd.wsgi --bind  unix:/tmp/gunicorn.sock
    $ sudo vim /etc/systemd/system/gunicorn.service
    

    创建Gunicorn服务

    [Unit]
    Description=gunicorn daemon
    After=network.target
    [Service]
    User=root
    Group=root
    WorkingDirectory=/home/rc/qrd/qrd
    ExecStart=/usr/bin/gunicorn --access-logfile - --workers 3 --bind unix:/tmp/gunicorn.sock qrd.wsgi
    [Install]
    WantedBy=multi-user.target
    

    开机启动

    systemctl start gunicorn
    systemctl enable gunicorn
    #systemctl stop gunicorn
    

    接下来安装Nginx

    yum install nginx
    vim /etc/nginx/conf.d/default.conf
    

    配置Nginx与Gunicorn通过UNIX Sockect通信

    server {
        listen       80;
        server_name  localhost;
        #charset koi8-r;
        #access_log  /var/log/nginx/host.access.log  main;
        #location / {
        #   root   /usr/share/nginx/html;
        #   index  index.html index.htm;
        #
        location / {
            proxy_pass http://unix:/tmp/gunicorn.sock;
            proxy_set_header Host $host;
            proxy_set_header X-Forwarded-For $proxy_add_x_forwarded_for;
        }
    }
    

    启动Nginx

    systemctl start nginx
    systemctl enable nginx
    

    安装MySQL及RabbitMQ

    yum install mysql-community-devel
    pip3 install mysqlclient
    
    
    yum install rabbitmq-server
    rabbitmq-server -detached
    rabbitmqctl status
    

    创建RabbitMQ vhost

    $ rabbitmqctl add_user qrdweb <password>
    Creating user "qrdweb" ...
    ...done.
    $ rabbitmqctl add_vhost qrdweb
    Creating vhost "qrdweb" ...
    ...done.
    $ rabbitmqctl set_user_tags qrdweb management
    Setting tags for user "qrdweb" to [management] ...
    ...done.
    $ rabbitmqctl set_permissions -p qrdweb qrdweb ".*" ".*" ".*"
    Setting permissions for user "qrdweb" in vhost "qrdweb" ...
    ...done.
    $ netstat -apn | grep rabbitmq
    $ rabbitmqctl status
    

    安装Celery

    pip3 install celery
    ln -s /usr/local/python3/bin/celery /usr/bin/celery
    

    测试Celery的异步任务worker及计划任务schedule

    $ cd /home/qrd/qrd/
    $ ls
    dashboard  db.sqlite3  manage.py  master  qrd  static
    $ celery -A qrd worker -l info
    /usr/local/python3/lib/python3.6/site-packages/celery/platforms.py:795: RuntimeWarning: You're running the worker with superuser privileges: this is
    absolutely not recommended!
    Please specify a different user using the -u option.
    User information: uid=0 euid=0 gid=0 egid=0
      uid=uid, euid=euid, gid=gid, egid=egid,
     -------------- [email protected] v4.1.0 (latentcall)
    ---- **** -----
    --- * ***  * -- Linux-3.10.0-693.2.2.el7.x86_64-x86_64-with-centos-7.4.1708-Core 2017-09-22 08:19:39
    -- * - **** ---
    - ** ---------- [config]
    - ** ---------- .> app:         qrd:0x7fda62e705c0
    - ** ---------- .> transport:   amqp://qrdweb:**@localhost:5672/qrdweb
    - ** ---------- .> results:     disabled://
    - *** --- * --- .> concurrency: 1 (prefork)
    -- ******* ---- .> task events: OFF (enable -E to monitor tasks in this worker)
    --- ***** -----
     -------------- [queues]
                    .> celery           exchange=celery(direct) key=celery
     
    [tasks]
      . dashboard.tasks.debug_task
    [2017-09-22 08:19:39,769: INFO/MainProcess] Connected to amqp://qrdweb:**@127.0.0.1:5672/qrdweb
    [2017-09-22 08:19:39,781: INFO/MainProcess] mingle: searching for neighbors
    [2017-09-22 08:19:40,811: INFO/MainProcess] mingle: all alone
    [2017-09-22 08:19:40,860: WARNING/MainProcess] /usr/local/python3/lib/python3.6/site-packages/celery/fixups/django.py:202: UserWarning: Using settings.DEBUG leads to a memory leak, never use this setting in production environments!
      warnings.warn('Using settings.DEBUG leads to a memory leak, never '
    [2017-09-22 08:19:40,860: INFO/MainProcess] [email protected] ready.
    [2017-09-22 08:20:55,023: INFO/MainProcess] Received task: dashboard.tasks.debug_task[71e6c0e1-92e1-494e-b5e9-163eeb7bd24e]
    [2017-09-22 08:20:55,027: INFO/ForkPoolWorker-1] Task dashboard.tasks.debug_task[71e6c0e1-92e1-494e-b5e9-163eeb7bd24e] succeeded in 0.001253978000022471s: 'debug_task'
    [2017-09-22 08:22:21,179: INFO/MainProcess] Received task: dashboard.tasks.debug_task[b81fe9a0-1725-4702-ba0e-13196c9b5977]
    [2017-09-22 08:22:21,180: INFO/ForkPoolWorker-1] Task dashboard.tasks.debug_task[b81fe9a0-1725-4702-ba0e-13196c9b5977] succeeded in 0.00018433199147693813s: 'debug_task'
     
     
    $ celery -A qrd beat -l info -s /tmp/celerybeat-schedule
    celery beat v4.1.0 (latentcall) is starting.
    __    -    ... __   -        _
    LocalTime -> 2017-09-24 04:20:37
    Configuration ->
        . broker -> amqp://qrdweb:**@localhost:5672/qrdweb
        . loader -> celery.loaders.app.AppLoader
        . scheduler -> celery.beat.PersistentScheduler
        . db -> /tmp/celerybeat-schedule
        . logfile -> [stderr]@%INFO
        . maxinterval -> 5.00 minutes (300s)
    [2017-09-24 04:20:37,823: INFO/MainProcess] beat: Starting...
    [2017-09-24 04:20:37,866: INFO/MainProcess] Scheduler: Sending due task add every 10 (qrd.celery.test)
    [2017-09-24 04:20:47,856: INFO/MainProcess] Scheduler: Sending due task add every 10 (qrd.celery.test)
    [2017-09-24 04:20:57,858: INFO/MainProcess] Scheduler: Sending due task add every 10 (qrd.celery.test)
    [2017-09-24 04:20:57,861: INFO/MainProcess] Scheduler: Sending due task qrd.celery.test('world') (qrd.celery.test)
    [2017-09-24 04:21:07,858: INFO/MainProcess] Scheduler: Sending due task add every 10 (qrd.celery.test)
    [2017-09-24 04:21:17,859: INFO/MainProcess] Scheduler: Sending due task add every 10 (qrd.celery.test)
    

    运行成功,可以使用Supervisord来守护监控Celery的运行,参考这里
    Django项目结果如下

    先配置Celery使用RabbitMQ作为Broker,使用Django DB来保存调用结果settings.py

    import os
    from configparser import RawConfigParser
    
    #https://code.djangoproject.com/wiki/SplitSettings
    config = RawConfigParser()
    config.read('/home/qrd/setting/settings.ini')
    
    STATIC_URL = '/static/'
    STATIC_ROOT = os.path.join(BASE_DIR, 'static')
    
    CELERY_BROKER_URL = 'amqp://usr:pwd@localhost:5672/qrdweb'
    CELERY_RESULT_BACKEND = 'django-db'
    

    然后在Django项目下创建celery.py文件

    from __future__ import absolute_import, unicode_literals
    import os
    from celery import Celery
    from celery.schedules import crontab
    
    # set the default Django settings module for the 'celery' program.
    os.environ.setdefault('DJANGO_SETTINGS_MODULE', 'qrd.settings')
    
    app = Celery('qrd')
    
    # Using a string here means the worker doesn't have to serialize
    # the configuration object to child processes.
    # - namespace='CELERY' means all celery-related configuration keys
    #   should have a `CELERY_` prefix.
    app.config_from_object('django.conf:settings', namespace='CELERY')
    
    # Load task modules from all registered Django app configs.
    app.autodiscover_tasks()
    
    
    app.conf.beat_schedule = {
        'hue-tasks-debug_task': {
            'task': 'hue.tasks.debug_task',
            'schedule': 10.0,
            'args': ()
        },
    }
    

    并且在__init__.py引入Celery即可集成

    from __future__ import absolute_import, unicode_literals
    
    # This will make sure the app is always imported when
    # Django starts so that shared_task will use this app.
    from .celery import app as celery_app
    
    __all__ = ['celery_app']
    

    Django的异步任务只能定义在各个app的task.py文件里,比如qrd.hue.tasks定义了一个定时任务

    from celery import task
    
    @task
    def debug_task():
        #print(arg)
        return 'debug_task'


    也可以在其模块里面调用

    from tasks import debug_task
    
    def save(data):
        debug_task.delay()
    

    顺便推荐一个Bootstrap管理后台模板:gentelella

    参考链接:
    异步任务神器 Celery
    Django配置celery执行异步任务和定时任务
    淺談 Gunicorn 各個 worker type 適合的情境

    Python使用Kerberos认证查询Impala

    最近做QoS报告,数据来源于Impala,客户端认证采用的是Kerberos。
    Impala是Cloudera公司开发并开源的一款基于HDFS/Hbase的MPP SQL引擎,它提供SQL语义,能够查询存储在Hadoop的HDFS和HBase中的PB级大数据。Kerberous本身是一个网络认证授权协议,借由中心服务器认证,对通信双方的客户端/服务端进行授权而不需要传递双方的密码。Kerberos的认证流程比较有意思,分为三个阶段

    • 客户端认证
      • 1 客户端发送自己用户名
      • 2 认证服务器返回使用客户端密钥加密的Client/TGS会话密钥和使用票据授权服务器密钥加密的TGT, 包括sessions key,用户信息及有效期
      • 3 客户端使用自己的密钥解密出Client/TGS会话密钥
    • 服务授权
      • 1 客户端发送两条消息:接收到的TGT和所请求的服务ID;使用Client/TGS会话密钥加密的用户ID和时间戳
      • 2 票据授权服务器使用自己的密钥解密TGT得到客户端的Client/TGS会话密钥,然后使用它解密出用户ID并进行认证。返回使用所请求服务端密钥加密的client-server票据和使用Client/TGS会话密钥加密的Client/Server会话密钥
      • 3 客户端使用Client/TGS会话密钥(Client/TGS Session Key)解密出Client/Server会话密钥
    • 服务请求
      • 1 客户端发送两条消息:使用所请求服务端密钥加密的client-server票据及使用Client/Server会话密钥加密的用户ID和时间戳
      • 2 服务端使用自己的密钥解密client-server票据从而得到Client/Server会话密钥,使用该密钥解密获得用户信息并认证。返回使用Client/Server会话密钥的新时间戳
      • 3 客户端使用Client/Server会话密钥解密该消息,认证结束并请求服务
      • 4 服务端提供服务

    在CentOS上安装Kerberos

    yum install krb5-devel pam_krb5 krb5-libs krb5-workstation
    

    编辑配置

    vim /etc/krb5.conf
    

    配置KDC,认证服务器

    [logging]
    default = FILE:/var/log/krb5libs.log
    kdc = FILE:/var/log/krb5kdc.log
    admin_server = FILE:/var/log/kadmind.log
    [libdefaults]
    default_realm = EXAMPLE.COM
    dns_lookup_realm = false
    dns_lookup_kdc = true
    ticket_lifetime = 24h
    renew_lifetime = 7d
    forwardable = true
    default_tkt_enctypes = rc4-hmac
    default_tgs_enctypes = rc4-hmac
    permitted_enctypes = rc4-hmac
    [realms]
    EXAMPLE.COM = {
    default_domain = example.com
    kdc = kdc01.example.com
    kdc = kdc02.example.com
    admin_server = adc01.example.com
    admin_server = adc02.example.com
    }
    [domain_realm]
    .example.com = EXAMPLE.COM
    example.com = EXAMPLE.COM
    

    测试一下

    [root@localhost rc]# kinit [email protected]
    Password for [email protected]:
    

    注意这个配置文件每行前面的空格被删掉,是因为在VirtualBox里面每行开头有莫名其妙的乱码,Linux下并不可见,在EditPlus下面才发现,否则会乱报错

    kinit: Improper format of Kerberos configuration file while initializing Kerberos 5 library
    kinit: Cannot find KDC for realm "EXAMPLE.COM" while getting initial credentials
    

    查看一下认证的ticket

    [root@localhost vagrant]# klist
    Ticket cache: FILE:/tmp/krb5cc_0
    Default principal: [email protected]
    
    Valid starting       Expires              Service principal
    09/21/2017 08:30:50  09/21/2017 18:30:50  krbtgt/[email protected]
            renew until 09/28/2017 08:30:42
    

    这个ticket在28号就会过期了,到时候又要输入密码,这样也不便于自动化程序使用。可以使用ktutil创建keytab文件

    $ ktutil
    ktutil:  addent -password -p [email protected] -k 1 -e RC4-HMAC
    Password for [email protected]:
    ktutil:  wkt abc.xyz.keytab
    ktutil:  q
    $ ls
    abc.xyz.keytab
    

    测试一下

    $ kinit -kt abc.xyz.keytab [email protected]
    $ klist -k abc.xyz.keytab
    Keytab name: FILE:abc.xyz.keytab
    KVNO Principal
    ---- --------------------------------------------------------------------------
      1 [email protected]
    

    之后便可以使用kinit自动更新ticket了。注意,如果更换了密码,需要重新生成新的keytab。
    另外,相同用户生成的授权ticket在任意一台机器上都是相同的, kinit时会自动同步回来的。
    公司的大数据平台使用Hue来提供基于web界面的查询,Impala也支持使用ODBC方式查询。在Python里使用的是impyla来查询,首先安装sasl的依赖

    yum install libgsasl-devel cyrus-sasl-devel cyrus-sasl-gssapi
    pip install impyla thrift_sasl
    

    测试脚本

    from impala.dbapi import connect
    conn = connect(host="impalad.example.com", port=21050, auth_mechanism='GSSAPI', kerberos_service_name='impala', database='acme')
    cur =  conn.cursor()
    cur.execute(r'SELECT * FROM acme WHERE dt="2017-09-12" LIMIT 5')
    print(cur.fetchall())
    

    运行下

    python test.py
    

    如下报错,则是服务器不能连接,检查一下网络,DNS/hosts及VPN

    thriftpy.transport.TTransportException: TTransportException(type=1, message="Could not connect to ('impalad.example.com', 21050)")
    

    如下报错,CentOS则是需要cyrus-sasl-gssapi模块

    thriftpy.transport.TTransportException: TTransportException(type=1, message="Could not start SASL: b'Error in sasl_client_start (-4) SASL(-4): no mechanism available: No worthy mechs found'")
    

    参考链接:
    Impala:新一代开源大数据分析引擎
    大数据时代快速SQL引擎-Impala
    CDH 5.2中Impala认证集成LDAP和Kerberos
    Kerberos
    Configuring Kerberos Authentication for Windows
    Speaking Kerberos with KNIME Big Data Extensions

    使用Supervisor 管理监控进程

    Supervisor是用Python写的一款应用程监控管理工具,能够启动,停止,重启死进程,提供web管理界面,XML-RPC接口及事件监听。通常我们写了一些脚本都不会带有daemon功能,而是加&或者nohub,screen什么的丢到后台去运行,同时使用corntab定时检测脚本是否存活,以便重新运行脚本。使用Supervisor可以将这些脚本,程序转为守护进程,自动重启它们;还可以监控机器的进程运行状况,输出警报等。
    Supervisor只能运行于Python 2.x的环境,但子进程可以为其他任意程序,比如Python 3,PHP等。这里使用pip来安装

    $ wget https://bootstrap.pypa.io/get-pip.py
    $ python -V
    $ sudo python get-pip.py
    $ sudo pip install supervisor
    

    生成配置文件及日志目录

    $ sudo echo_supervisord_conf > /etc/supervisord.conf
    $ mkdir /var/log/supervisor
    $ chmod 655 /var/log/supervisor
    

    启动supervisord

    $ sudo supervisord -c /etc/supervisord.conf
    $ supervisorctl
    $ Server requires authentication
    $ Username:user
    $ Password:
    
    $ supervisor> status
    $ supervisor> help
    
    default commands (type help <topic>):
    =====================================
    add    exit      open  reload  restart   start   tail
    avail  fg        pid   remove  shutdown  status  update
    clear  maintail  quit  reread  signal    stop    version
    $ supervisor> quit
    

    这里没有任何进程。以下为常用命令:

    • supervisorctl stop program 停止某个进程
    • supervisorctl start program 启动某个进程
    • supervisorctl restart program 重启某个进程
    • supervisorctl stop group 重启属于group分组的所有进程(start,restart同理)
    • supervisorctl stop all 停止全部进程,注:start、restart、stop都不会载入最新的配置文件
    • supervisorctl reload 载入最新配置文件,停止原有进程并按新配置启动进程
    • supervisorctl update 根据最新配置文件,启动新配置或有改动的进程,没有改动的进程不受影响

    编辑supervisord.conf启用web界面,账号密码为web及supervisorctl共用,必须更改

    $ sudo vim /etc/supervisord.conf
    #取消以下行的注释
    [inet_http_server]         ; inet (TCP) server disabled by default
    port=*:9002           ; ip_address:port specifier, *:port for all iface
    username=user              ; default is no username (open server)
    password=123               ; default is no password (open server)
    
    #添加新应用qrd
    [program:qrd]
    command = /usr/bin/gunicorn --access-logfile - --workers 3 --bind 127.0.0.1:8000 qrd.wsgi
    directory = /home/qrd/qrd/
    user = root
    autostart = true
    autorestart = true
    startsecs = 5
    startretries = 3
    stdout_logfile = /var/log/supervisor/qrd.log
    stderr_logfile = /var/log/supervisor/qrd.log
    

    重启使HTTP配置生效

    ps aux | grep supervisord 
    kill 
    supervisord -c /etc/supervisord.conf
    

    关于supervisord.conf配置项,命令释义可以参考这里

    • command 为要运行的脚本或程序
    • directory 为脚本或程序运行时的工作目录
    • user 为脚本或程序运行时的用户
    • autostart 随supervisord启动
    • startsecs 启动后等待时间,过了这个时间没起来就重新启动
    • startretries 启动失败后重试的次数
    • stdout_logfile,stderr_logfile 为输出日志

    重新加载所有应用

    $ supervisorctl
    Server requires authentication
    Username:user
    Password:
    
    supervisor> reload
    Really restart the remote supervisord process y/N? y
    Restarted supervisord
    supervisor> status
    qrd                              RUNNING   pid 3861, uptime 0:00:22
    

    可以看到定义的qrd程序已经起来了。如果qrd程序意外退出了,那么supervisord将会重启它。如果杀掉了supervisord,那么qrd对应的进程也将被杀死。也可以去web界面查看http://127.0.0.1:9002/

    可以通过web页面来启动,停止进程,查看日志等。
    再增加下Celery的Worker,Beat配置

    ; ==================================
    ;  celery worker supervisor example
    ; ==================================
    
    [program:qrdworker]
    ; Set full path to celery program if using virtualenv
    command=/usr/bin/celery worker -A qrd --loglevel=INFO
    
    ; Alternatively,
    ;command=celery --app=your_app.celery:app worker --loglevel=INFO -n worker.%%h
    ; Or run a script
    ;command=celery.sh
    
    directory=/home/qrd/qrd/
    user=nobody
    numprocs=1
    stdout_logfile=/var/log/supervisor/qrdworker.log
    stderr_logfile=/var/log/supervisor/qrdworker.log
    autostart=true
    autorestart=true
    startsecs=10
    
    ; Need to wait for currently executing tasks to finish at shutdown.
    ; Increase this if you have very long running tasks.
    stopwaitsecs = 600
    
    ; Causes supervisor to send the termination signal (SIGTERM) to the whole process group.
    stopasgroup=true
    
    ; Set Celery priority higher than default (999)
    ; so, if rabbitmq is supervised, it will start first.
    priority=1000
    
    ; ================================
    ;  celery beat supervisor example
    ; ================================
    
    [program:qrdbeat]
    ; Set full path to celery program if using virtualenv
    command=/usr/bin/celery -A qrd beat -l info -s /tmp/celerybeat-schedule
    
    ; remove the -A myapp argument if you aren't using an app instance
    
    directory=/home/qrd/qrd/
    user=nobody
    numprocs=1
    stdout_logfile=/var/log/supervisor/beat.log
    stderr_logfile=/var/log/supervisor/beat.log
    autostart=true
    autorestart=true
    startsecs=10
    
    ; Causes supervisor to send the termination signal (SIGTERM) to the whole process group.
    stopasgroup=true
    
    ; if rabbitmq is supervised, set its priority higher
    ; so it starts first
    priority=999
    

    然后启用它们

    supervisor> update
    qrdbeat: added process group
    supervisor> status
    qrd                              RUNNING   pid 4468, uptime 0:03:49
    qrdbeat                          BACKOFF   Exited too quickly (process log may have details)
    qrdworker                        RUNNING   pid 4469, uptime 0:03:49
    

    查看下进程

    $ sudo ps aux | grep python
    root      1038  0.0  3.1 562392 15720 ?        Ssl  01:49   0:01 /usr/bin/python -Es /usr/sbin/tuned -l -P
    root      3992  0.1  3.0 222124 15224 ?        Ss   03:49   0:00 /bin/python /bin/supervisord -c /etc/supervisord.conf
    root      3993  0.3  3.8 211868 19296 ?        S    03:49   0:00 /usr/local/python3/bin/python3.6 /usr/bin/gunicorn --access-logfile - --workers 3 --bind 127.0.0.1:8000 qrd.wsgi
    root      3996  0.3  6.9 264048 34780 ?        S    03:49   0:00 /usr/local/python3/bin/python3.6 /usr/bin/gunicorn --access-logfile - --workers 3 --bind 127.0.0.1:8000 qrd.wsgi
    root      3998  0.3  6.9 264056 34784 ?        S    03:49   0:00 /usr/local/python3/bin/python3.6 /usr/bin/gunicorn --access-logfile - --workers 3 --bind 127.0.0.1:8000 qrd.wsgi
    root      3999  0.4  6.9 264024 34784 ?        S    03:49   0:00 /usr/local/python3/bin/python3.6 /usr/bin/gunicorn --access-logfile - --workers 3 --bind 127.0.0.1:8000 qrd.wsgi
    root      4014  0.0  0.1 112660   976 pts/0    R+   03:50   0:00 grep --color=auto python
    

    除了program标签,Supervisor也支持group标签,用来启动一系列的program,比如先启动数据库,再启动web服务器。
    Supervisor也可以用来管理PHP进程,比如使用 Supervisor 管理 Laravel 队列进程
    Docker官方推荐一个docker容器只运行一个服务,如果你想启动多个脚本或程序,可以使用Supervisor会更简单点
    如果需要Supervisor开启启动,可以使用GitHub上的脚本和配置。CentOS 7上可以配置为service,由systemctl来管理:

    $ sudo vim /etc/systemd/system/supervisord.service
    

    内容如下:

    # supervisord service for systemd (CentOS 7.0+)
    # by ET-CS (https://github.com/ET-CS)
    [Unit]
    Description=Supervisor daemon
    
    [Service]
    Type=forking
    ExecStart=/usr/bin/supervisord
    ExecStop=/usr/bin/supervisorctl $OPTIONS shutdown
    ExecReload=/usr/bin/supervisorctl $OPTIONS reload
    KillMode=process
    Restart=on-failure
    RestartSec=42s
    
    [Install]
    WantedBy=multi-user.target
    

    然后启用

    $ sudo systemctl enable supervisord.service
    Created symlink from /etc/systemd/system/multi-user.target.wants/supervisord.service to /etc/systemd/system/supervisord.service.
    $ sudo systemctl start supervisord.service
    $ sudo ps aux | grep python
    

    虽然supervisorctl及web界面都只能管理本机,但是Supervisor提供了XML-RPC接口,可以获取进程运行信息,因此诞生了许多监控平台,以便监控服务器集群的进程的运行状况。
    Supervisor还提供了event listener配置,在这里Supervisor将会通知脚本其他进程的运行状态变更的事件,可以用来发送警报监控等。

    参考链接:
    使用Supervisor3.2.1基于Mac10.10.3对系统进程进行管理
    supervisor的配置浅析
    Python 进程管理工具 Supervisor 使用教程
    Supervisor进程监护使用指南
    supervisord 的 XML-RPC API 使用说明
    Supervisor Event Listener
    Dockerizing Nginx and SSH using Supervisord