即时通信的需求,不仅在公共互联网上,比如微信、QQ,也在企业的内部网络,特别是与内部系统的整合,比如OA、客服系统。XMPP,也叫扩展消息与存在协议,是一种以XML为基础的开放式即时通信协议。XMPP不但能够用来做消息通信(单聊/群聊/订阅),也可以做语音通信。XMPP甚至支持多个服务器之间互相连接,互相通信,早期Gtalk就能够与其他XMPP服务器通信。采用XMPP来开发的好处是,已经有大量的开源服务器(ejabberd、Openfire)和客户端(Spark/Smack/converse.js/XMPPFramework)实现,能够快速搭建。
Ejabberd则是ProcessOne出品的,基于Erlang开发的XMPP/MQTT/SIP服务器,内置了WebSocket/文件上传支持,提供更加丰富的REST API。在CentOS64下面安装Ejabberd,会安装到/etc/init.d/ejabberd,直接service start ejabberd就好了,可以使用docker快速启用
[root@vagrant-centos64 tmp]# wget https://static.process-one.net/ejabberd/downloads/20.04/ejabberd-20.04-0.x86_64.rpm
--2020-10-29 08:26:16--  https://static.process-one.net/ejabberd/downloads/20.04/ejabberd-20.04-0.x86_64.rpm
Resolving static.process-one.net... 13.226.36.69, 13.226.36.105, 13.226.36.34, ...
Connecting to static.process-one.net|13.226.36.69|:443... connected.
HTTP request sent, awaiting response... 200 OK
Length: 18713774 (18M) [application/x-rpm]
Saving to: “ejabberd-20.04-0.x86_64.rpm”

100%[====================================================================================================================================================================================================================================>] 18,713,774  2.84M/s   in 9.1s

2020-10-29 08:26:27 (1.96 MB/s) - “ejabberd-20.04-0.x86_64.rpm” saved [18713774/18713774]

[root@vagrant-centos64 tmp]# yum localinstall ejabberd-20.04-0.x86_64.rpm
Loaded plugins: fastestmirror
Setting up Local Package Process
Examining ejabberd-20.04-0.x86_64.rpm: ejabberd-20.04-0.x86_64
Marking ejabberd-20.04-0.x86_64.rpm to be installed
Loading mirror speeds from cached hostfile
 * base: mirrors.163.com
 * epel: mirror.math.princeton.edu
 * extras: mirrors.cn99.com
 * updates: mirrors.cn99.com
 * webtatic: uk.repo.webtatic.com
phalcon_stable/signature                                                                                                                                                                                                                               |  819 B     00:00
phalcon_stable/signature                                                                                                                                                                                                                               |  951 B     00:00 ...
phalcon_stable-source/signature                                                                                                                                                                                                                        |  819 B     00:00
phalcon_stable-source/signature                                                                                                                                                                                                                        |  951 B     00:00 ...
Resolving Dependencies
--> Running transaction check
---> Package ejabberd.x86_64 0:20.04-0 will be installed
--> Finished Dependency Resolution

Dependencies Resolved

==============================================================================================================================================================================================================================================================================
 Package                                                       Arch                                                        Version                                                        Repository                                                                     Size
==============================================================================================================================================================================================================================================================================
Installing:
 ejabberd                                                      x86_64                                                      20.04-0                                                        /ejabberd-20.04-0.x86_64                                                       29 M

Transaction Summary
==============================================================================================================================================================================================================================================================================
Install       1 Package(s)

Total size: 29 M
Installed size: 29 M
Is this ok [y/N]: y
Downloading Packages:
Running rpm_check_debug
Running Transaction Test
Transaction Test Succeeded
Running Transaction
  Installing : ejabberd-20.04-0.x86_64                                                                                                                                                                                                                                    1/1
  Verifying  : ejabberd-20.04-0.x86_64                                                                                                                                                                                                                                    1/1

Installed:
  ejabberd.x86_64 0:20.04-0

Complete!
[root@vagrant-centos64 tmp]# ls  /etc/init.d/ejabberd
/etc/init.d/ejabberd
[root@vagrant-centos64 tmp]# ls -la /opt/ejabberd
total 24
drwxr-xr-x  5 ejabberd ejabberd 4096 Oct 29 08:27 .
drwxr-xr-x. 8 root     root     4096 Oct 29 08:27 ..
drwxr-xr-x  2 ejabberd ejabberd 4096 Oct 29 08:27 conf
drwxr-xr-x  3 ejabberd ejabberd 4096 Oct 29 08:27 database
-r--------  1 ejabberd ejabberd   20 Oct 29 00:00 .erlang.cookie
drwxr-xr-x  2 ejabberd ejabberd 4096 Oct 29 08:27 logs
[root@vagrant-centos64 bin]# service ejabberd start
Starting ejabberd...
done.
[root@vagrant-centos64 sql]# ps aux | grep ejabberd
ejabberd 10097  0.2  7.9 1817344 48144 ?       Sl   08:51   0:04 /opt/ejabberd-20.04/bin/beam.smp -K true -P 250000 -- -root /opt/ejabberd-20.04 -progname /opt/ejabberd-20.04/bin/erl -- -home /opt/ejabberd -- -sname ejabberd@localhost -smp enable -mnesia dir "/opt/ejabberd/database/ejabberd@localhost" -ejabberd log_rate_limit 100 log_rotate_size 10485760 log_rotate_count 1 log_rotate_date "" -s ejabberd -noshell -noinput
ejabberd 10105  0.0  0.0   4060   496 ?        Ss   08:51   0:00 erl_child_setup 1024
ejabberd 10186  0.0  0.0   4052   572 ?        Ss   08:51   0:00 /opt/ejabberd-20.04/lib/os_mon-2.4.7/priv/bin/memsup
root     11215  0.0  0.1 103324   892 pts/4    S+   09:16   0:00 grep ejabberd
[root@vagrant-centos64 bin]# netstat -apn | grep beam
tcp        0      0 127.0.0.1:7777              0.0.0.0:*                   LISTEN      10097/beam.smp
tcp        0      0 0.0.0.0:37617               0.0.0.0:*                   LISTEN      1599/beam
tcp        0      0 0.0.0.0:15672               0.0.0.0:*                   LISTEN      1599/beam
tcp        0      0 0.0.0.0:55672               0.0.0.0:*                   LISTEN      1599/beam
tcp        0      0 0.0.0.0:43674               0.0.0.0:*                   LISTEN      10097/beam.smp
tcp        0      0 127.0.0.1:44055             127.0.0.1:4369              ESTABLISHED 1599/beam
tcp        0      0 127.0.0.1:35415             127.0.0.1:4369              ESTABLISHED 10097/beam.smp
tcp        0      0 :::5280                     :::*                        LISTEN      10097/beam.smp
tcp        0      0 :::5443                     :::*                        LISTEN      10097/beam.smp
tcp        0      0 :::5222                     :::*                        LISTEN      10097/beam.smp
tcp        0      0 :::5672                     :::*                        LISTEN      1599/beam
tcp        0      0 :::5269                     :::*                        LISTEN      10097/beam.smp
tcp        0      0 :::1883                     :::*                        LISTEN      10097/beam.smp
unix  3      [ ]         STREAM     CONNECTED     1637533 10097/beam.smp
Ejabberd自带Erlang的数据库服务Mnesia,但有一些限制建议使用第三方的比如MySQL,这样也方便第三方交互(比如认证Token)。初始化的SQL脚本在/opt/ejabberd-20.04/lib/ejabberd-20.04/priv/sql,如果只是支持单个domain的话使用mysql.sql就可以了,多domain支持使用mysql.new.sql
[root@vagrant-centos64 sql]# ls
lite.new.sql  lite.sql  mssql.sql  mysql.new.sql  mysql.sql  pg.new.sql  pg.sql
[root@vagrant-centos64 sql]# pwd
/opt/ejabberd-20.04/lib/ejabberd-20.04/priv/sql
更改为使用MySQL存储和认证
[root@vagrant-centos64 bin]# cat /opt/ejabberd/conf/ejabberd.yml
###
###' ejabberd configuration file
###
### The parameters used in this configuration file are explained at
###
### https://docs.ejabberd.im/admin/configuration
###
### The configuration file is written in YAML.
### *******************************************************
### ******* !!! WARNING !!! *******
### ******* YAML IS INDENTATION SENSITIVE *******
### ******* MAKE SURE YOU INDENT SECTIONS CORRECTLY *******
### *******************************************************
### Refer to http://en.wikipedia.org/wiki/YAML for the brief description.
###
hosts:
- "vagrant-centos64"
loglevel: 4
log_rotate_size: 10485760
log_rotate_date: ""
log_rotate_count: 1
log_rate_limit: 100
certfiles:
- "/opt/ejabberd/conf/server.pem"
## - "/etc/letsencrypt/live/localhost/fullchain.pem"
## - "/etc/letsencrypt/live/localhost/privkey.pem"
ca_file: "/opt/ejabberd/conf/cacert.pem"
listen:
-
port: 5222
ip: "::"
module: ejabberd_c2s
max_stanza_size: 262144
shaper: c2s_shaper
access: c2s
starttls_required: true
-
port: 5269
ip: "::"
module: ejabberd_s2s_in
max_stanza_size: 524288
-
port: 5443
ip: "::"
module: ejabberd_http
tls: true
request_handlers:
"/admin": ejabberd_web_admin
"/api": mod_http_api
"/bosh": mod_bosh
"/captcha": ejabberd_captcha
"/upload": mod_http_upload
"/ws": ejabberd_http_ws
"/oauth": ejabberd_oauth
-
port: 5280
ip: "::"
module: ejabberd_http
request_handlers:
"/admin": ejabberd_web_admin
-
port: 1883
ip: "::"
module: mod_mqtt
backlog: 1000
s2s_use_starttls: optional
acl:
local:
user_regexp: ""
loopback:
ip:
- 127.0.0.0/8
- ::1/128
- ::FFFF:127.0.0.1/128
admin:
user:
- "admin@vagrant-centos64"
access_rules:
local:
allow: local
c2s:
deny: blocked
allow: all
announce:
allow: admin
configure:
allow: admin
muc_create:
allow: local
pubsub_createnode:
allow: local
trusted_network:
allow: loopback
api_permissions:
"console commands":
from:
- ejabberd_ctl
- mod_http_api
who: all
what: "*"
"admin access":
who:
access:
allow:
acl: loopback
acl: admin
oauth:
scope: "ejabberd:admin"
access:
allow:
acl: loopback
acl: admin
what:
- "*"
- "!stop"
- "!start"
"public commands":
who:
ip: 127.0.0.1/8
what:
- status
- connected_users_number
shaper:
normal: 1000
fast: 50000
shaper_rules:
max_user_sessions: 10
max_user_offline_messages:
5000: admin
100: all
c2s_shaper:
none: admin
normal: all
s2s_shaper: fast
max_fsm_queue: 10000
acme:
contact: "mailto:admin@vagrant-centos64"
ca_url: "https://acme-v01.api.letsencrypt.org"
modules:
mod_adhoc: {}
mod_admin_extra: {}
mod_announce:
access: announce
mod_avatar: {}
mod_blocking: {}
mod_bosh: {}
mod_caps: {}
mod_carboncopy: {}
mod_client_state: {}
mod_configure: {}
mod_disco: {}
mod_fail2ban: {}
mod_http_api: {}
mod_http_upload:
put_url: https://@HOST@:5443/upload
mod_last: {}
mod_mam:
## Mnesia is limited to 2GB, better to use an SQL backend
## For small servers SQLite is a good fit and is very easy
## to configure. Uncomment this when you have SQL configured:
## db_type: sql
assume_mam_usage: true
default: never
mod_mqtt: {}
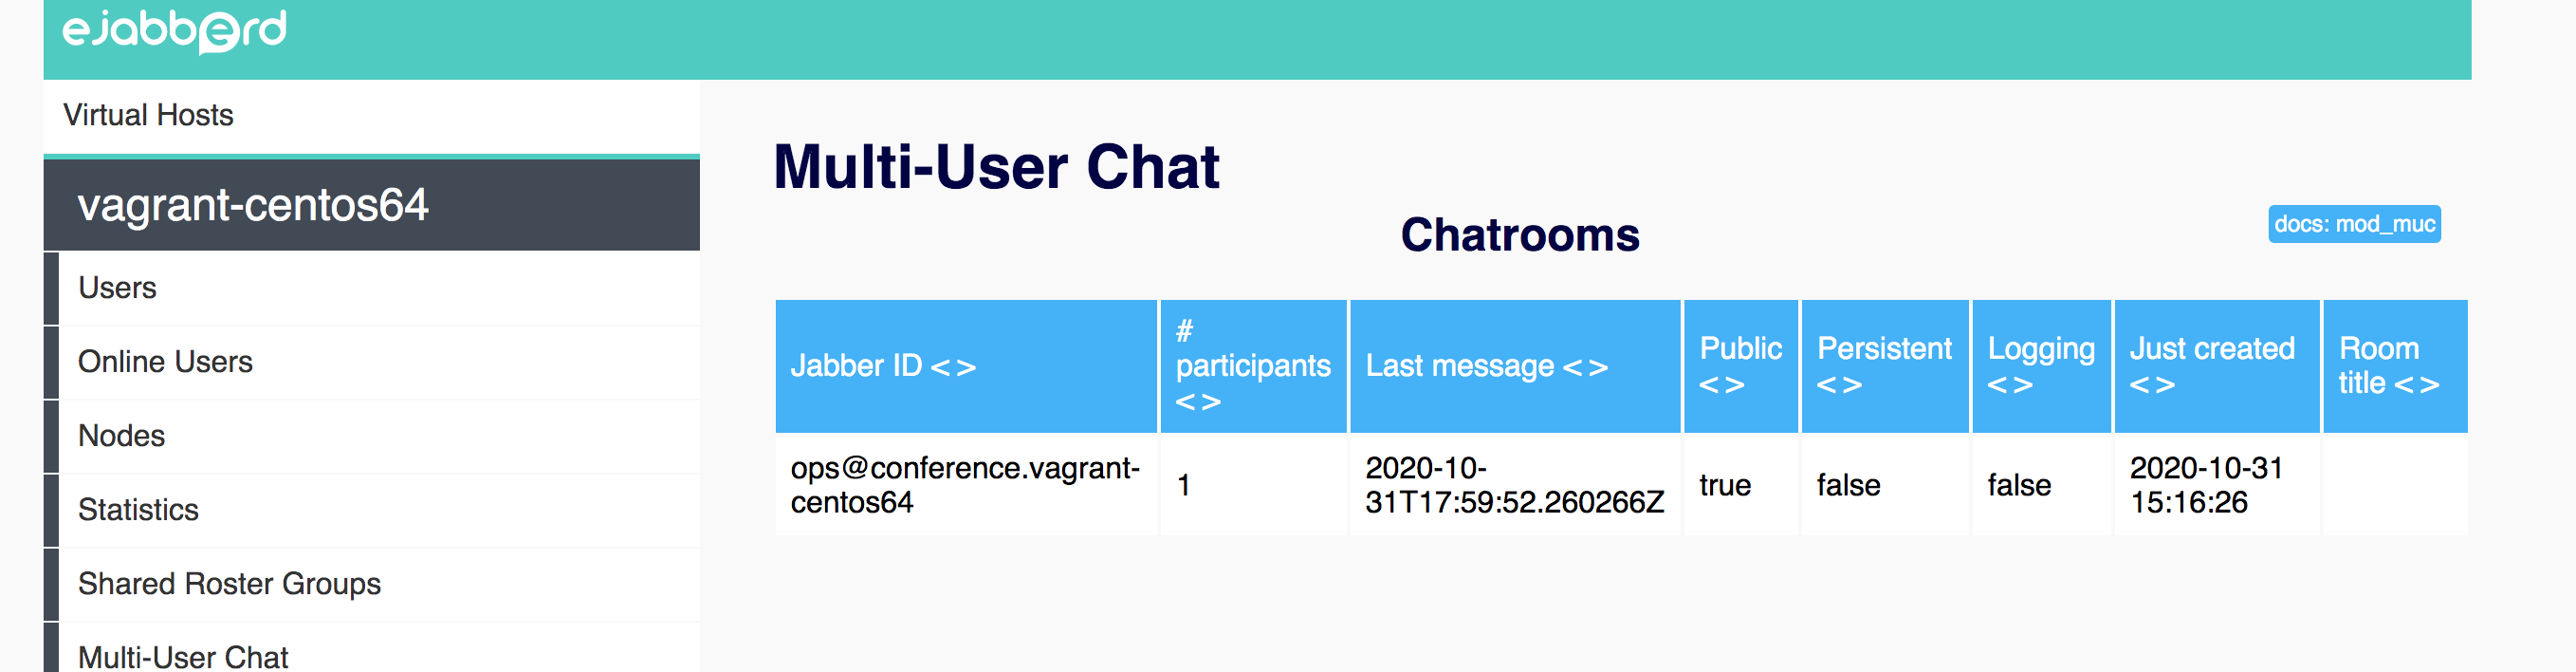
mod_muc:
access:
- allow
access_admin:
- allow: admin
access_create: muc_create
access_persistent: muc_create
access_mam:
- allow
default_room_options:
allow_subscription: true # enable MucSub
mam: false
mod_muc_admin: {}
mod_offline:
access_max_user_messages: max_user_offline_messages
mod_ping: {}
mod_privacy: {}
mod_private: {}
mod_proxy65:
access: local
max_connections: 5
mod_pubsub:
access_createnode: pubsub_createnode
plugins:
- flat
- pep
force_node_config:
## Avoid buggy clients to make their bookmarks public
storage:bookmarks:
access_model: whitelist
mod_push: {}
mod_push_keepalive: {}
mod_register:
## Only accept registration requests from the "trusted"
## network (see access_rules section above).
## Think twice before enabling registration from any
## address. See the Jabber SPAM Manifesto for details:
## https://github.com/ge0rg/jabber-spam-fighting-manifesto
ip_access: trusted_network
mod_roster:
versioning: true
mod_s2s_dialback: {}
mod_shared_roster: {}
mod_stream_mgmt:
resend_on_timeout: if_offline
mod_vcard: {}
mod_vcard_xupdate: {}
mod_version:
show_os: false
auth_method: sql
sql_type: mysql
sql_server: "localhost"
sql_database: "ejabberd"
sql_username: "ejabberd"
sql_password: "ejabberd"
default_db: sql
## If you want to specify the port:
#sql_port: 3306
### Local Variables:
### mode: yaml
### End:
### vim: set filetype=yaml tabstop=8
试着注册一下管理员
[root@vagrant-centos64 bin]# ./ejabberdctl register admin1 localhost admin
Error: cannot_register
失败了,这是因为hostname的关系,在ejabberd.yml配置的host并不是localhost,改一下注册的domain就好了,具体可以参考这里和这里
[root@vagrant-centos64 bin]# ./ejabberdctl status
The node ejabberd@localhost is started with status: started
[root@vagrant-centos64 logs]# hostname -s
vagrant-centos64
[root@vagrant-centos64 bin]# ./ejabberdctl register admin vagrant-centos64 admin
User admin@vagrant-centos64 successfully registered
访问http://127.0.0.1:5280/admin就可以进入到管理界面了。管理界面比较简单,只能管理用户/消息/聊天室,完整的xmpp协议服务器是支持的,客户端对应实现就好了。

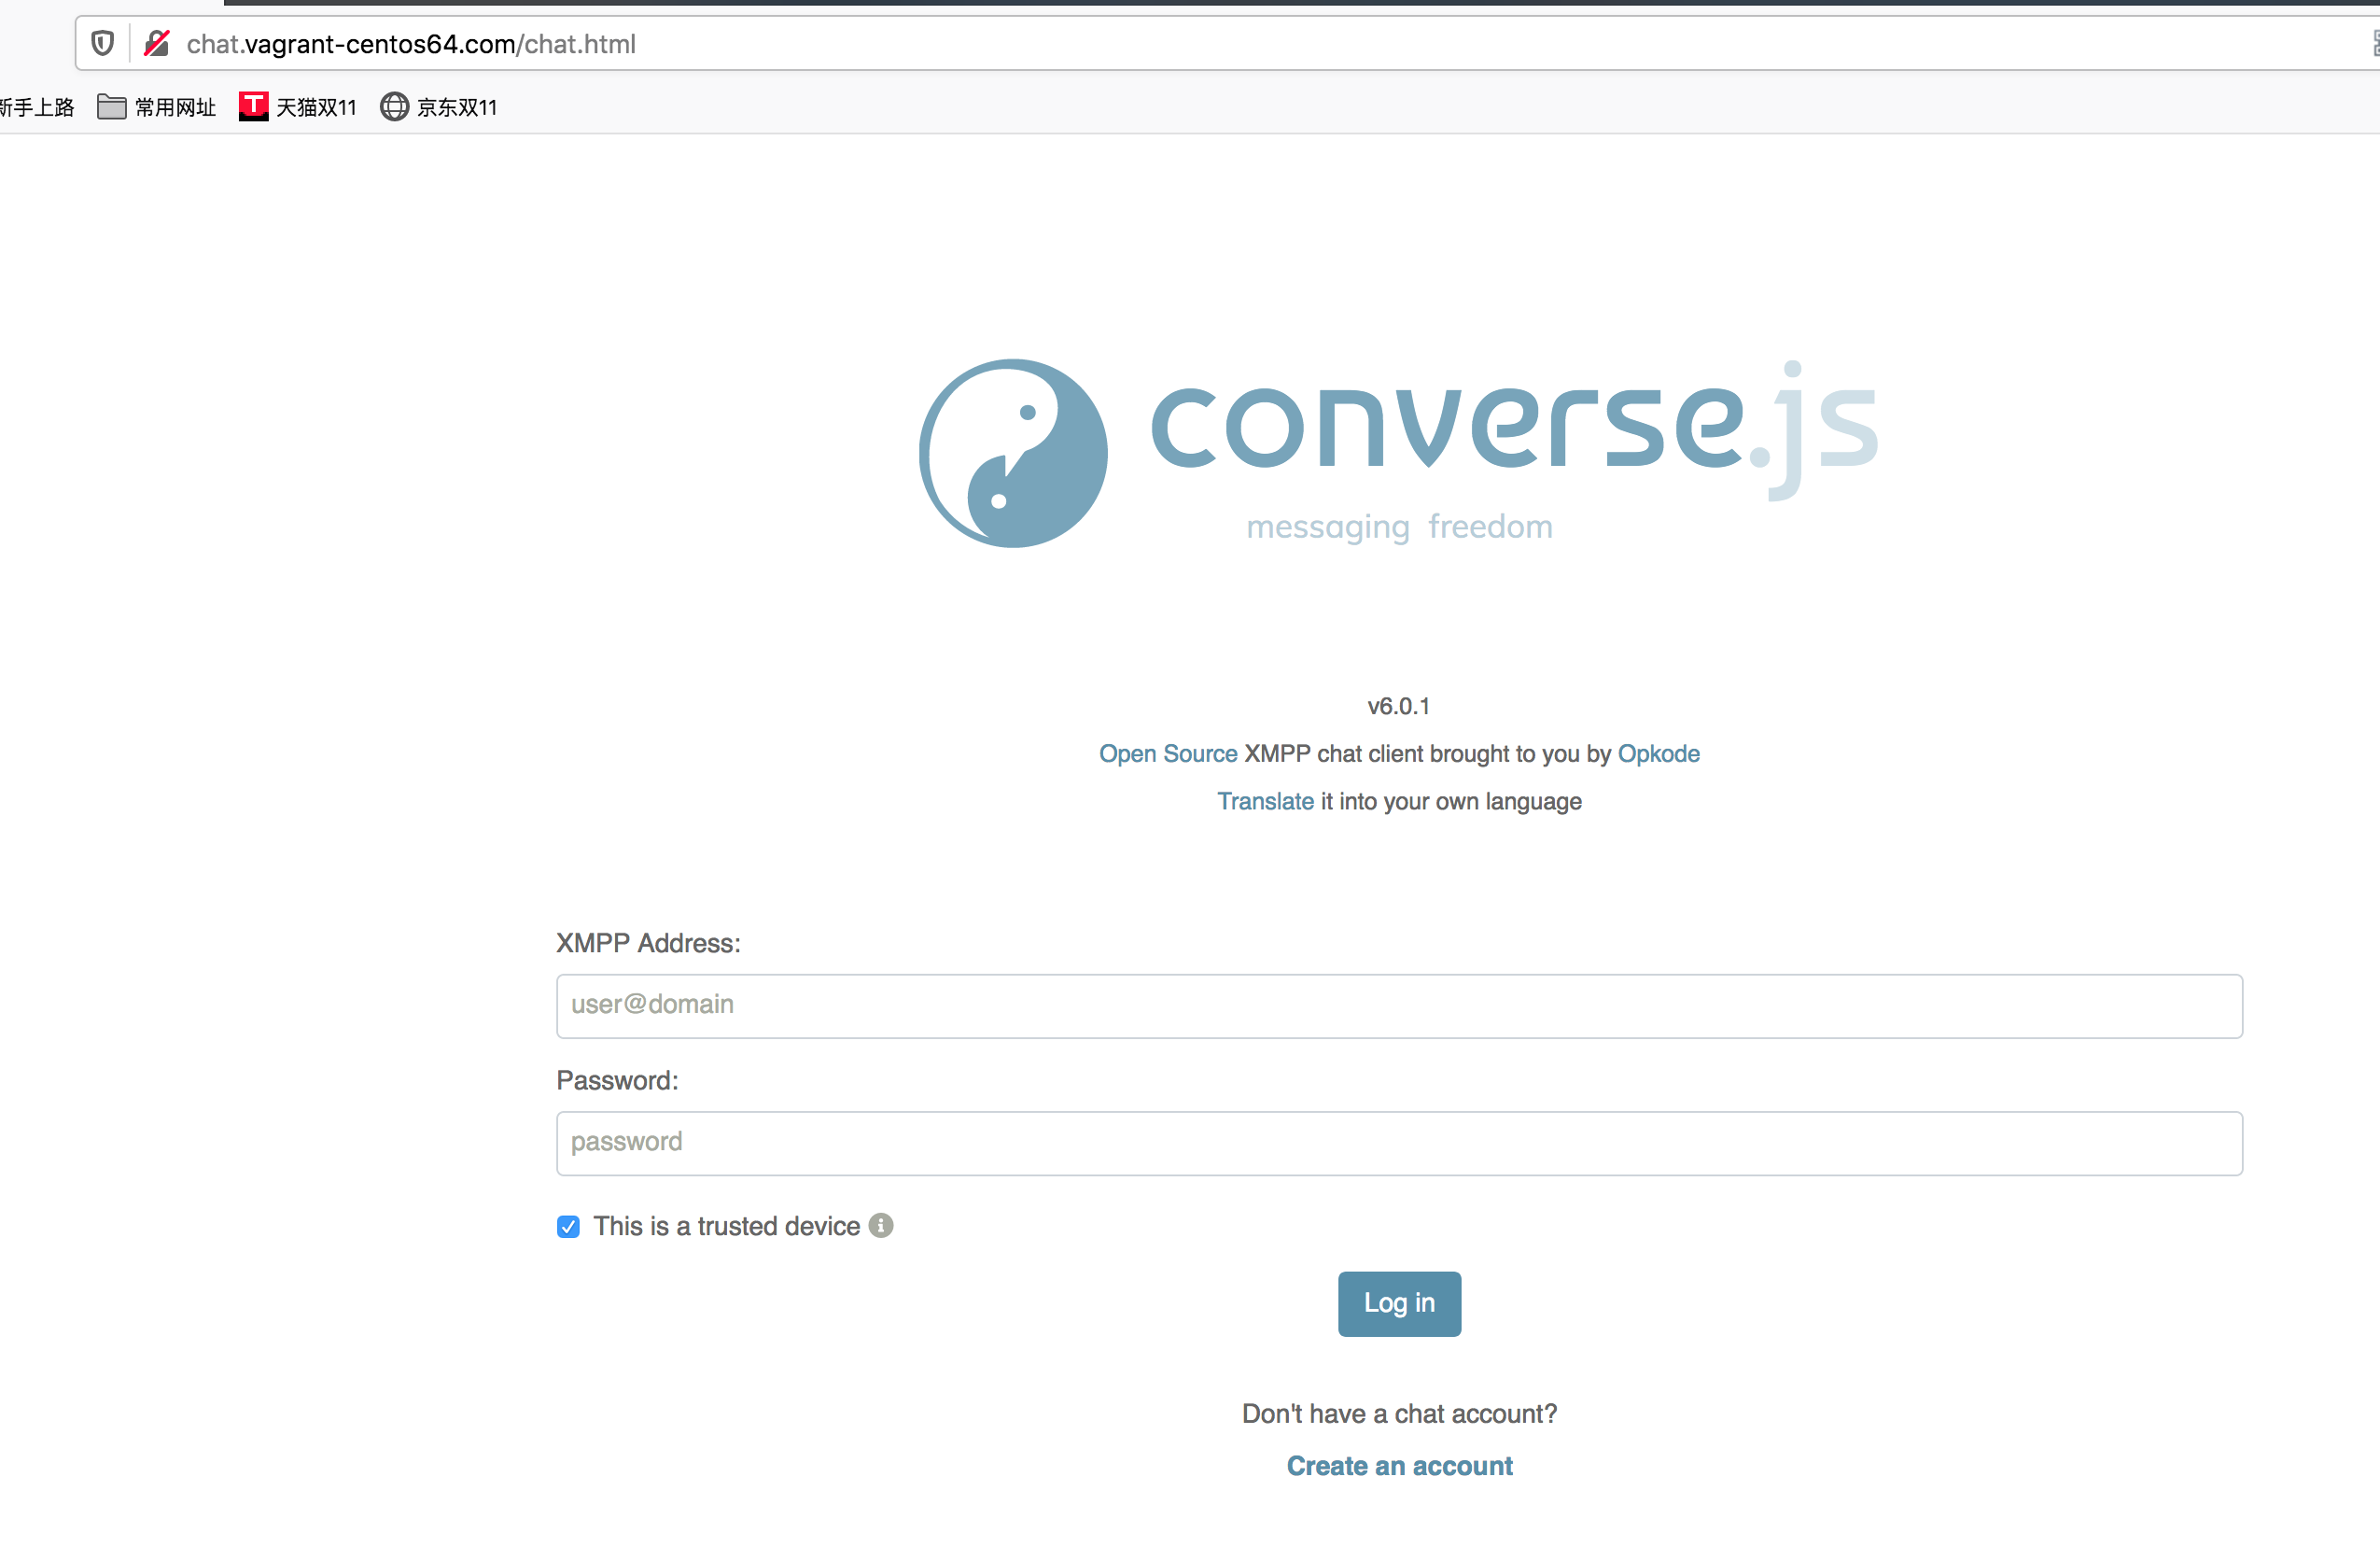
使用conversejs快速搭建一个web客户端来验证一下,创建chat.html
<html>
    <head>
        <title>chat</title>
        <link rel="stylesheet" type="text/css" media="screen" href="https://cdn.conversejs.org/dist/converse.min.css">
        <script src="https://cdn.conversejs.org/dist/converse.min.js" charset="utf-8"></script>
    </head>
    <body>
        <script>
            converse.initialize({
                //bosh_service_url: 'http://chat.vagrant-centos64.com/bosh',
                websocket_url: 'wss:chat.vagrant-centos64.com/ws',
                //show_controlbox_by_default: true,
                view_mode: 'fullscreen'
            });
        </script>
    </body>
</html>
打开浏览器,访问对应的url登录就可以看到了聊天界面了。这里使用的域名是经过nginx代理转发过的了,配置可以参考API 网关 Kong,如果使用nginx-proxy-servier需要打开Websockets Support,以便进行协议升级101 Switching Protocols。

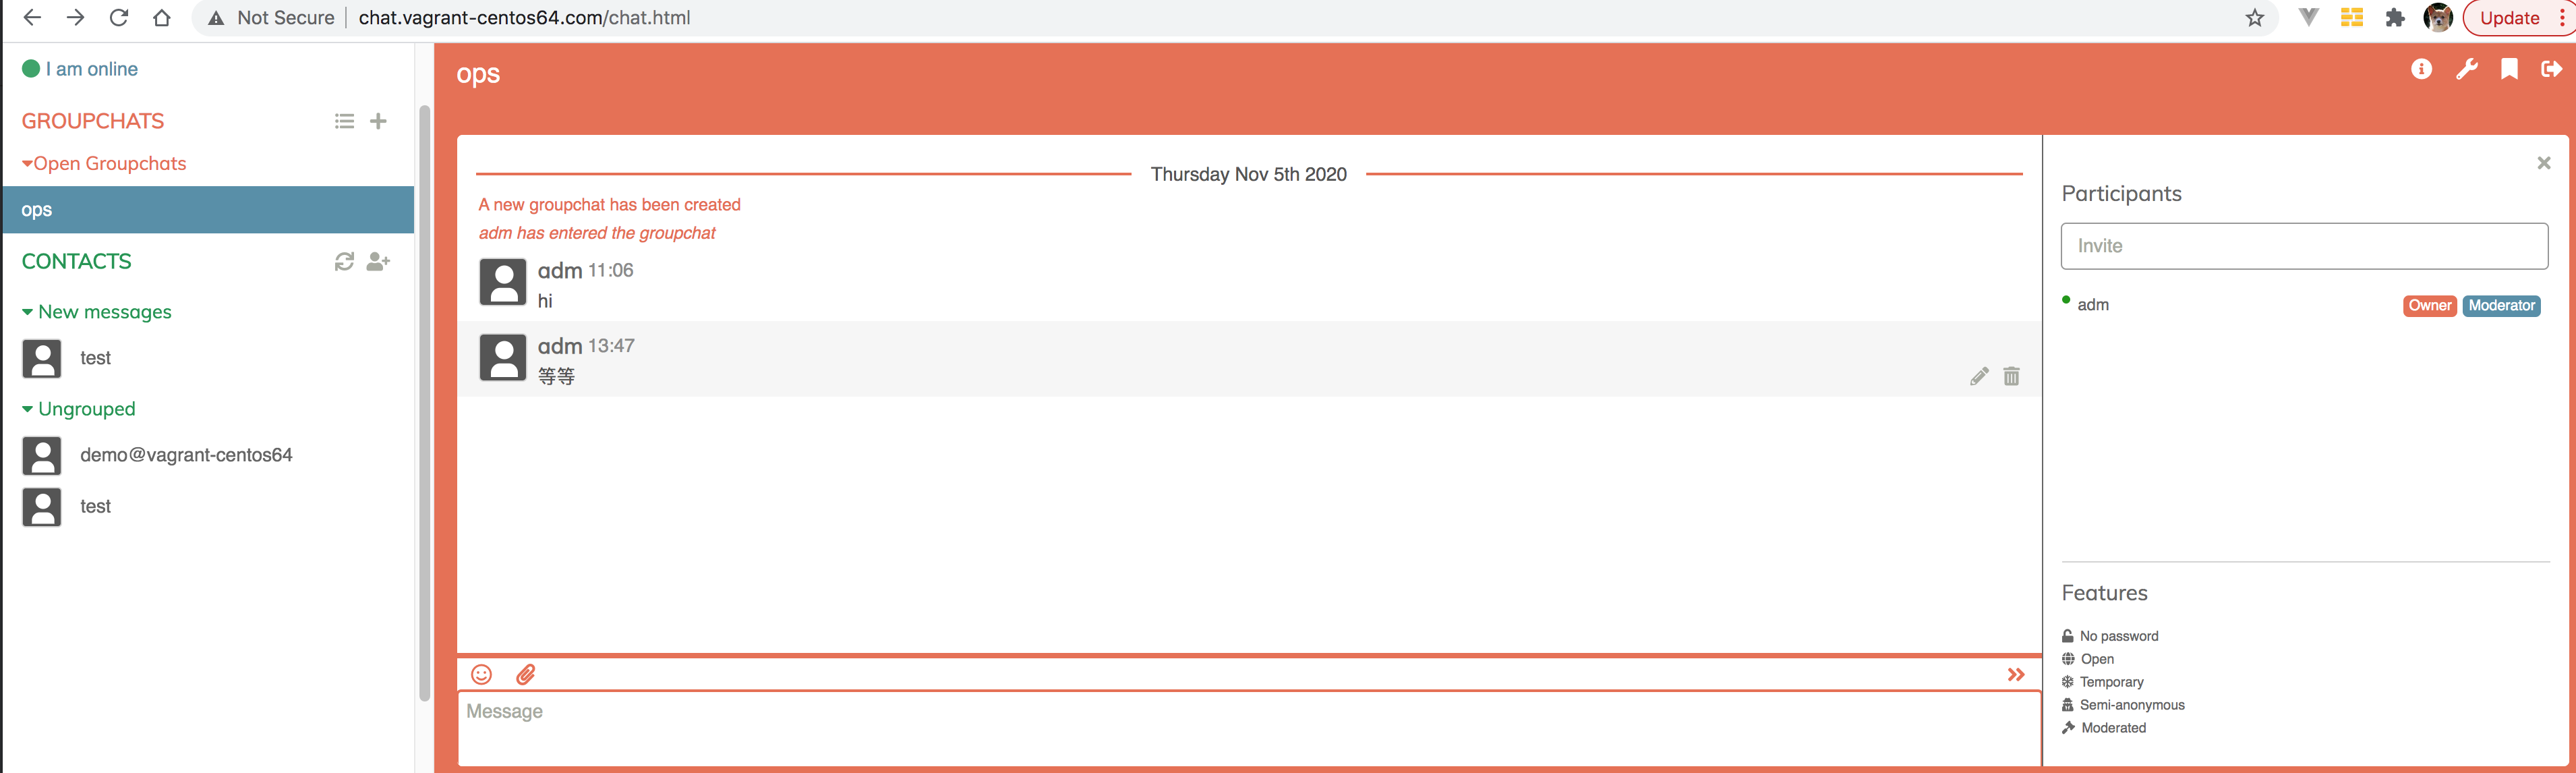
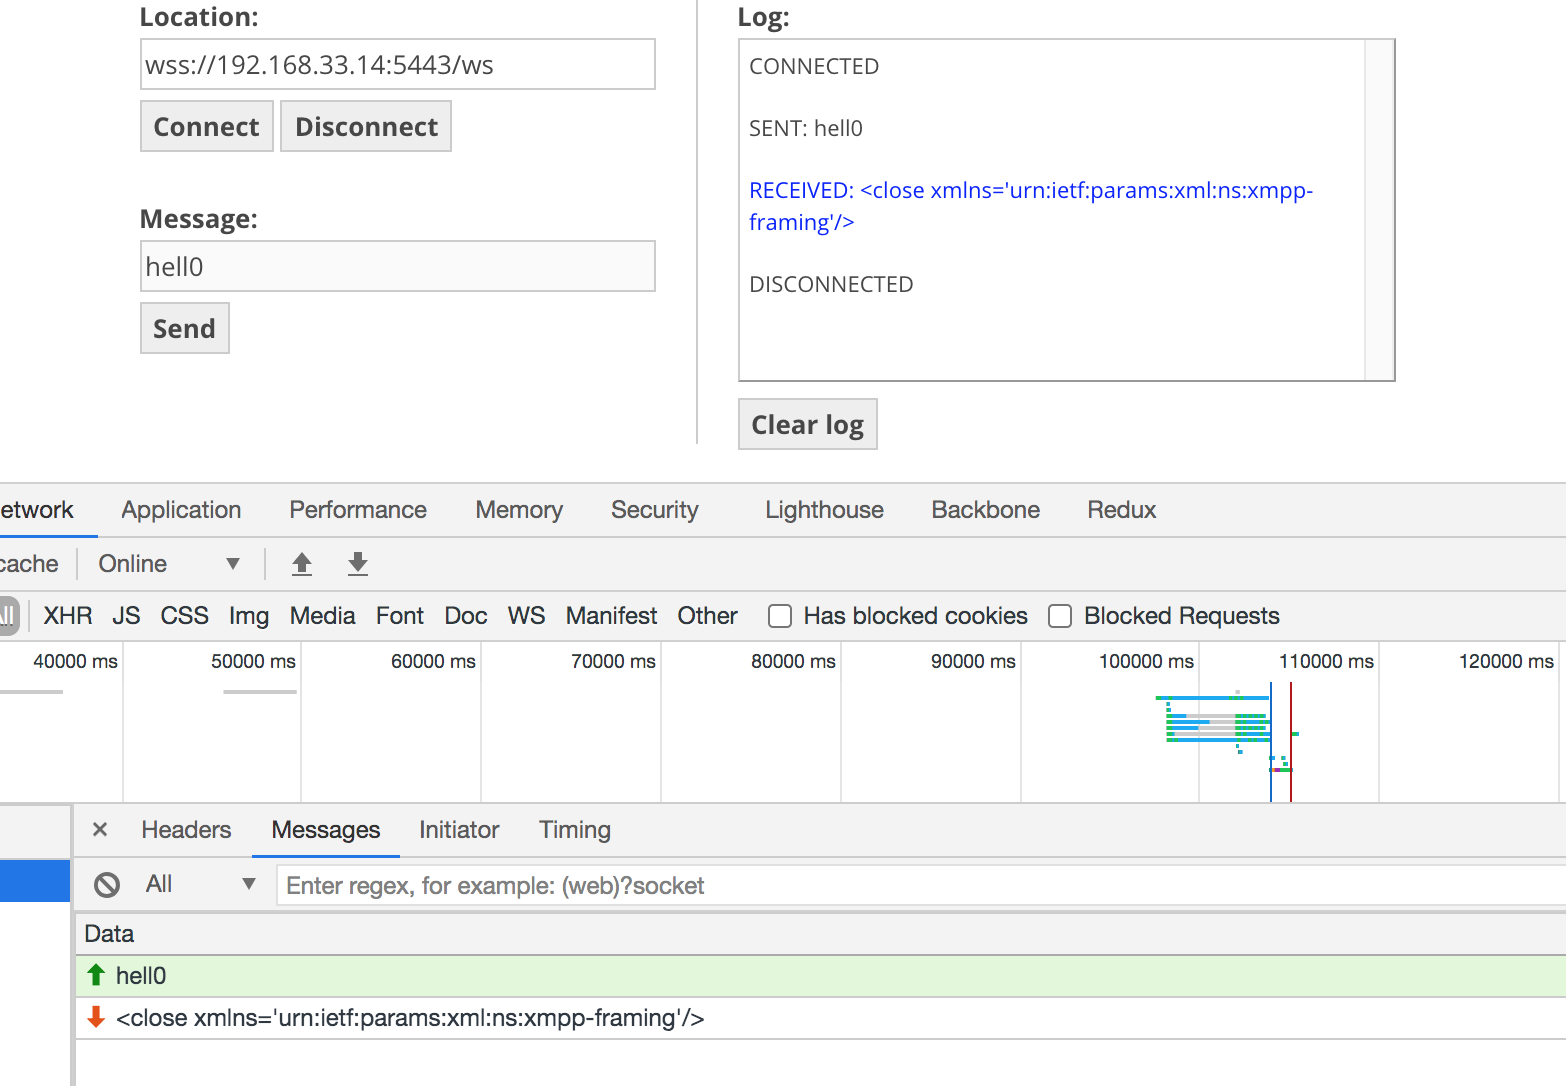
conversejs配置里面有两个url,一个是BOSH(Bidirectional-streams Over Synchronous HTTP)的,即HTTP长连接,以便通服务器即时交互,获取消息;另一个是WebSocket,基于TCP的,客户端/服务器双向通信。BOHS需要浏览器定时发起一个请求直致服务器返回消息,而WebSocket可以像其他TCP那样双向通信,灵活的多。如果服务端不支持Websocket协议升级或者连接失败conversejs会自动切换使用BOSH通信。如果使用https://www.websocket.org/echo.html来测试连接,需要遵循XMPP协议要求,先认证,否则连接会被关闭。conversejs的认证是在Websocket里面的做的,并不基于cookie之类的,所以一个浏览器打开多个聊天窗口登录不同的账户也是可以的


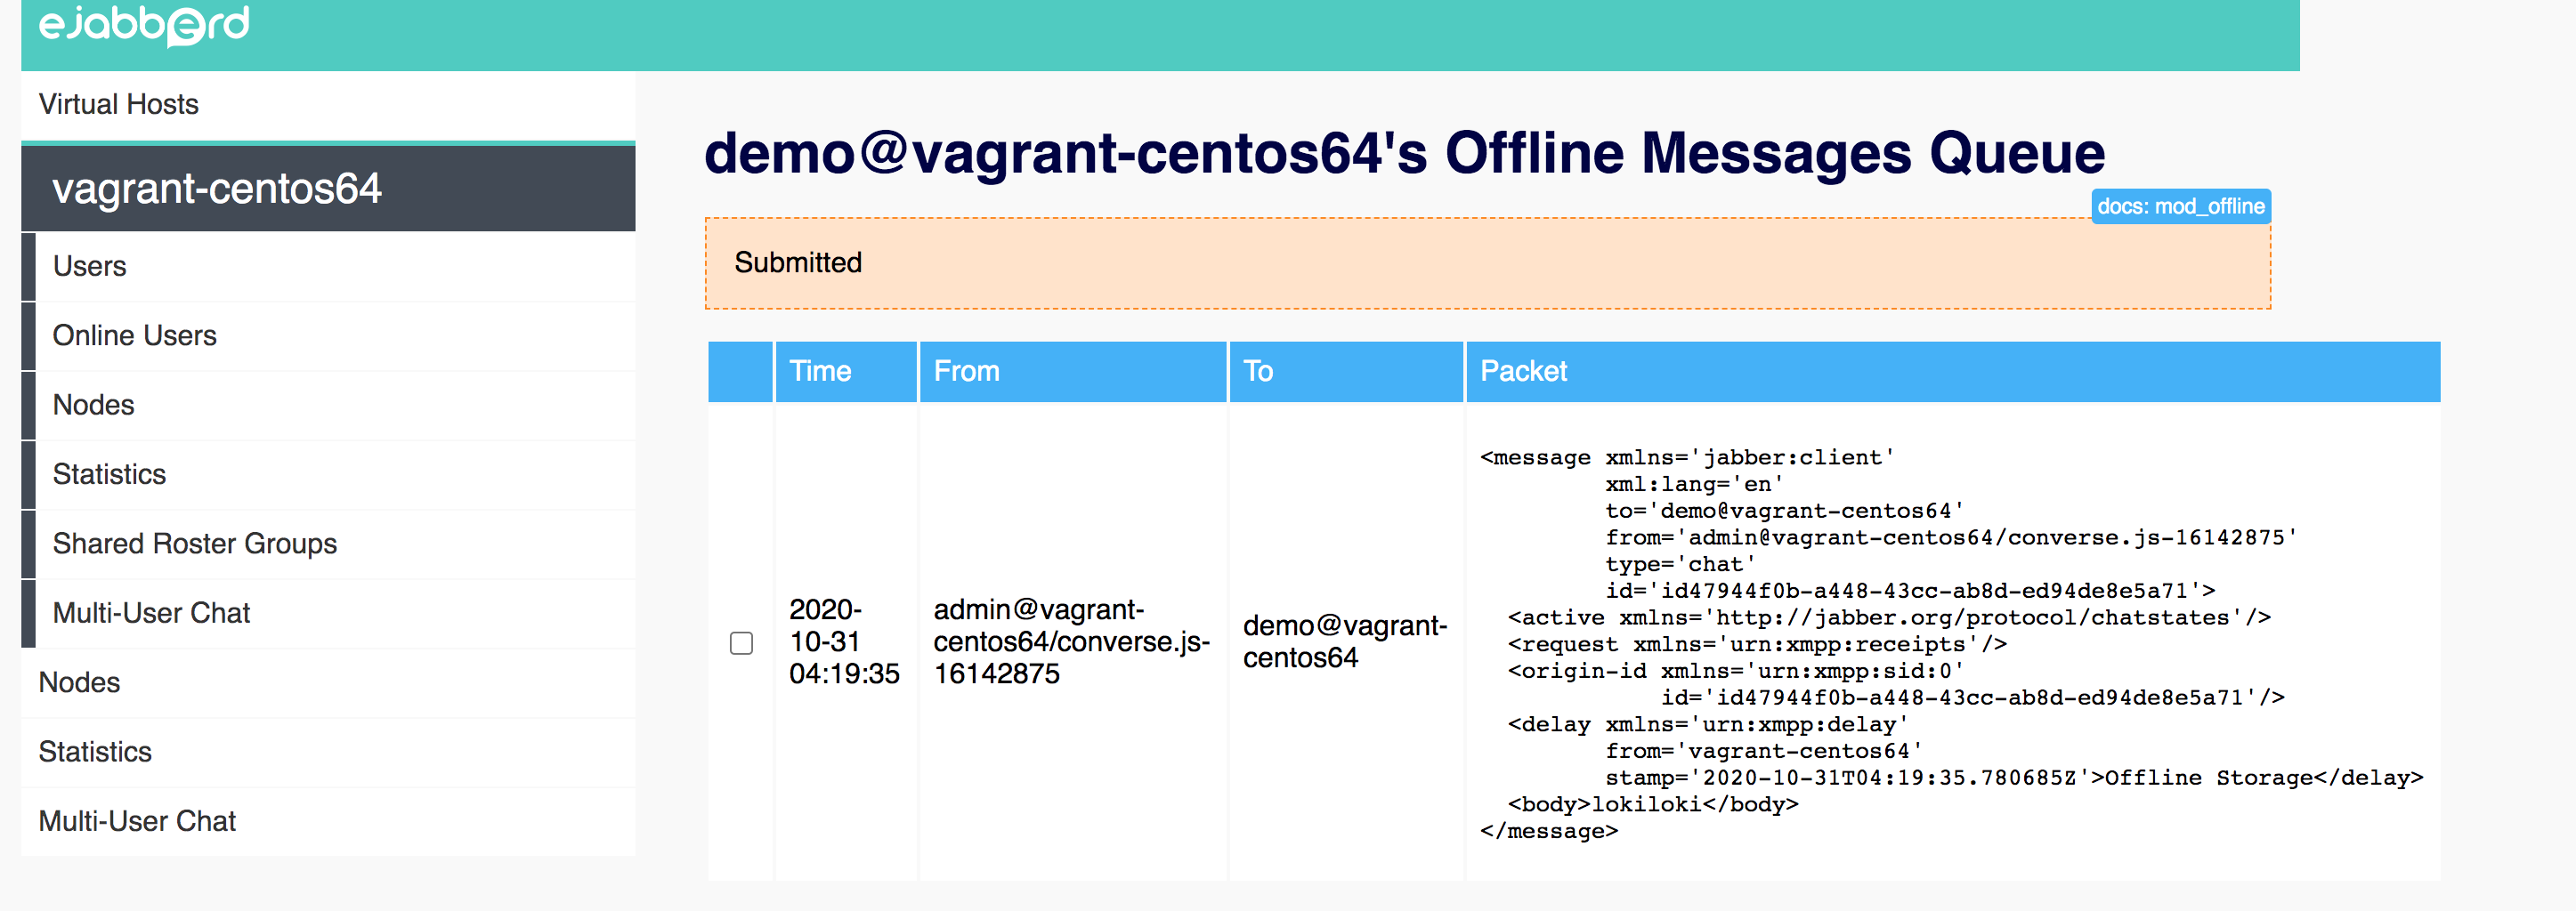
Ejabberd支持REST API来做交互比如查看在线用户、发送消息
➜  chat-example git:(master) ✗ curl -k https://192.168.33.14:5443/api/connected_users
["admin@vagrant-centos64/converse.js-16142875"]                                                                                                                                                                                                                              ➜  chat-example git:(master) ✗ curl -k https://192.168.33.14:5443/api/send_message -X POST -d '{"type":"headline","from":"test@vagrant-centos64","to":"admin@vagrant-centos64","subject":"Restart","body":"In 5 minutes"}'
这些API将大大增加ejabberd与第三方软件的交互。虽然ejabberd支持OAuth认证,但那是以ejabberd为账户中心的认证,方便其他系统调用ejabberd功能。通常即时通信只是内部系统的一部分,账户中心部署在其他地方,所以需要ejabberd支持外部的认证。前边已经配置ejabberd为数据库认证,还可以配置为使用LDAP认证。如果不满足,还可以配置为外部脚本认证或者使用第三方开发的HTTP认证。对于简单的内部交互,可以将认证服务的token刷新到ejabberd的数据库即可。
Openfire则是ignite realtime出品的Java实现的XMPP服务器,同时提供Java客户端Spark、Java开发库Smack,还提供Chrome扩展Pade。Openfire提供基于web的管理界面,支持LDAP登录及数据库存储。有一些功能Openfire并不直接支持,比如API,而是以扩展的形式支持,包括用户管理/分组管理/聊天室管理/消息广播/邮件监听/WebSocket/Meeting/Sip等等。
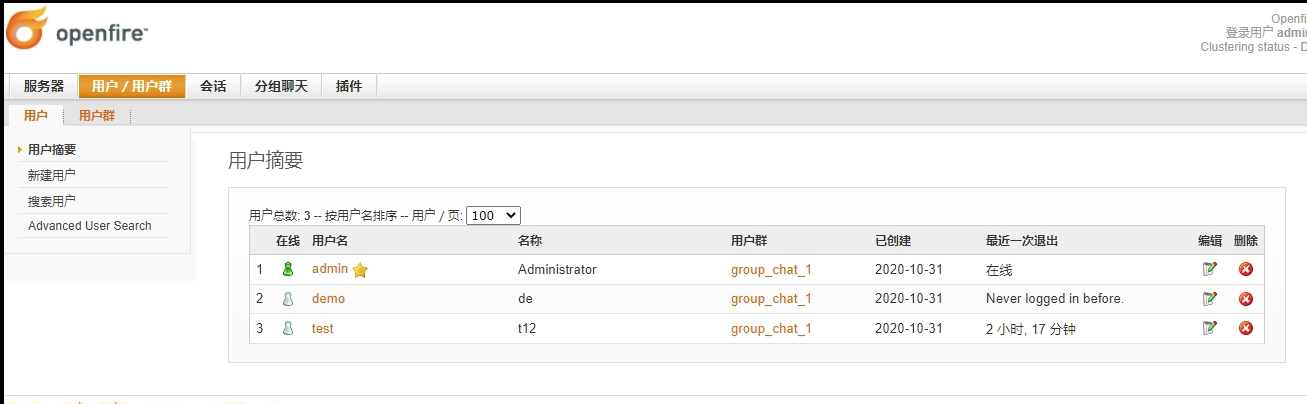
用户管理

配置用户分组,可以配置部门之类的,会出现在用户的个人分组里面(Spark)
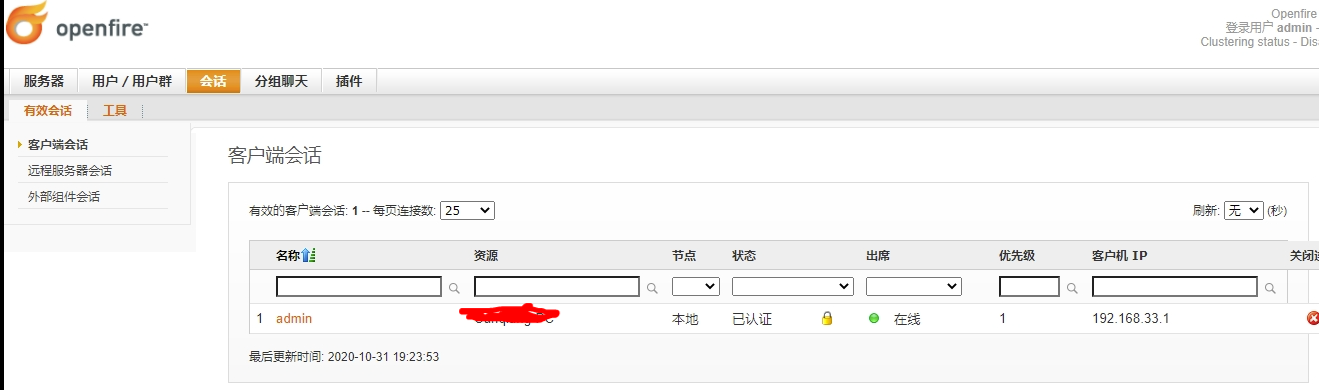
在线会话管理,可以踢人
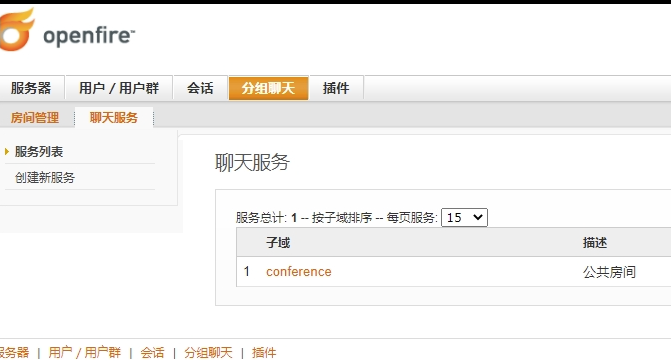
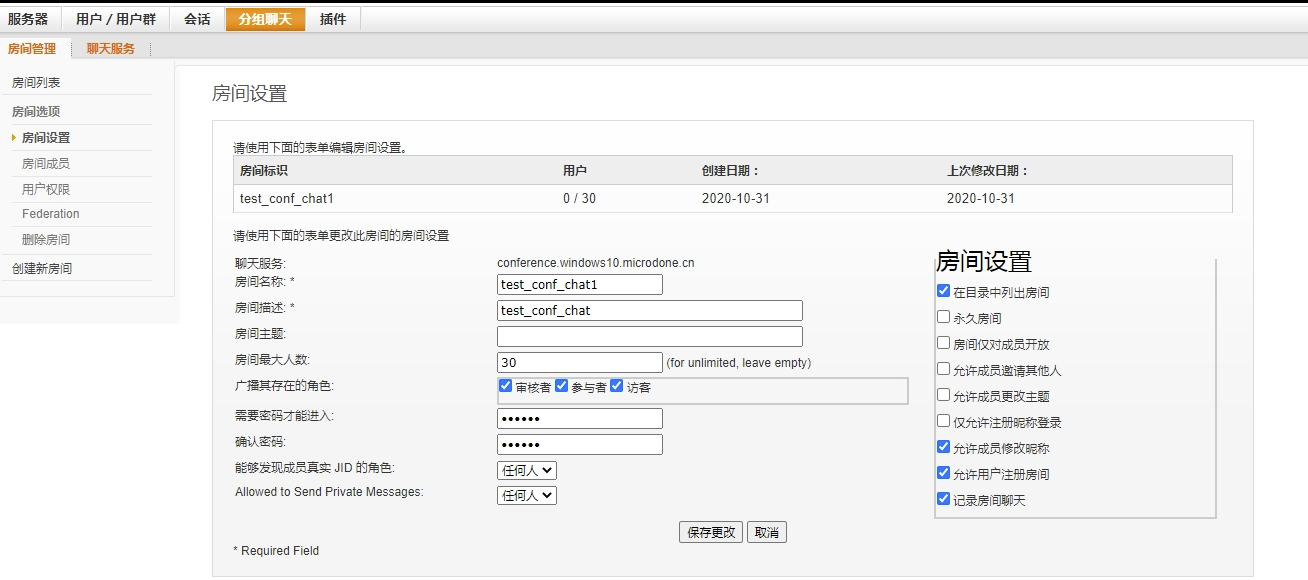
创建聊天室之前需要创建对应的service,默认的service叫conference。
Openfire的API并不支持OAuth/SSO,简单的1V1消息发送,聊天室消息订阅等等,需要自己基于Java扩展。
Ejabberd是采用Erlang开发的,一如消息队列服务器RabbitMQ,具有极高吞吐能力,提供REST API/XMl RPC,方便交互;Openfire则易于管理和扩展,采用哪个软件进行开发需要结合企业实际进行考量。
XMPP服务器主要提供消息聊天,对于语音服务可以使用SIP服务器实现,结合客户端sip.js,比如ctxSip。
参考链接:
TCP UDP探索
SIP(会话发起协议)