有时候虽然我们部署一个服务到了公网,但只想提供给部分用户而不想其他人(黑客/robot)使用,比如webhook或者跨机房的服务调用。虽然我们可以使用密码/token保护这些服务,但是程序可以被直接扫描到,仍然存在被攻击的风险。而如果把这些服务放在某个认证服务器后面,又存在二次登陆的问题。如何标识目标用户又不影响请求过程?答案是mTLS认证。
TLS认证是当前WEB通信的基石,没有加密的通信无异于裸奔:任何中间人都可以查看/串改通信内容。mTLS认证,亦即双向TLS认证,不但客户端校验服务器证书,服务器亦校验客户端证书,这意味着如果客户端证书不在服务器的信任列表里面,那么客户端也访问不了服务。请求认证过程如下
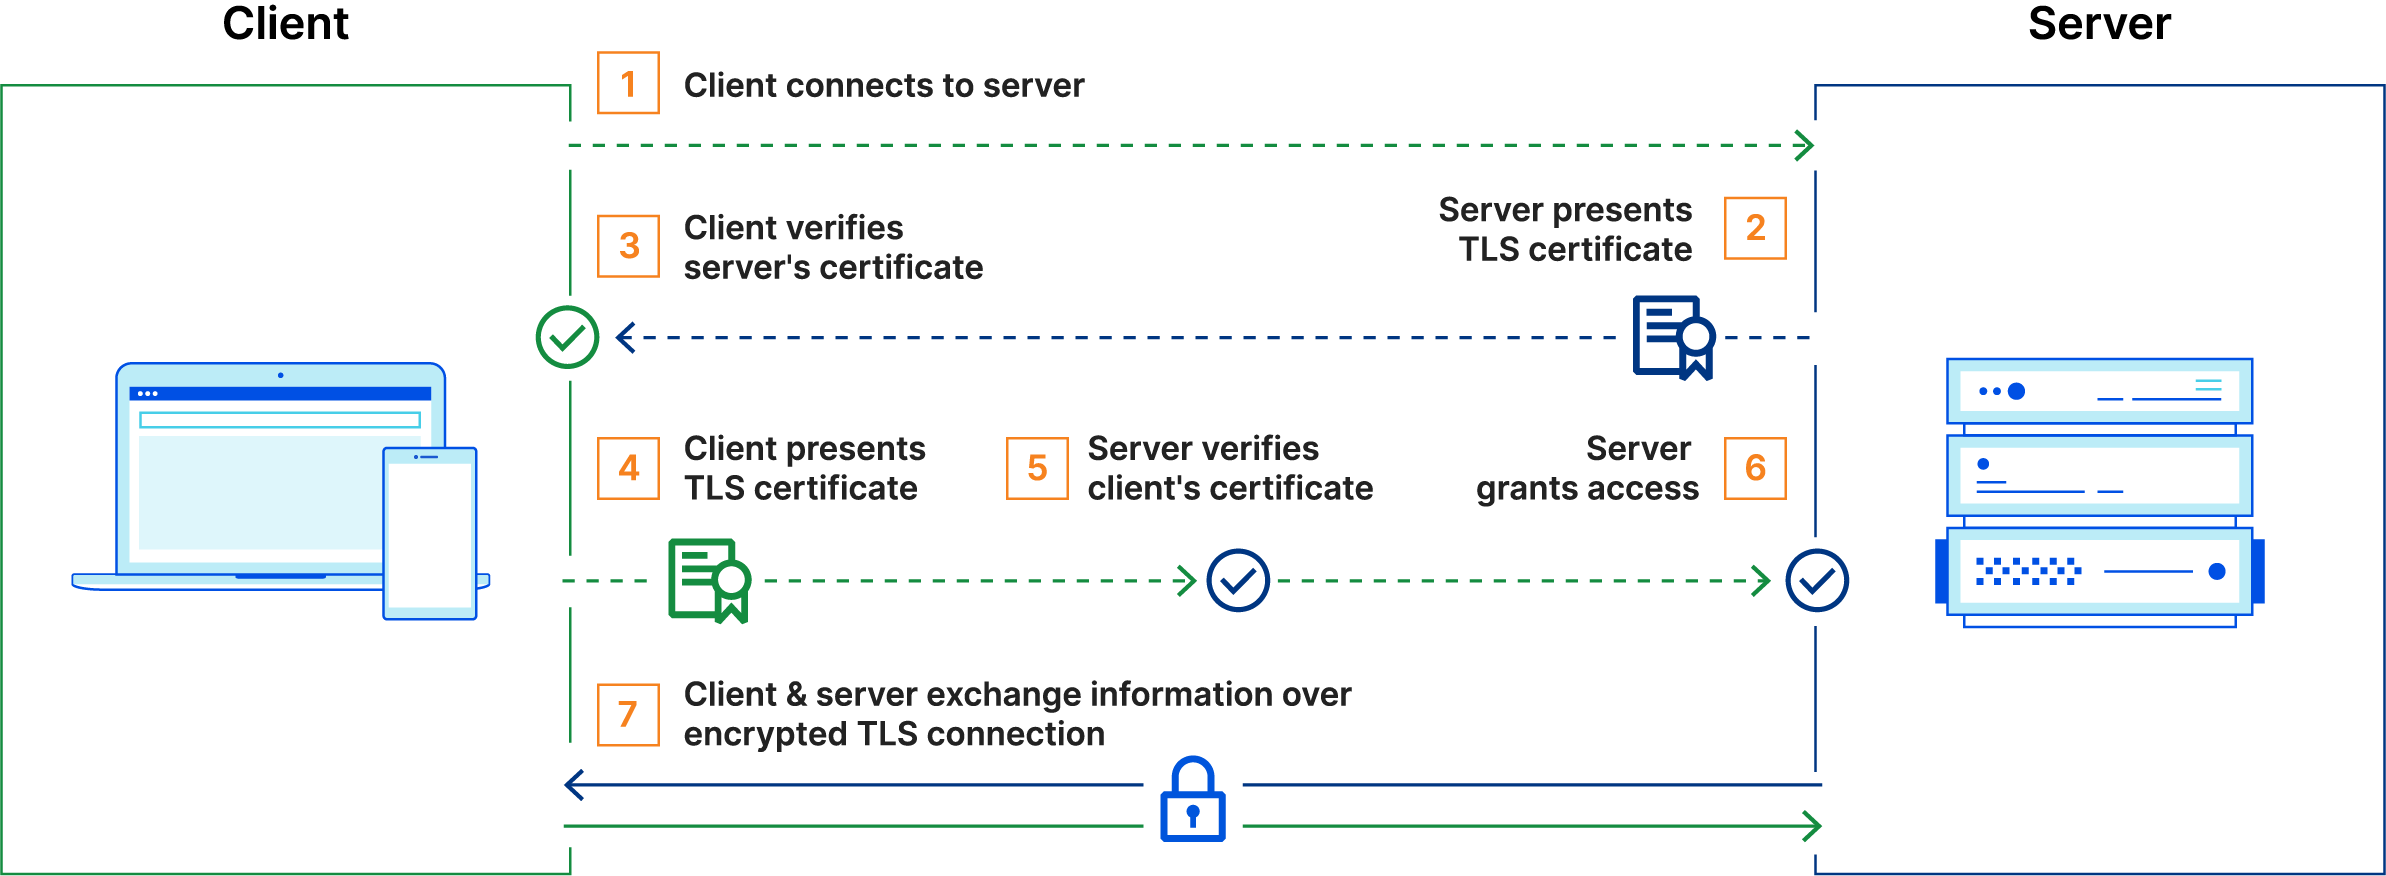
mTLS可以用来保护私有服务,加强通信过程,减少服务器攻击。由于客户端也需要提供证书,证书里面可以携带用户或者设备信息,可以识别仅授信用户,才授权访问 。由于服务器需要校验客户端信息,所以未提供有效证书用户不能访问,就算盗取了用户的密码/token也不可以。因为双方都互相校验证书,所以也可以抵抗中间人攻击。这样子我们便可以公开服务,但又限制某些用户使用了。
mTLS认证有别于应用程序认证。mTLS仅涉及证书校验,在网关出就可以进行,不需要涉及应用程序逻辑/数据库。mTLS也不依赖于请求头/请求体里面的内容,所以不会影响已有程序。
mTLS认证限制某些用户/设备访问,也有别于传统VPN网络。VPN总是要求服务端/客户端先建立连接,才能在同一内网内访问。一旦连接建立,便可以访问所有服务。而采用mTLS认证,则每一个服务都可以使用不同的客户端证书,限制不同的用户访问。零信任(ZeroTrust)亦建立在mTLS之上,即对每个请求都做双向认证。
mTLS并不是什么新鲜事物,许多互联网软件都支持,比如浏览器、SSH,SSH采用私钥登陆的过程,即双向认证:客户端先将自己的公钥上传至服务器,建立连接时,客户端询问是否信任服务器,服务器亦校验客户端。Git使用SSH key登陆也是类似双向认证。开发者调用Google云服务,除了app认证信息,也是需要双向认证的。有些互联网公司也采用双向认证来保护自己的应用,比如支付功能,甚至是所有页面-只允许自己的APP查看,其他免谈。
Nginx早已支持mTLS认证,除了服务器本身的证书,还需要配置客户端证书或其签发root CA证书。关于服务器证书获取之前已介绍基于DNS自动获取证书了,同样的方法也可以用来生成客户端证书,比如基于用户id来生成不同域名username.id.example.com的证书给客户端使用。这里介绍另外一种基于LEGO ACME在本地生成客户端证书的方法。
首先安装lego程序,如果有golang环境直接就好了,或者下载对应平台的程序。
$ go install github.com/go-acme/lego/v4/cmd/lego@latest
然后就可以基于DNS厂商来生成证书,这里以腾讯云DNS,注意它的APP Key是不同于DNSPod的。如果网络不加,建议延长TIMEOUT时间。这里一并生成浏览器/系统可用的PKCS12文件(.pfx)
$ TENCENTCLOUD_SECRET_ID=*** TENCENTCLOUD_PROPAGATION_TIMEOUT=120 TENCENTCLOUD_POLLING_INTERVAL=5 \
TENCENTCLOUD_SECRET_KEY=***\
lego --email [email protected] --pem --pfx --pfx.pass *** --cert.timeout 120 --dns tencentcloud --domains user1.idt.exmaple.com run

2023/04/08 11:42:46 [INFO] [user1.idt.exmaple.com] acme: Obtaining bundled SAN certificate
2023/04/08 11:42:47 [INFO] [user1.idt.exmaple.com] AuthURL: https://acme-v02.api.letsencrypt.org/acme/authz-v3/217627103547
2023/04/08 11:42:47 [INFO] [user1.idt.exmaple.com] acme: Could not find solver for: tls-alpn-01
2023/04/08 11:42:47 [INFO] [user1.idt.exmaple.com] acme: Could not find solver for: http-01
2023/04/08 11:42:47 [INFO] [user1.idt.exmaple.com] acme: use dns-01 solver
2023/04/08 11:42:47 [INFO] [user1.idt.exmaple.com] acme: Preparing to solve DNS-01
2023/04/08 11:42:50 [INFO] [user1.idt.exmaple.com] acme: Trying to solve DNS-01
2023/04/08 11:42:50 [INFO] [user1.idt.exmaple.com] acme: Checking DNS record propagation using [127.0.0.53:53]
2023/04/08 11:42:55 [INFO] Wait for propagation [timeout: 2m0s, interval: 5s]
2023/04/08 11:42:55 [INFO] [user1.idt.exmaple.com] acme: Waiting for DNS record propagation.
2023/04/08 11:43:01 [INFO] [user1.idt.exmaple.com] acme: Waiting for DNS record propagation.
2023/04/08 11:43:06 [INFO] [user1.idt.exmaple.com] acme: Waiting for DNS record propagation.
2023/04/08 11:43:11 [INFO] [user1.idt.exmaple.com] acme: Waiting for DNS record propagation.
2023/04/08 11:43:17 [INFO] [user1.idt.exmaple.com] acme: Waiting for DNS record propagation.
2023/04/08 11:43:22 [INFO] [user1.idt.exmaple.com] acme: Waiting for DNS record propagation.
2023/04/08 11:43:35 [INFO] [user1.idt.exmaple.com] The server validated our request
2023/04/08 11:43:35 [INFO] [user1.idt.exmaple.com] acme: Cleaning DNS-01 challenge
2023/04/08 11:43:37 [INFO] [user1.idt.exmaple.com] acme: Validations succeeded; requesting certificates
2023/04/08 11:43:39 [INFO] [user1.idt.exmaple.com] Server responded with a certificate.
$ ls -la .lego/certificates
total 40
drwx------ 2 channing channing 4096 4月 8 11:43 .
drwx------ 4 channing channing 4096 4月 8 10:58 ..
-rw------- 1 channing channing 5341 4月 8 11:43 user1.idt.exmaple.com.crt
-rw------- 1 channing channing 3751 4月 8 11:43 user1.idt.exmaple.com.issuer.crt
-rw------- 1 channing channing 244 4月 8 11:43 user1.idt.exmaple.com.json
-rw------- 1 channing channing 227 4月 8 11:43 user1.idt.exmaple.com.key
-rw------- 1 channing channing 5568 4月 8 11:43 user1.idt.exmaple.com.pem
-rw------- 1 channing channing 2992 4月 8 11:43 user1.idt.exmaple.com.pfx
由于这个证书的CA是Let’s Encrypt的,而Let’s Encrypt本身的证书又是Internet Security Research Group签发。而当Nginx配置ssl_client_certificate CA证书时只能是Root CA,也就是ISRG的证书,而不是中间厂商的证书,也就是不能用Let’s Encrypt的CA证书。ISRG的证书可以从浏览器导出或者网上下载,然后保存到服务器上
$ mv isrg_root.crt /etc/nginx/certs/
$ chomd 400 etc/nginx/certs/isrg_root.crt
Nginx配置如下,可以将日志级别设置为debug,调试/观察认证
$ vim /etc/nginx/conf.d/site-available/100-mtls.example.com
server {
    listen 80;
    server_name mtls.example.com;
    return 301 https://$host$request_uri;
}

server {

    listen 443 ssl;
    server_name mtls.example.com;

    ssl_certificate           /etc/letsencrypt/live/example.com/fullchain.pem;
    ssl_certificate_key       /etc/letsencrypt/live/example.com/privkey.pem;
    ssl_client_certificate    /etc/nginx/conf.d/certs/isrg_root.crt;
    ssl_verify_client on;
    ssl_verify_depth 2;

    ssl_session_cache  builtin:1000  shared:SSL:10m;
    ssl_protocols  TLSv1 TLSv1.1 TLSv1.2;
    ssl_ciphers HIGH:!aNULL:!eNULL:!EXPORT:!CAMELLIA:!DES:!MD5:!PSK:!RC4;
    ssl_prefer_server_ciphers on;
#    error_log /var/log/nginx/error.log debug;
    location / {
        root  /var/www/mtls.example.com/html;
        index  index.html index.htm;
    }
    error_page  500 502 503 504  /50x.html;
    location = /50x.html {
        root  /usr/share/nginx/html;
    }
}
使用curl测试一下,提示需要客户端证书
curl https://mtls.example.com
<html>
  <head>
    <title>400 No required SSL certificate was sent</title>
  </head>

  <body bgcolor="white">
    <center>
      <h1>400 Bad Request</h1>
    </center>
    <center>No required SSL certificate was sent</center>
    <hr>
    <center>nginx/1.14.0</center>
  </body>
</html>
当带上证书的时候就可以了
curl --cert user1.idt.exmaple.com.crt --key user1.idt.exmaple.com.key https://mtls.example.com
<html>
<head>
<title>Welcome to mtls.example.com!</title>
</head>
<body>
<h1>Success! The mtls server is working!</h1>
</body>
</html>
使用浏览器访问目标网站需要安装.pfx文件,否则也会报错,禁止访问。通常Windows/Mac双击.pfx文件即可自动安,也可以通过浏览器配置来安装。使用Chrome需要在从菜单设置->隐私设置和安全性->安全->管理设备证书->个人->导入。使用Firefox则是从从菜单设置->隐私与安全->安全->查看证书->您的证书->导入。iOS和Android可以通过邮件的方式将.pfx文件传输到手机上,点击.pfx文件按照系统提示安装即可。最后使用浏览器打开https://mtls.example.com,会提示使用刚才配置好的证书,选择即可。
上面Nginx配置的是公共CA的根证书(isrg_root.crt),这意味着所有该CA签发的证书都将可以访问https://mtls.example.com,这有点太开放了。如果我们自己生成Root CA证书,便可以做进一步的控制。
首先生成Root CA证书
$ openssl genrsa -des3 -out ca.key 4096
Enter PEM pass phrase:
Verifying - Enter PEM pass phrase:
$ openssl req -new -x509 -days 3650 -key ca.key -out ca.crt39:06
Enter pass phrase for ca.key:
You are about to be asked to enter information that will be incorporated
into your certificate request.
What you are about to enter is what is called a Distinguished Name or a DN.
There are quite a few fields but you can leave some blank
For some fields there will be a default value,
If you enter '.', the field will be left blank.
-----
Country Name (2 letter code) [AU]:
State or Province Name (full name) [Some-State]:
Locality Name (eg, city) []:
Organization Name (eg, company) [Internet Widgits Pty Ltd]:
Organizational Unit Name (eg, section) []:
Common Name (e.g. server FQDN or YOUR name) []:
Email Address []:

$ cat ca.key > ca.pem
$ cat ca.crt >> ca.pem
$ ls
ca.crt ca.key ca.pem
然后使用CA证书生成客户端
$ openssl genrsa -out user1.key
Enter PEM pass phrase:
$ openssl req -new -key user1.key -out user1.csr
You are about to be asked to enter information that will be incorporated
into your certificate request.
What you are about to enter is what is called a Distinguished Name or a DN.
There are quite a few fields but you can leave some blank
For some fields there will be a default value,
If you enter '.', the field will be left blank.
-----
Country Name (2 letter code) [AU]:
State or Province Name (full name) [Some-State]:
Locality Name (eg, city) []:
Organization Name (eg, company) [Internet Widgits Pty Ltd]:
Organizational Unit Name (eg, section) []:
Common Name (e.g. server FQDN or YOUR name) []:
Email Address []:

Please enter the following 'extra' attributes
to be sent with your certificate request
A challenge password []:
An optional company name []:
$ openssl x509 -req -days 365 -in user1.csr -CA ca.crt -CAkey ca.key -set_serial 01 -out user1.crt
Certificate request self-signature ok
Enter pass phrase for ca.key:
$ openssl pkcs12 -export -out user1.pfx -inkey user1.key -in user1.crt -certfile ca.crt
Enter Export Password:
Verifying - Enter Export Password:
然后将ca.crt上传至服务器/etc/nginx/certs/下面并配置ssl_client_certificate使用该证书即可。使用curl测试一下
curl --cert user1.crt --key user1.key https://mtls.example.com
<html>
<head>
<title>Welcome to mtls.example.com!</title>
</head>
<body>
<h1>Success! The mtls server is working!</h1>
</body>
</html>
同样可以成功访问。不过刚才生成的.pfx文件只有Firefox可以导入使用,其他系统/浏览器不可以,那么可以从Firefox中重新备份导出该文件,Chrome/其他系统就可以使用了。或者重新转换一下
openssl pkcs12 -in user1.pfx -out user1.pem -nodes #pfx证书转换为x.509格式的pem证书
openssl pkcs12 -in user1.pfx -nocerts -nodes -out user1.key #pfx证书中提取密钥对
openssl rsa -in user1.key -out user1_private.key #密钥对提取私钥
openssl pkcs12 -export -in user1.pem -inkey user1_private.key -out user1.pfx #使用x.509+私钥转换为win10可用的pfx证书
使用自定义CA可以有效控制证书的签发,也可以免CA直接签发客户端证书
$ openssl req -x509 -nodes -days 9999 -newkey rsa:2048 -keyout user2.key -out user2.crt
..+...+...
-----
You are about to be asked to enter information that will be incorporated
into your certificate request.
What you are about to enter is what is called a Distinguished Name or a DN.
There are quite a few fields but you can leave some blank
For some fields there will be a default value,
If you enter '.', the field will be left blank.
-----
Country Name (2 letter code) [AU]:
State or Province Name (full name) [Some-State]:
Locality Name (eg, city) []:
Organization Name (eg, company) [Internet Widgits Pty Ltd]:
Organizational Unit Name (eg, section) []:
Common Name (e.g. server FQDN or YOUR name) []:
Email Address []
无CA签名的证书,就直接将user2.crt上传至服务器/etc/nginx/certs/下面并配置ssl_client_certificate使用该证书即可。如果生成了多个,就合并成一个上传服务器就好了。使用curl测试一下,也是可以的
curl --cert user2.crt --key user2.key https://mtls.example.com
<html>
<head>
<title>Welcome to mtls.example.com!</title>
</head>
<body>
<h1>Success! The mtls server is working!</h1>
</body>
</html>
Nginx还支持将客户端证书及CA的DN传递给后端程序,再配合访问控制,便可以精细控制用户访问了。Nginx配置如下,注意这里ssl_verify_client是optional,认证失败不再返回400而是403
$ vim /etc/nginx/conf.d/site-available/100-mtls.example.com
server {
    listen 443 ssl;
    server_name mtls.example.com;

    ssl_certificate           /etc/letsencrypt/live/example.comfullchain.pem;
    ssl_certificate_key       /etc/letsencrypt/live/example.com/privkey.pem;
    ssl_client_certificate    /etc/nginx/conf.d/certs/ca.crt;
    ssl_verify_client optional;
    ssl_verify_depth 2;

    ssl_session_cache  builtin:1000  shared:SSL:10m;
    ssl_protocols  TLSv1 TLSv1.1 TLSv1.2;
    ssl_ciphers HIGH:!aNULL:!eNULL:!EXPORT:!CAMELLIA:!DES:!MD5:!PSK:!RC4;
    ssl_prefer_server_ciphers on;
#    error_log /var/log/nginx/error.log debug;
    location / {
#        if ($ssl_client_i_dn != "/C=EX/CN=Client/[email protected]") {
#          return 403;
#        }
        if ($ssl_client_verify != SUCCESS) { return 403; }
        proxy_set_header     SSL_Client_Issuer $ssl_client_i_dn;
        proxy_set_header     SSL_Client $ssl_client_s_dn;
        proxy_set_header     SSL_Client_Verify $ssl_client_verify;
        proxy_pass           http://127.0.0.1:3000/;
    }
    error_page  500 502 503 504  /50x.html;
    location = /50x.html {
        root  /usr/share/nginx/html;
    }
}
➜
NodeJS代码如下
const express = require('express');

const port = 3000;
const host = '127.0.0.1';
const options = { };

const app = express();

app.get('/', (req, res) => {
    res.status(200)
        .json(`Hello ${req.header("ssl_client")}, your certificate was issued by ${req.header("SSL_Client_Issuer")}!`);
});
app.listen(port, host, () => {
  console.log("listening");
})
使用curl测试一下便会输出客户端DN。
$ curl --cert user1.crt --key user1.key https://mtls.example.com/
"Hello emailAddress=user1@example,CN=exmaple,OU=server,C=exmaple, your certificate was issued by emailAddress=user1@example,CN=exmaple,OU=user1,C=exmaple!"
事实上不仅Nginx支持设置客户端认证,Kong网关,云原生应用传输traefik等也早已支持,编程语言层面更是支持开发mTLS应用了。
参考链接:
What is mutual TLS (mTLS)?
Mutual authentication
mTLS Golang Example
How to configure certification based client authentication with Nginx ?
How To Implement Two Way SSL With Nginx
mTLS with node
mTLS with NGINX and NodeJS
LEGO
Firefox导出PFX证书在Win10导入提示密码错误
NGinx SSL certificate authentication signed by intermediate CA (chain)