从前开发一个互联网服务程序,大概可以在一台机器上完成:数据库、应用都在一起。随着业务发展壮大,会把数据库独立出来,以便扩展拆分。然后再把一部分公用业务独立出来扩展,譬如文件存储、缓存等。接着业务也才拆分,比如会员、商品。微服务大行其道,各个团队维护着许多服务、API。这么多服务,前端业务逻辑该怎么接入呢?
如今单一的前端UI也可能是多个团队共同开发的结果。当你在本地开发一个小功能时,甚至会牵扯到多个前端UI/后端API。一个前端页面除了加载自己的资源外,还加载V2/V3的API(为什么会同时存在V1/V2/V3的API),甚至嵌入了另外一个页面(React看起来也不错),该怎么调试这种混合开发呢?cookie都传递不过去,好吧,使用JWT代替,再设置一下跨源资源共享(CORS)。。。但是那些旧的应用怎么办?
当我们启动一个Node.js应用时npm run start,默认监听3000端口。当然我们也可以让它监听80端口。但是当我们多开几个应用时,只好让它们都监听不同端口了,怎么样才能统一端口监听呢?当然Node.js可以通过诸如node-http-proxy来转发这些请求,但是代理转发跟应用业务无关吧?如果是其他编程语言呢?都重复这些代理配置/开发吗?Don’t Repeat Yourself。
Faas也日渐流行,比如AWS Lambda, 强调仅仅专注某个功能,根据事件驱动进行计算,那么每个服务也要开发一整套路由分发/认证/日志吗?
这些问题可以使用反向代理来解决,提供统一的服务入口,对前端/客户端隐藏背后的细节,最简单的当然是Nginx。Nginx监听来自某个端口(比如80)的请求,然后根据不同的来源/端口/域名/url分发给不同的后端服务器。这看起来跟云服务厂商各自开发的负载均衡器差不多,比如AWS ELB。
在本地开发的时候,我们当然不会使用ELB来解决。直接使用Nginx当然也没啥问题,编辑一下配置文件,重启应用。但是如果有个UI就更好了,如果还有API就非常好了-这样就能方便的在线注册/更改路由而不需要重启服务器,在这个快速发展、弹性开发的年代更需要这个能力。
Kong是一个基于OpenResty的网关服务器,可以进行路由(转发/负载),插件(日志/认证/监控)管理,并提供RESTful API。而OpenResty 是一个基于Nginx与Lua的高性能Web平台,使用Lua来构建动态网关。听起来像是在Nginx上面编程,这跟在Apache上面使用PHP模块进行编程有什么区别?最大的区别在于,这里的编程对象是Nginx(或者公共模块),扩展Nginx能力,比如负载均衡/日志/认证/监控,而不是输出web页面/业务逻辑。这些东西抽出来以后,就不需要每个模块再重复开发了,比如认证/安全。
在本地可以使用docker来运行Kong服务,麻烦在于数据库迁移工作。通常部署Kong需要几个步骤,比如初始化数据库,迁移升级等等。网上的配置大都过时了,这里可以使用官方提供docker-compose.yml来做数据库工作,并且使用Konga作为管理UI
➜  kong ls
POSTGRES_PASSWORD         data                      docker-compose.yml
➜  kong ls data
postgresql
➜  kong cat POSTGRES_PASSWORD
kong
➜  kong cat docker-compose.yml
version: '3.7'

volumes:
  kong_data: {}

networks:
  kong-net:
    external: false

services:
  kong-migrations:
    image: "${KONG_DOCKER_TAG:-kong:latest}"
    command: kong migrations bootstrap
    depends_on:
      - db
    environment:
      KONG_DATABASE: postgres
      KONG_PG_DATABASE: ${KONG_PG_DATABASE:-kong}
      KONG_PG_HOST: db
      KONG_PG_USER: ${KONG_PG_USER:-kong}
      KONG_PG_PASSWORD_FILE: /run/secrets/kong_postgres_password
    secrets:
      - kong_postgres_password
    networks:
      - kong-net
    restart: on-failure
    deploy:
      restart_policy:
        condition: on-failure

  kong-migrations-up:
    image: "${KONG_DOCKER_TAG:-kong:latest}"
    command: kong migrations up && kong migrations finish
    depends_on:
      - db
    environment:
      KONG_DATABASE: postgres
      KONG_PG_DATABASE: ${KONG_PG_DATABASE:-kong}
      KONG_PG_HOST: db
      KONG_PG_USER: ${KONG_PG_USER:-kong}
      KONG_PG_PASSWORD_FILE: /run/secrets/kong_postgres_password
    secrets:
      - kong_postgres_password
    networks:
      - kong-net
    restart: on-failure
    deploy:
      restart_policy:
        condition: on-failure

  kong:
    image: "${KONG_DOCKER_TAG:-kong:latest}"
    user: "${KONG_USER:-kong}"
    depends_on:
      - db
    environment:
      KONG_ADMIN_ACCESS_LOG: /dev/stdout
      KONG_ADMIN_ERROR_LOG: /dev/stderr
      KONG_ADMIN_LISTEN: '0.0.0.0:8001'
      KONG_CASSANDRA_CONTACT_POINTS: db
      KONG_DATABASE: postgres
      KONG_PG_DATABASE: ${KONG_PG_DATABASE:-kong}
      KONG_PG_HOST: db
      KONG_PG_USER: ${KONG_PG_USER:-kong}
      KONG_PROXY_ACCESS_LOG: /dev/stdout
      KONG_PROXY_ERROR_LOG: /dev/stderr
      KONG_PG_PASSWORD_FILE: /run/secrets/kong_postgres_password
    secrets:
      - kong_postgres_password
    networks:
      - kong-net
    ports:
      - "8000:8000/tcp"
      - "127.0.0.1:8001:8001/tcp"
      - "8443:8443/tcp"
      - "127.0.0.1:8444:8444/tcp"
    healthcheck:
      test: ["CMD", "kong", "health"]
      interval: 10s
      timeout: 10s
      retries: 10
    restart: on-failure
    deploy:
      restart_policy:
        condition: on-failure

  db:
    image: postgres:9.5
    environment:
      POSTGRES_DB: ${KONG_PG_DATABASE:-kong}
      POSTGRES_USER: ${KONG_PG_USER:-kong}
      POSTGRES_PASSWORD_FILE: /run/secrets/kong_postgres_password
    secrets:
      - kong_postgres_password
    healthcheck:
      test: ["CMD", "pg_isready", "-U", "${KONG_PG_USER:-kong}"]
      interval: 30s
      timeout: 30s
      retries: 3
    restart: on-failure
    deploy:
      restart_policy:
        condition: on-failure
    stdin_open: true
    tty: true
    networks:
      - kong-net
    volumes:
      - /Users/xxxx/docker/kong/data/postgresql:/var/lib/postgresql/data

  konga:
    image: pantsel/konga
    environment:
      TOKEN_SECRET: channing.token
      DB_ADAPTER: postgres
      DB_HOST: db
      DB_USER: ${KONG_PG_USER:-kong}
      DB_PASSWORD: kong
      DB_DATABASE: ${KONG_PG_DATABASE:-kong}
    ports:
     - 1337:1337
    networks:
     - kong-net

    depends_on:
      - db

secrets:
  kong_postgres_password:
    file: ./POSTGRES_PASSWORD
运行docker-composer up就可以看到
➜  kong docker ps
CONTAINER ID        IMAGE                             COMMAND                  CREATED             STATUS                             PORTS                                                                                                NAMES
20ebe7885c0d        kong:latest                       "/docker-entrypoint.…"   2 hours ago         Up 11 seconds (healthy)            0.0.0.0:8000->8000/tcp, 127.0.0.1:8001->8001/tcp, 0.0.0.0:8443->8443/tcp, 127.0.0.1:8444->8444/tcp   kong_kong_1
4a7a39c863ae        pantsel/konga                     "/app/start.sh"          2 hours ago         Up 11 seconds                      0.0.0.0:1337->1337/tcp                                                                               kong_konga_1
aa732758fc51        postgres:9.5                      "docker-entrypoint.s…"   2 hours ago         Up 11 seconds (health: starting)   5432/tcp                                                                                             kong_db_1
访问http://127.0.0.1:1337/即可以进入Konga 管理界面了。8000/8443端口是需要监听转发的端口,8001/8444则是Kong RESTFUl管理API的端口。这里也可以把8000/8443改为80/443,这样访问的时候就可以直接使用域名/localhost而不必加端口了。
注册登录进去后首先要添加Kong RESTFUl管理API的地址,这里使用的是docker环境,IP是动态分配的,所以使用链接名就可以了
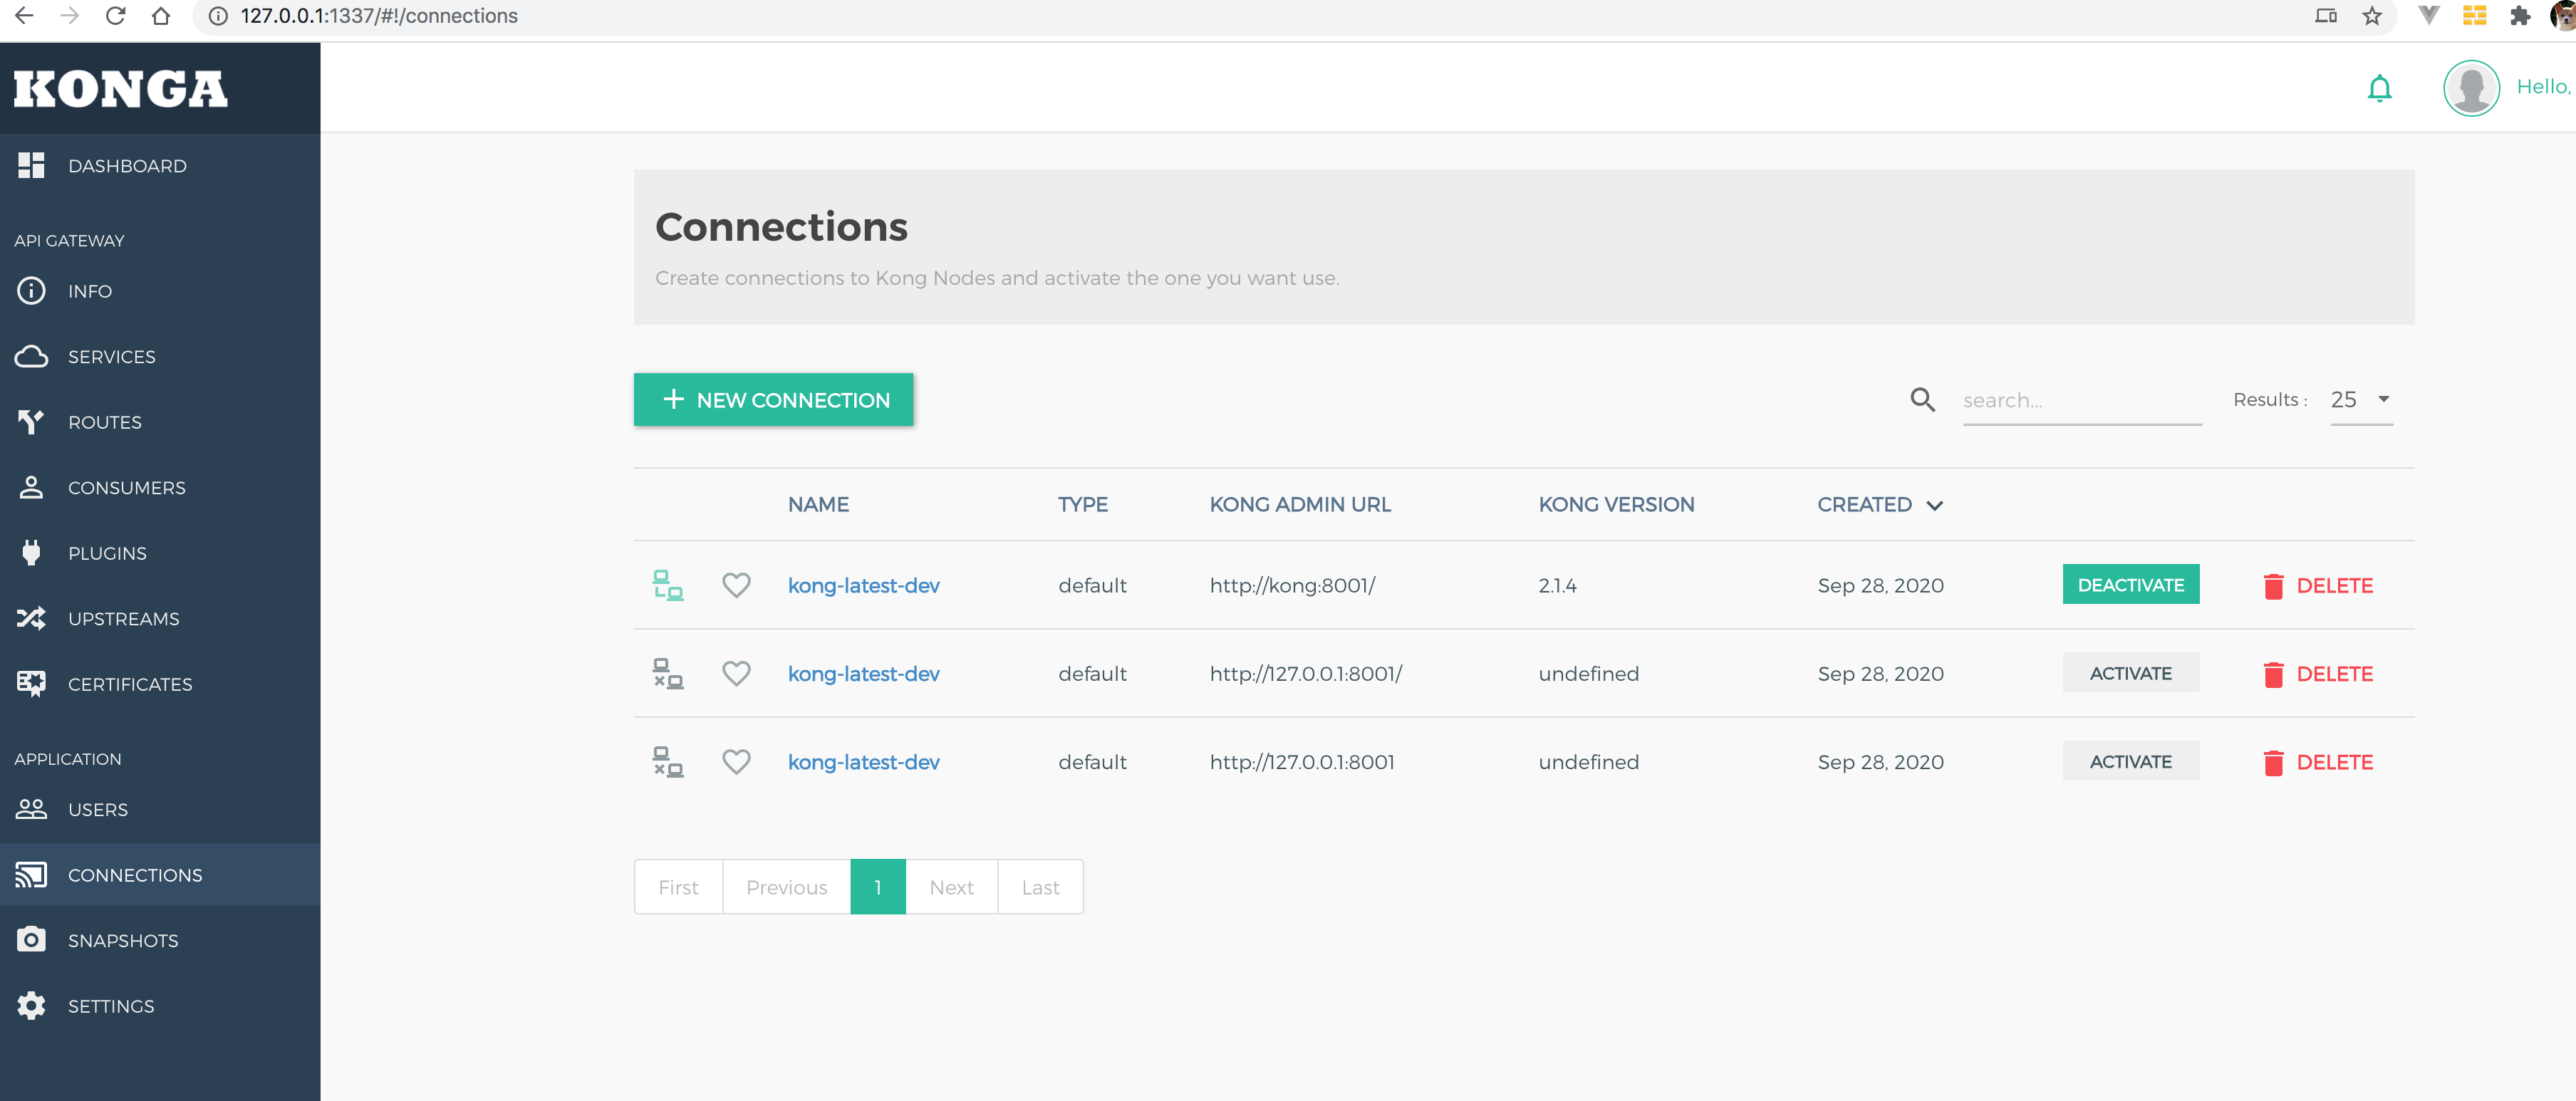
连接上Kong API后可以看到dashboard列出了支持的插件

Kong里面的管理对象是service,路由转发/插件都是围绕service展开的,添加一个service
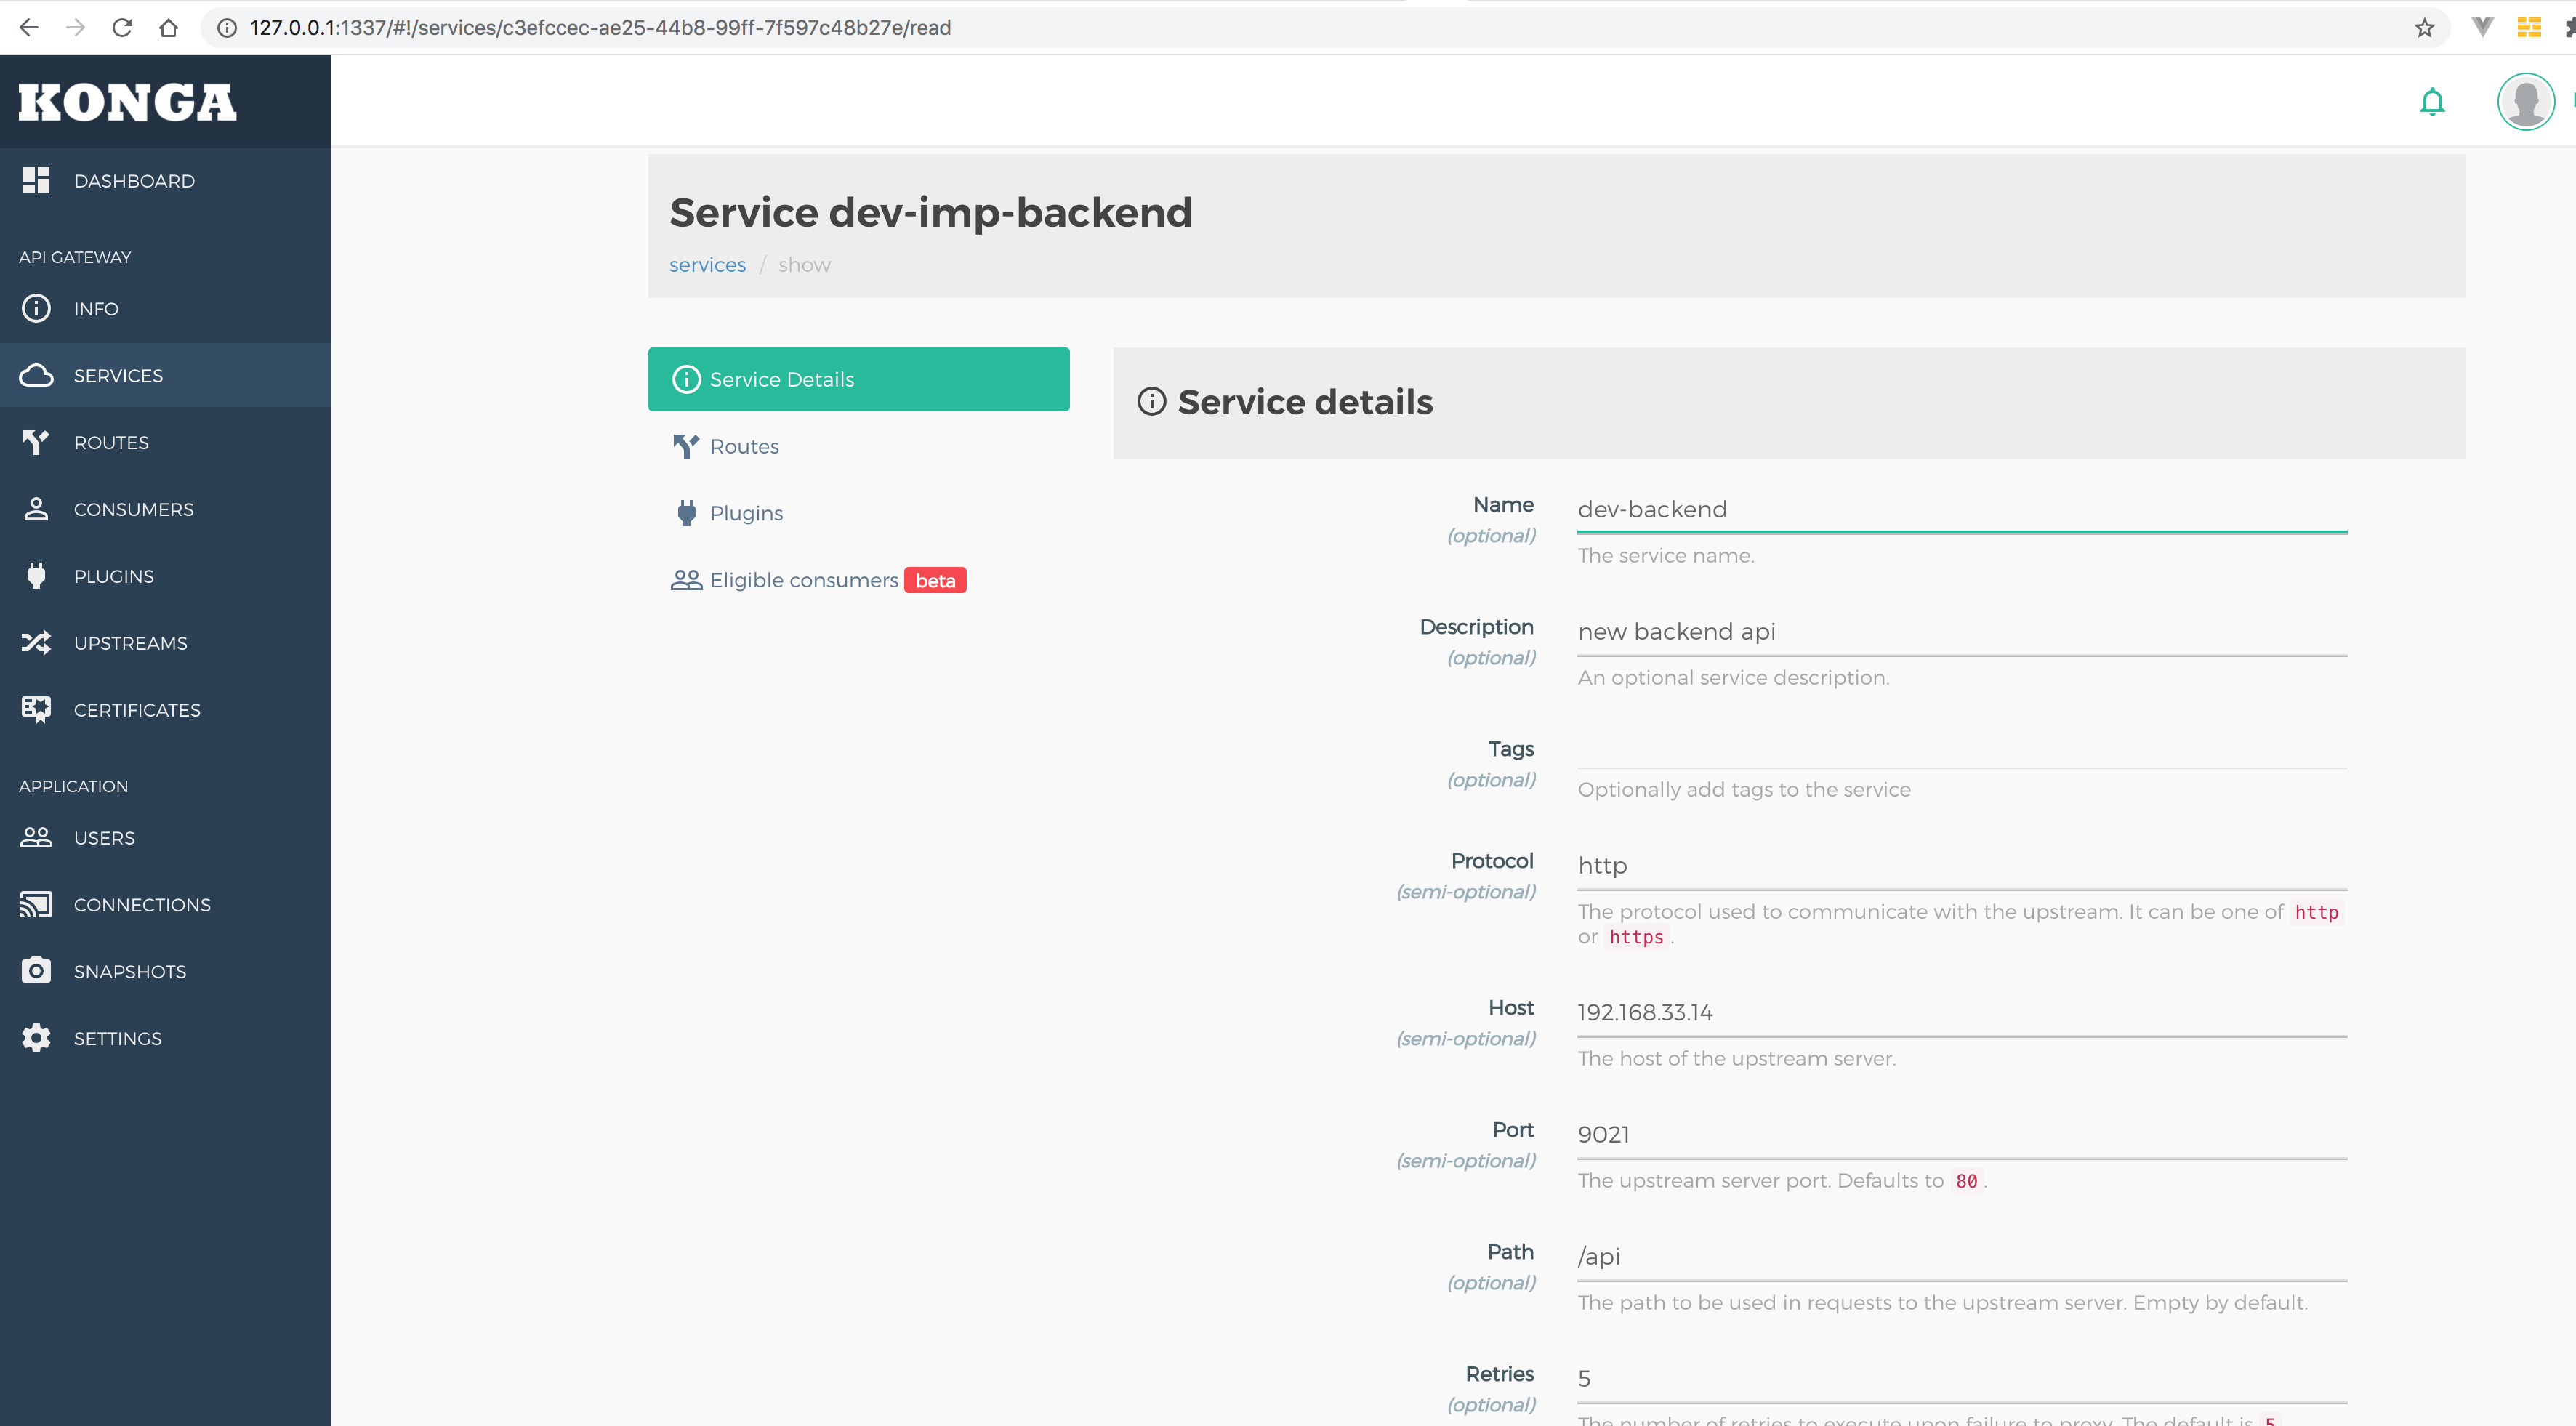
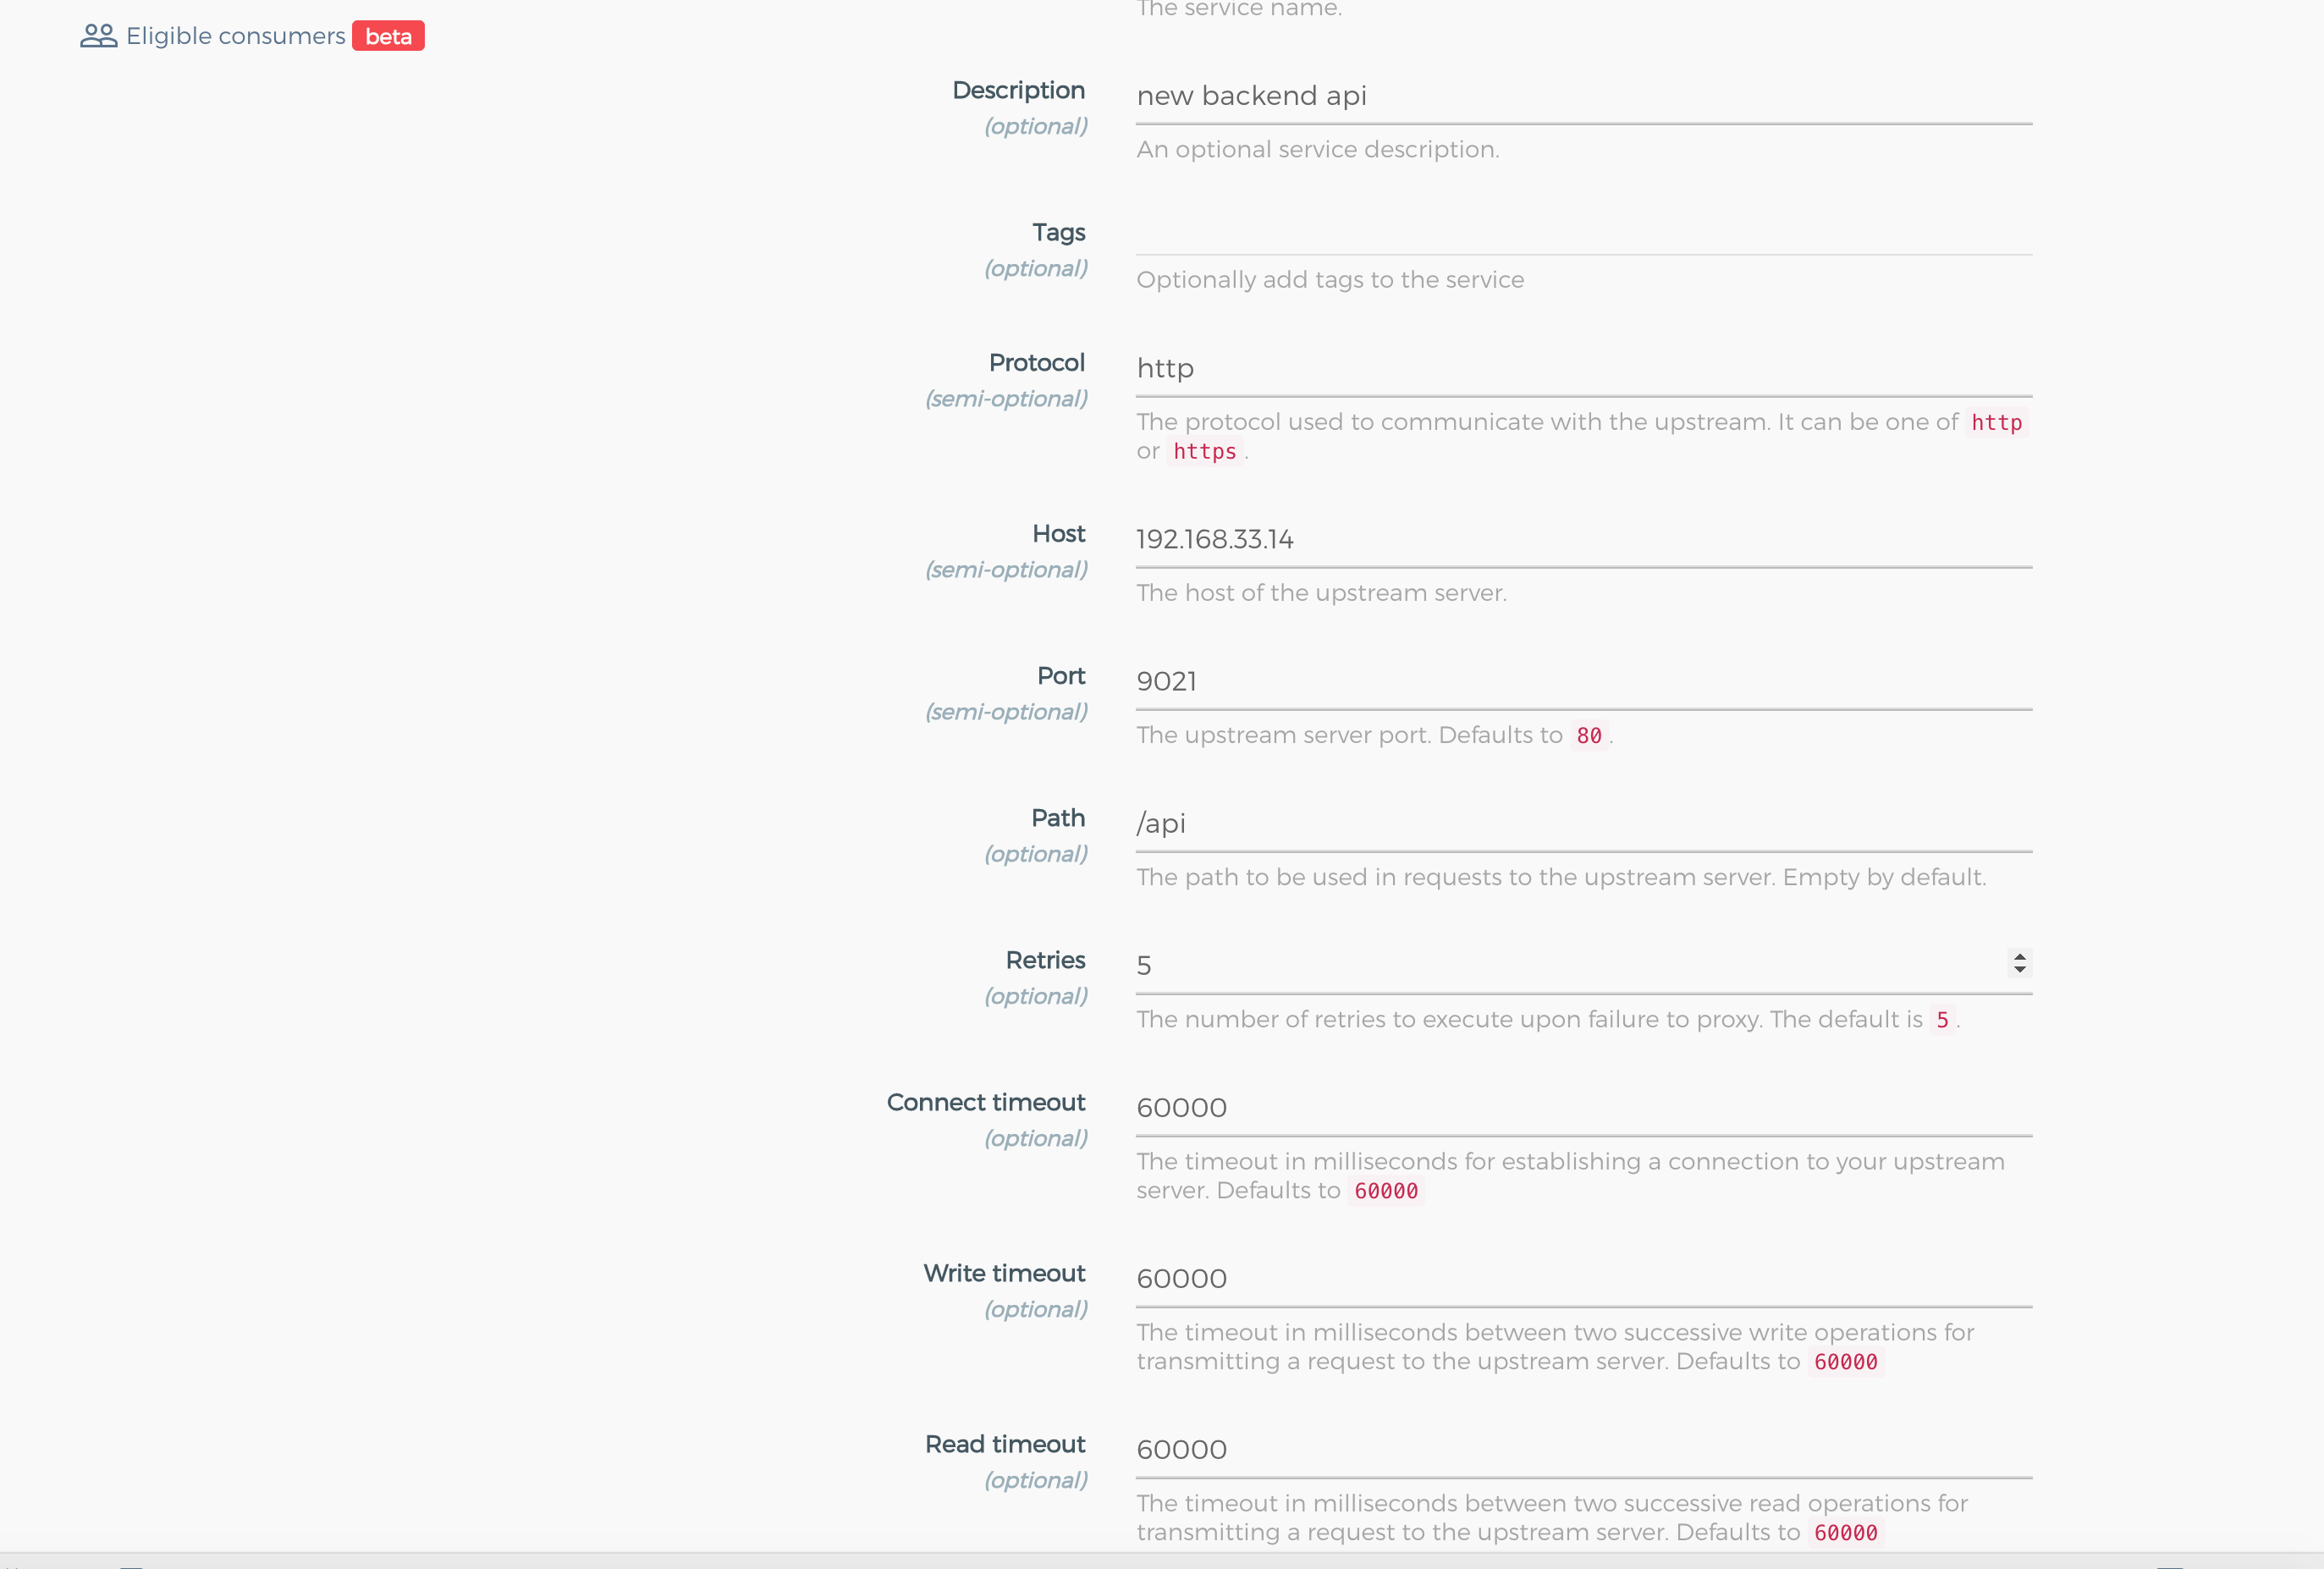
在它上面添加一个路由,这里我们在服务只监听以/api开头的url,并转发到后端服务器去
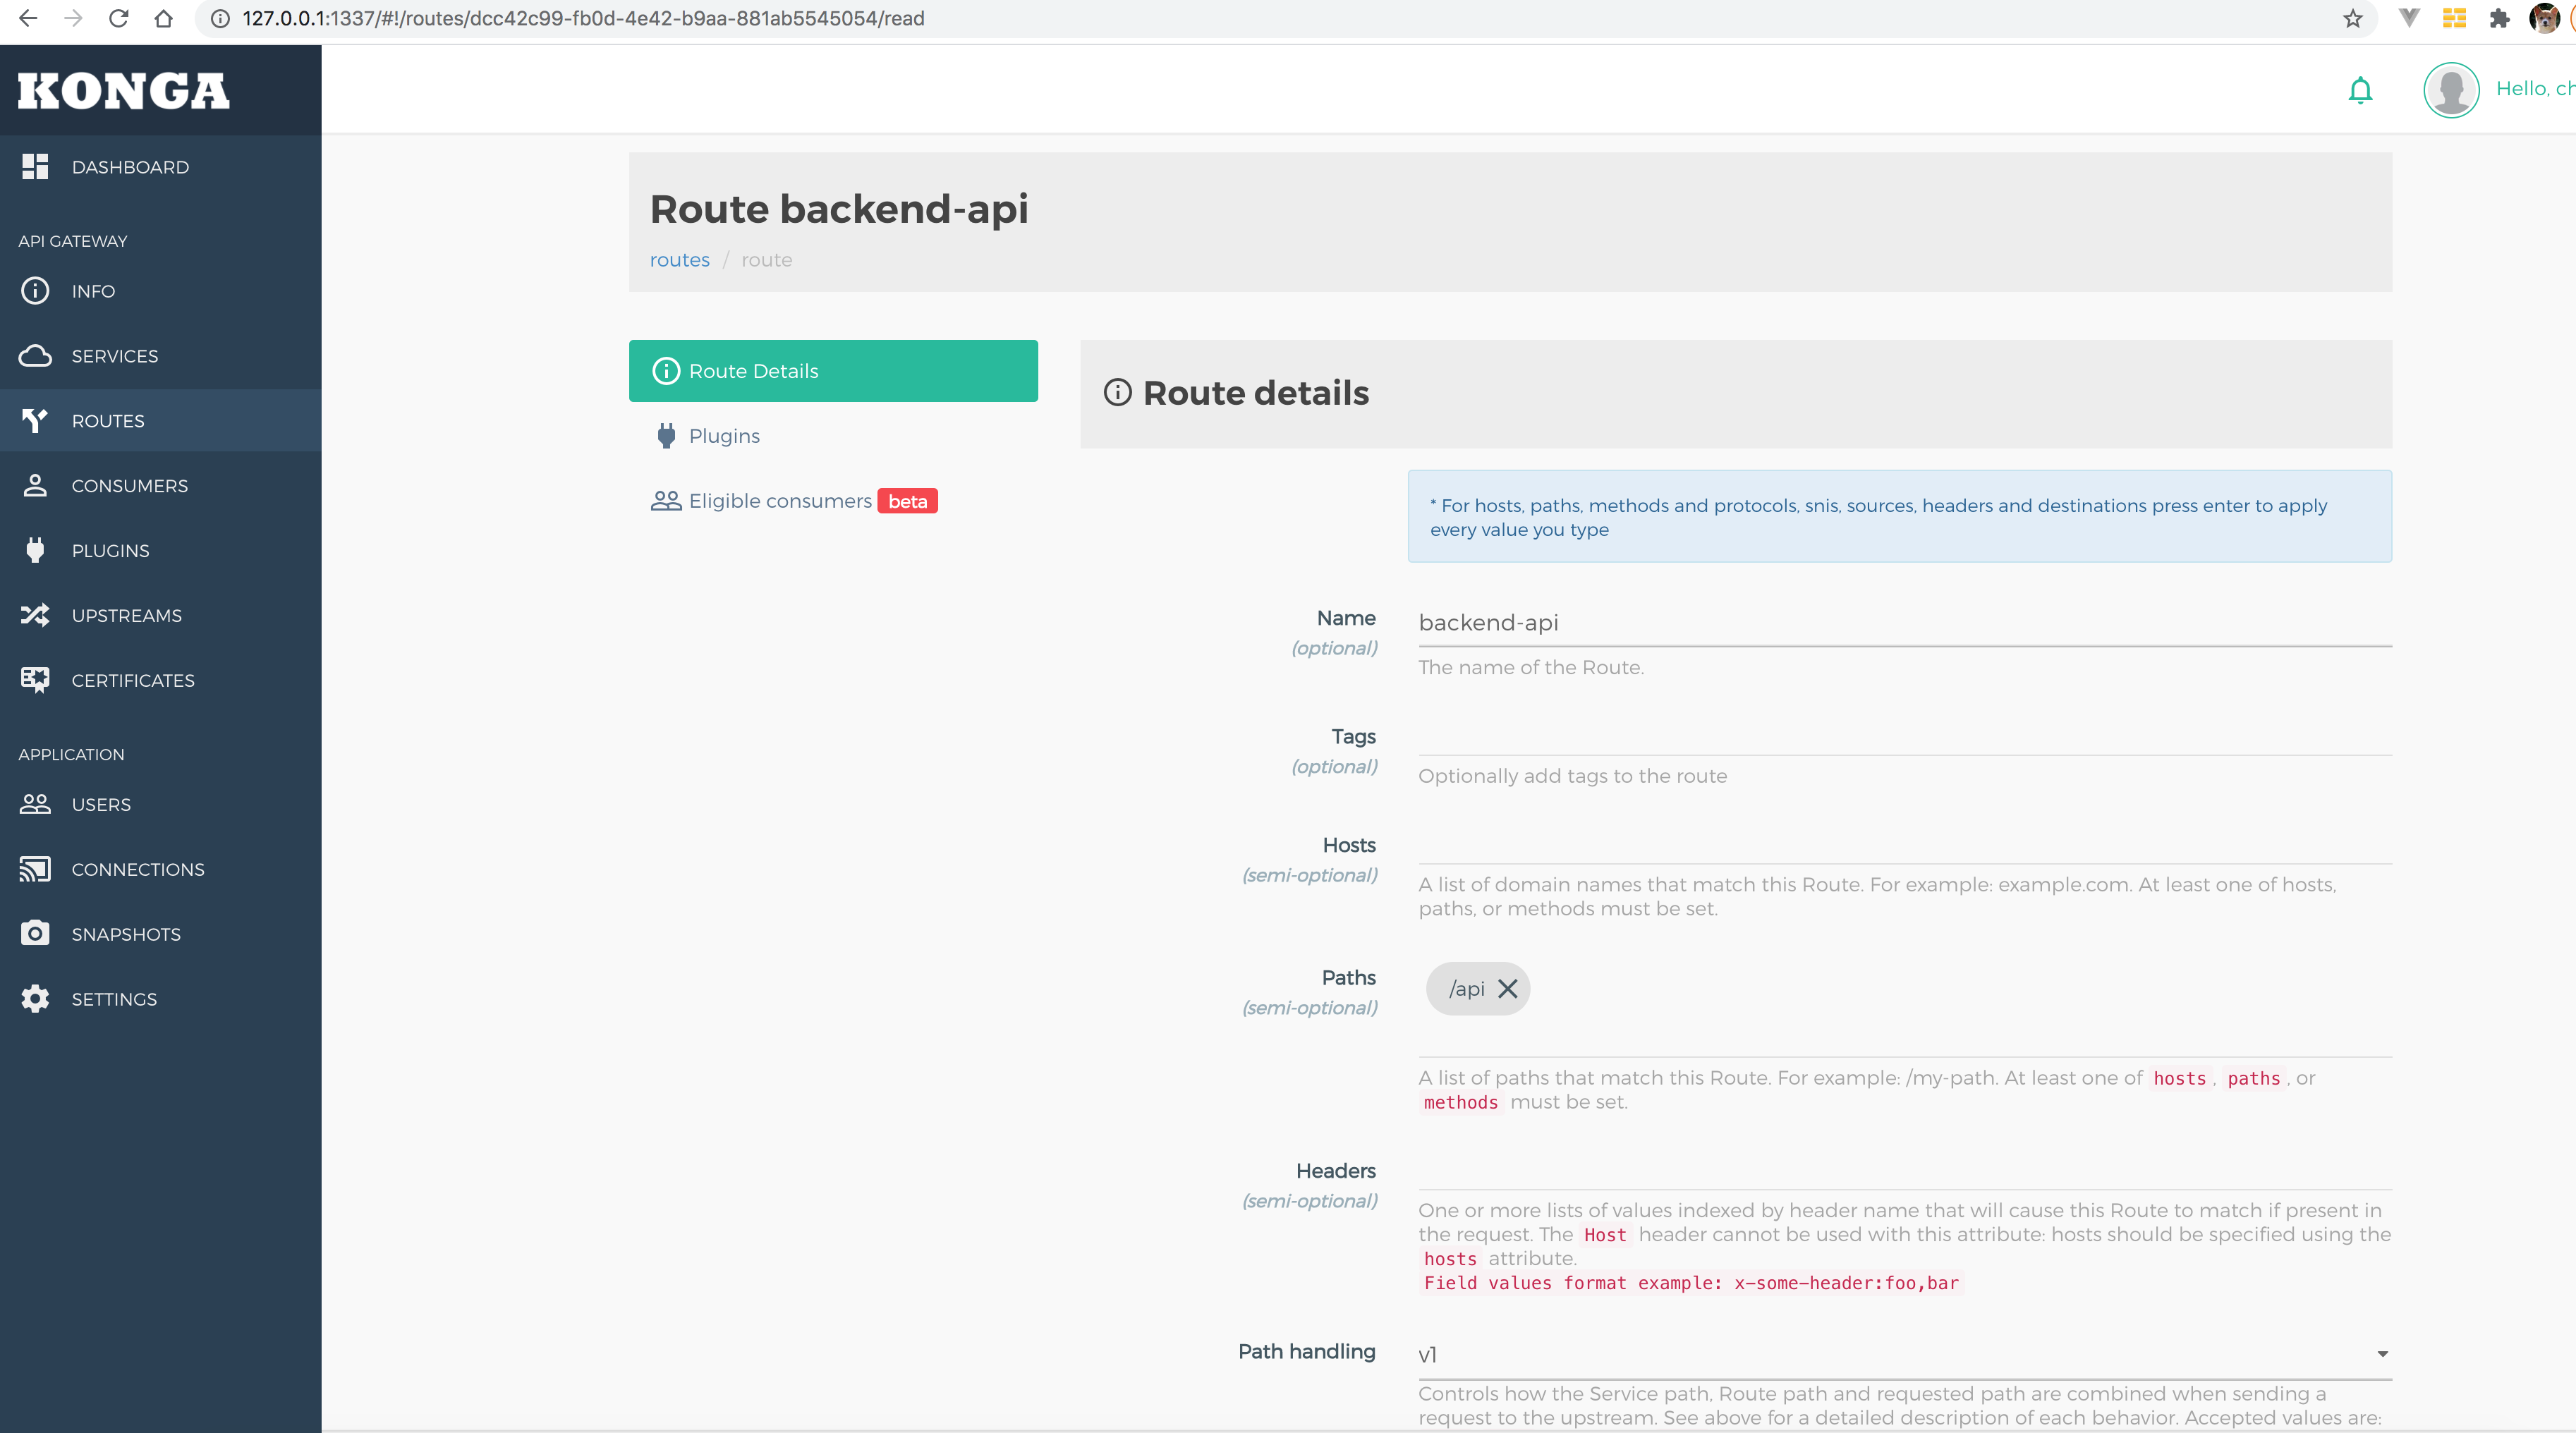
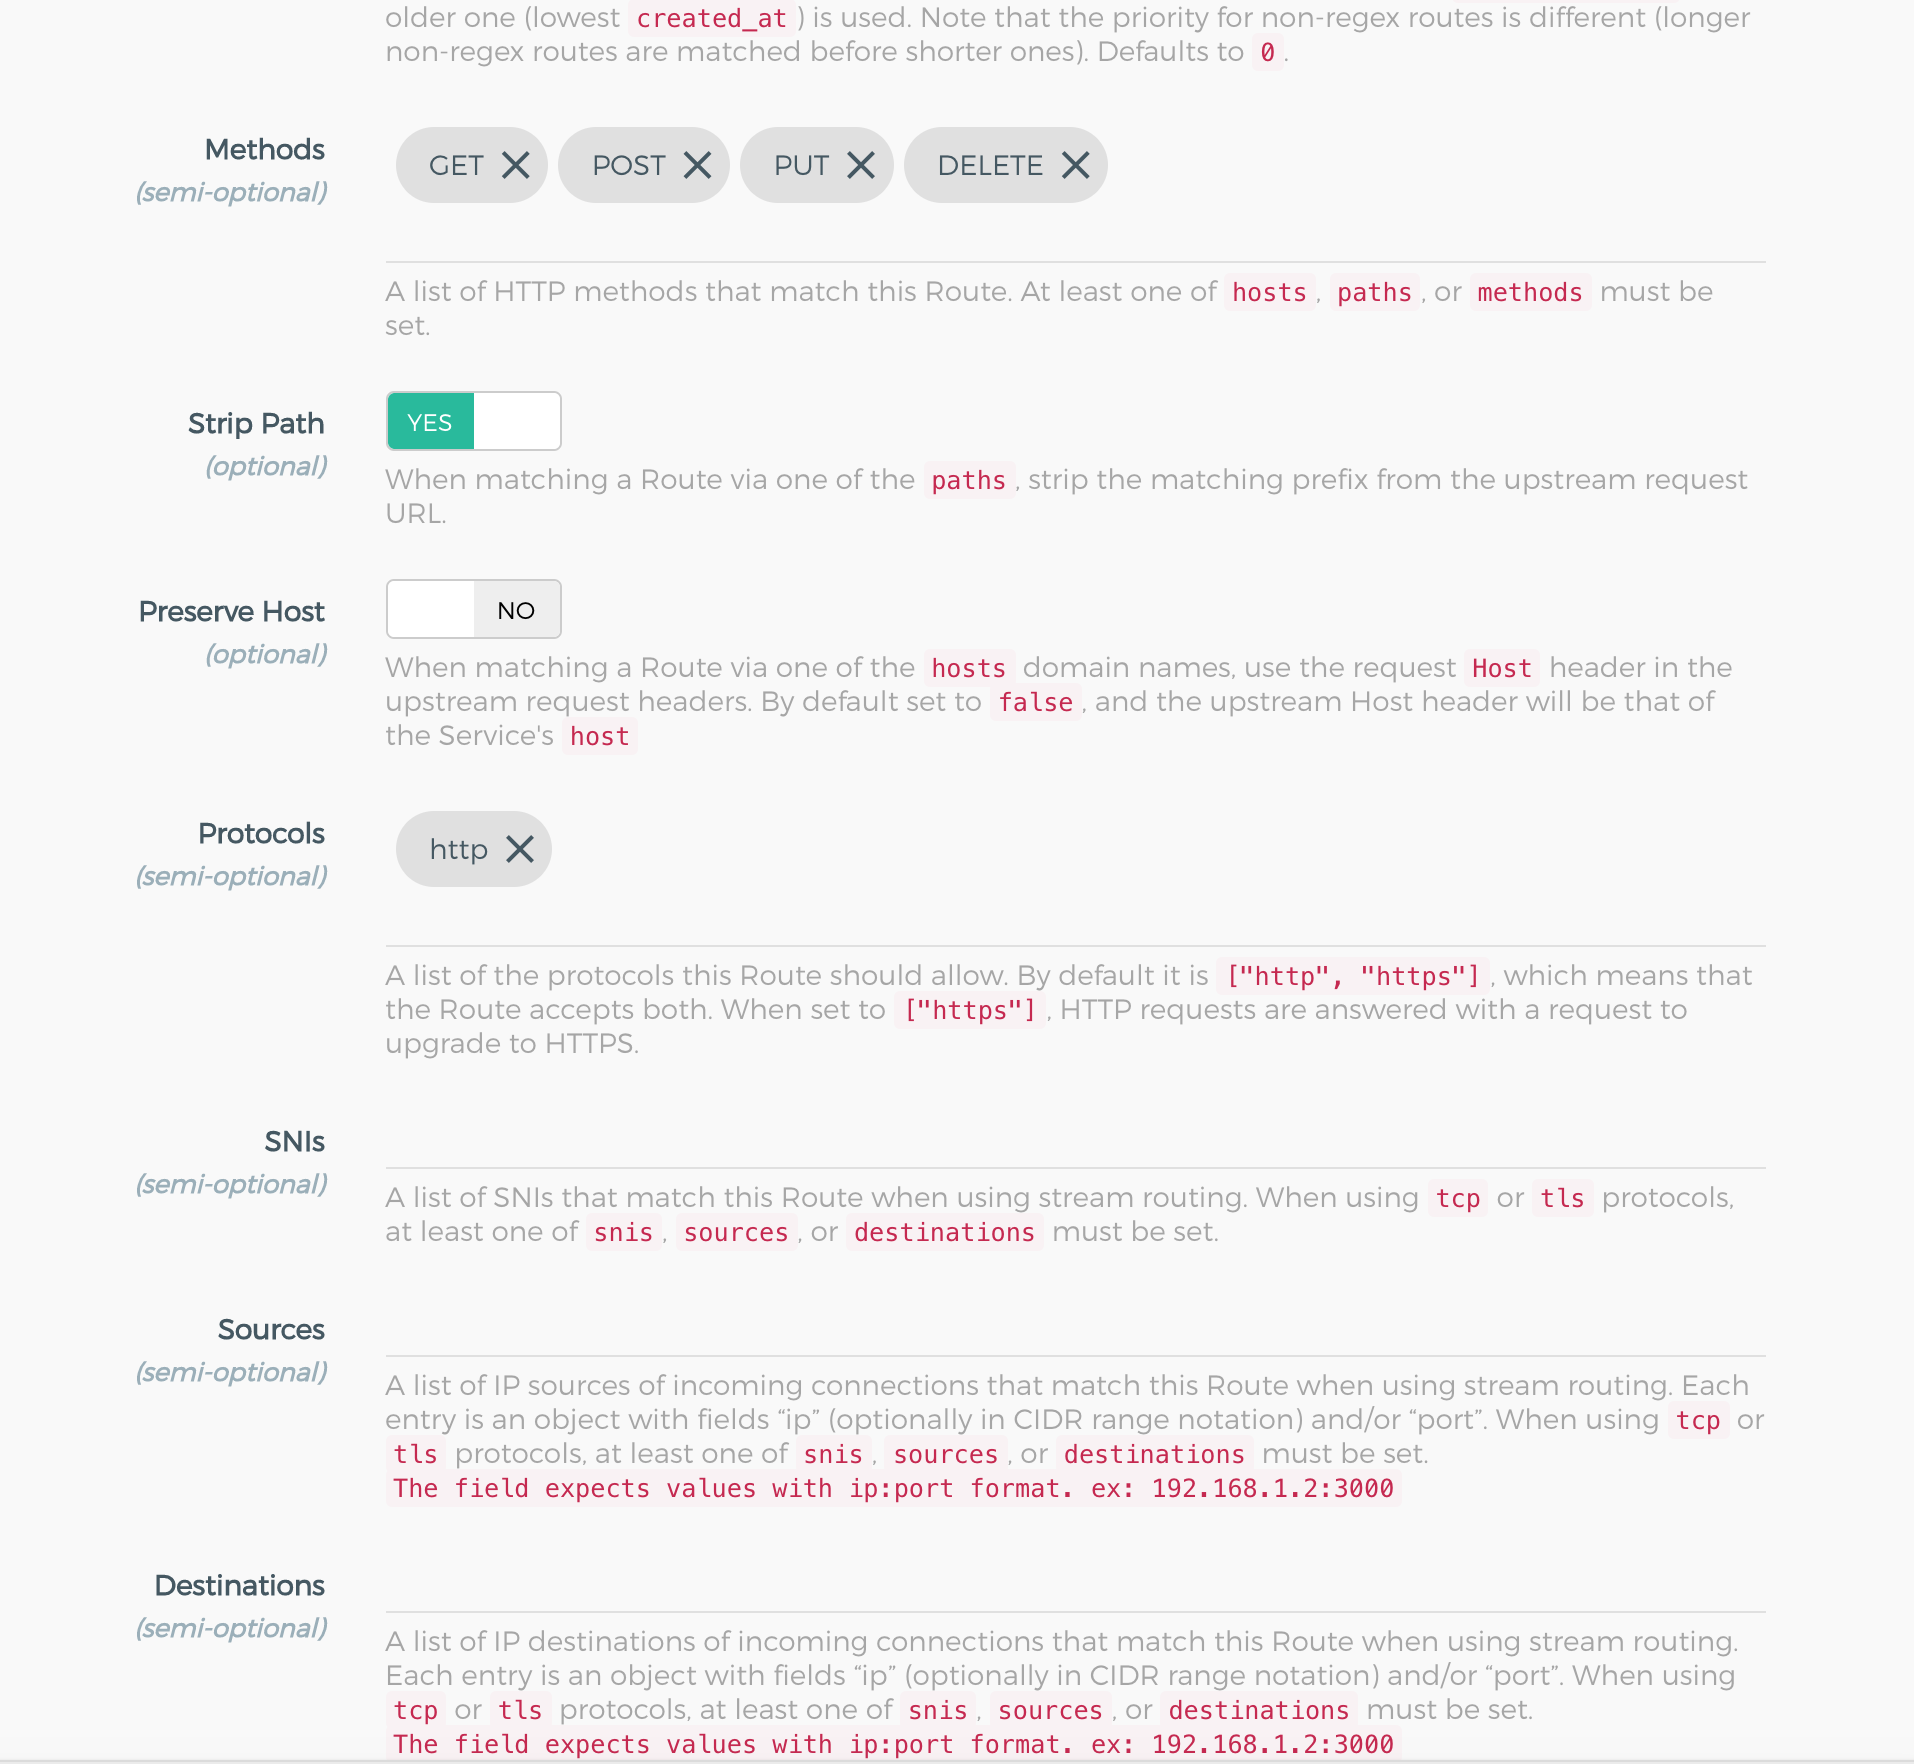
注意这里在route里面的path里面也需要添加/api,否则转发的时候会出错(多拼api)。最简单就是service监听不指定path,在route里指定。一个service下面可以有多个转发路由,每个可以独立管理、设置超时等。
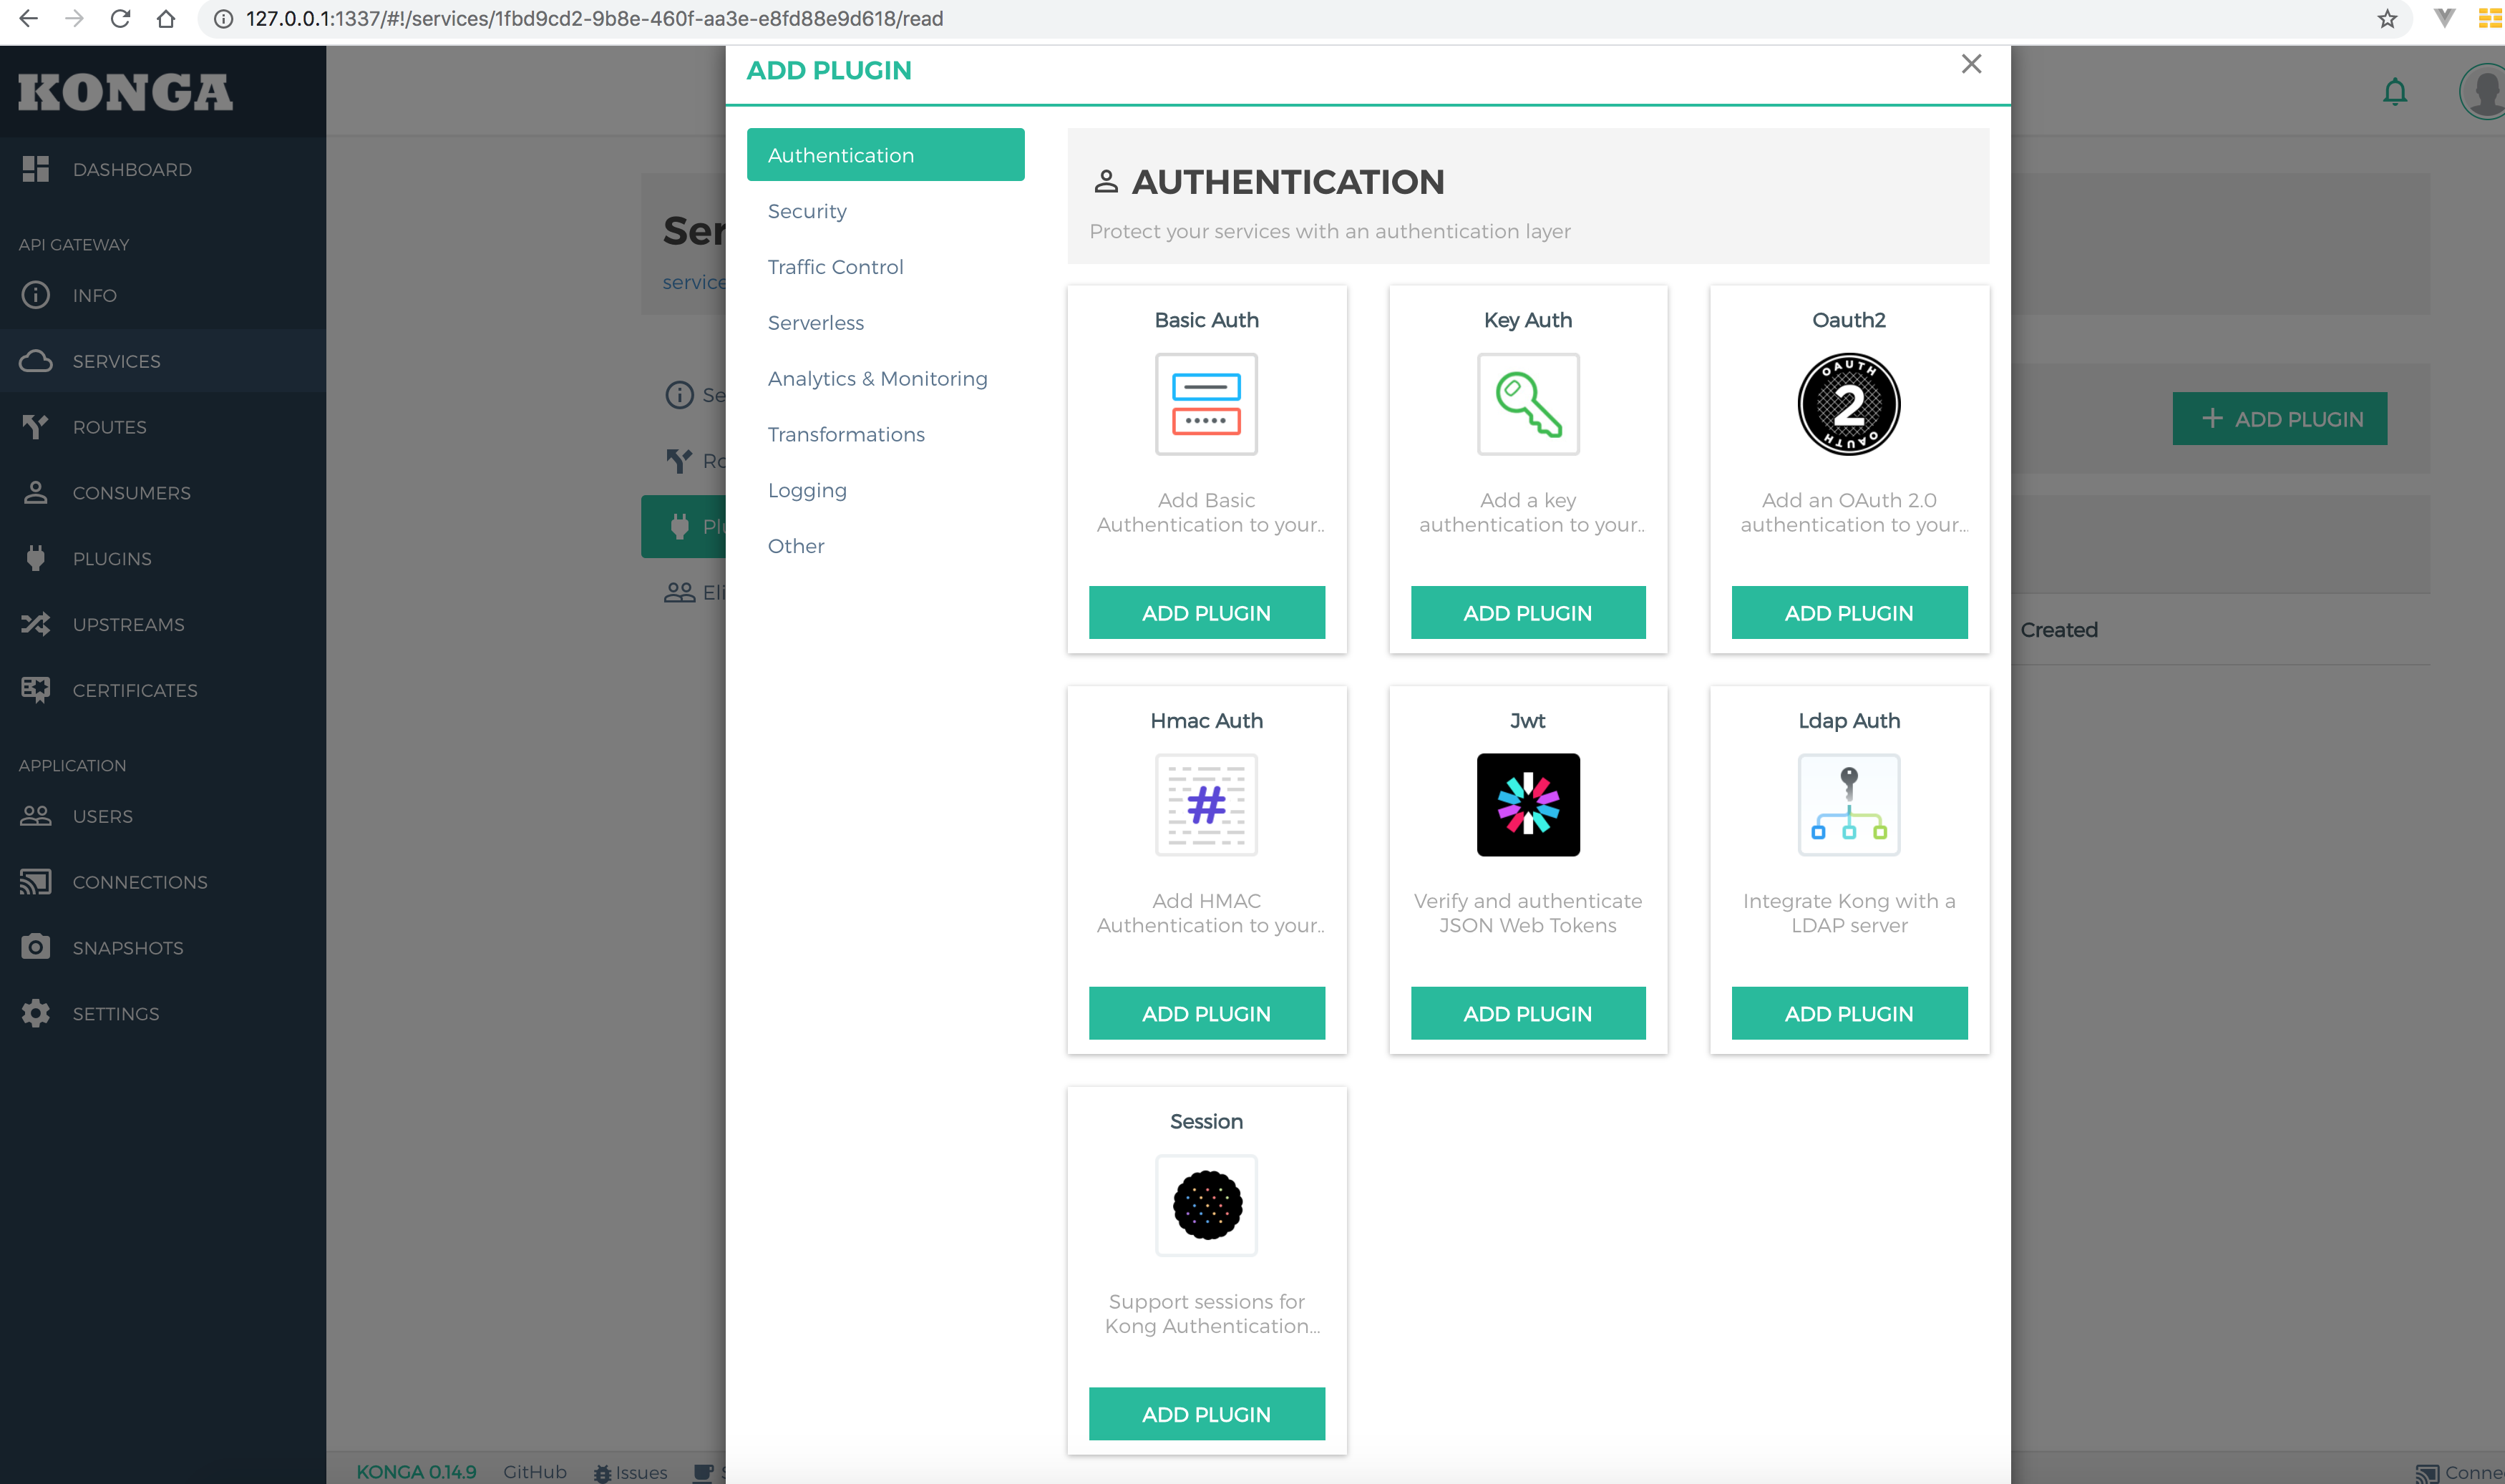
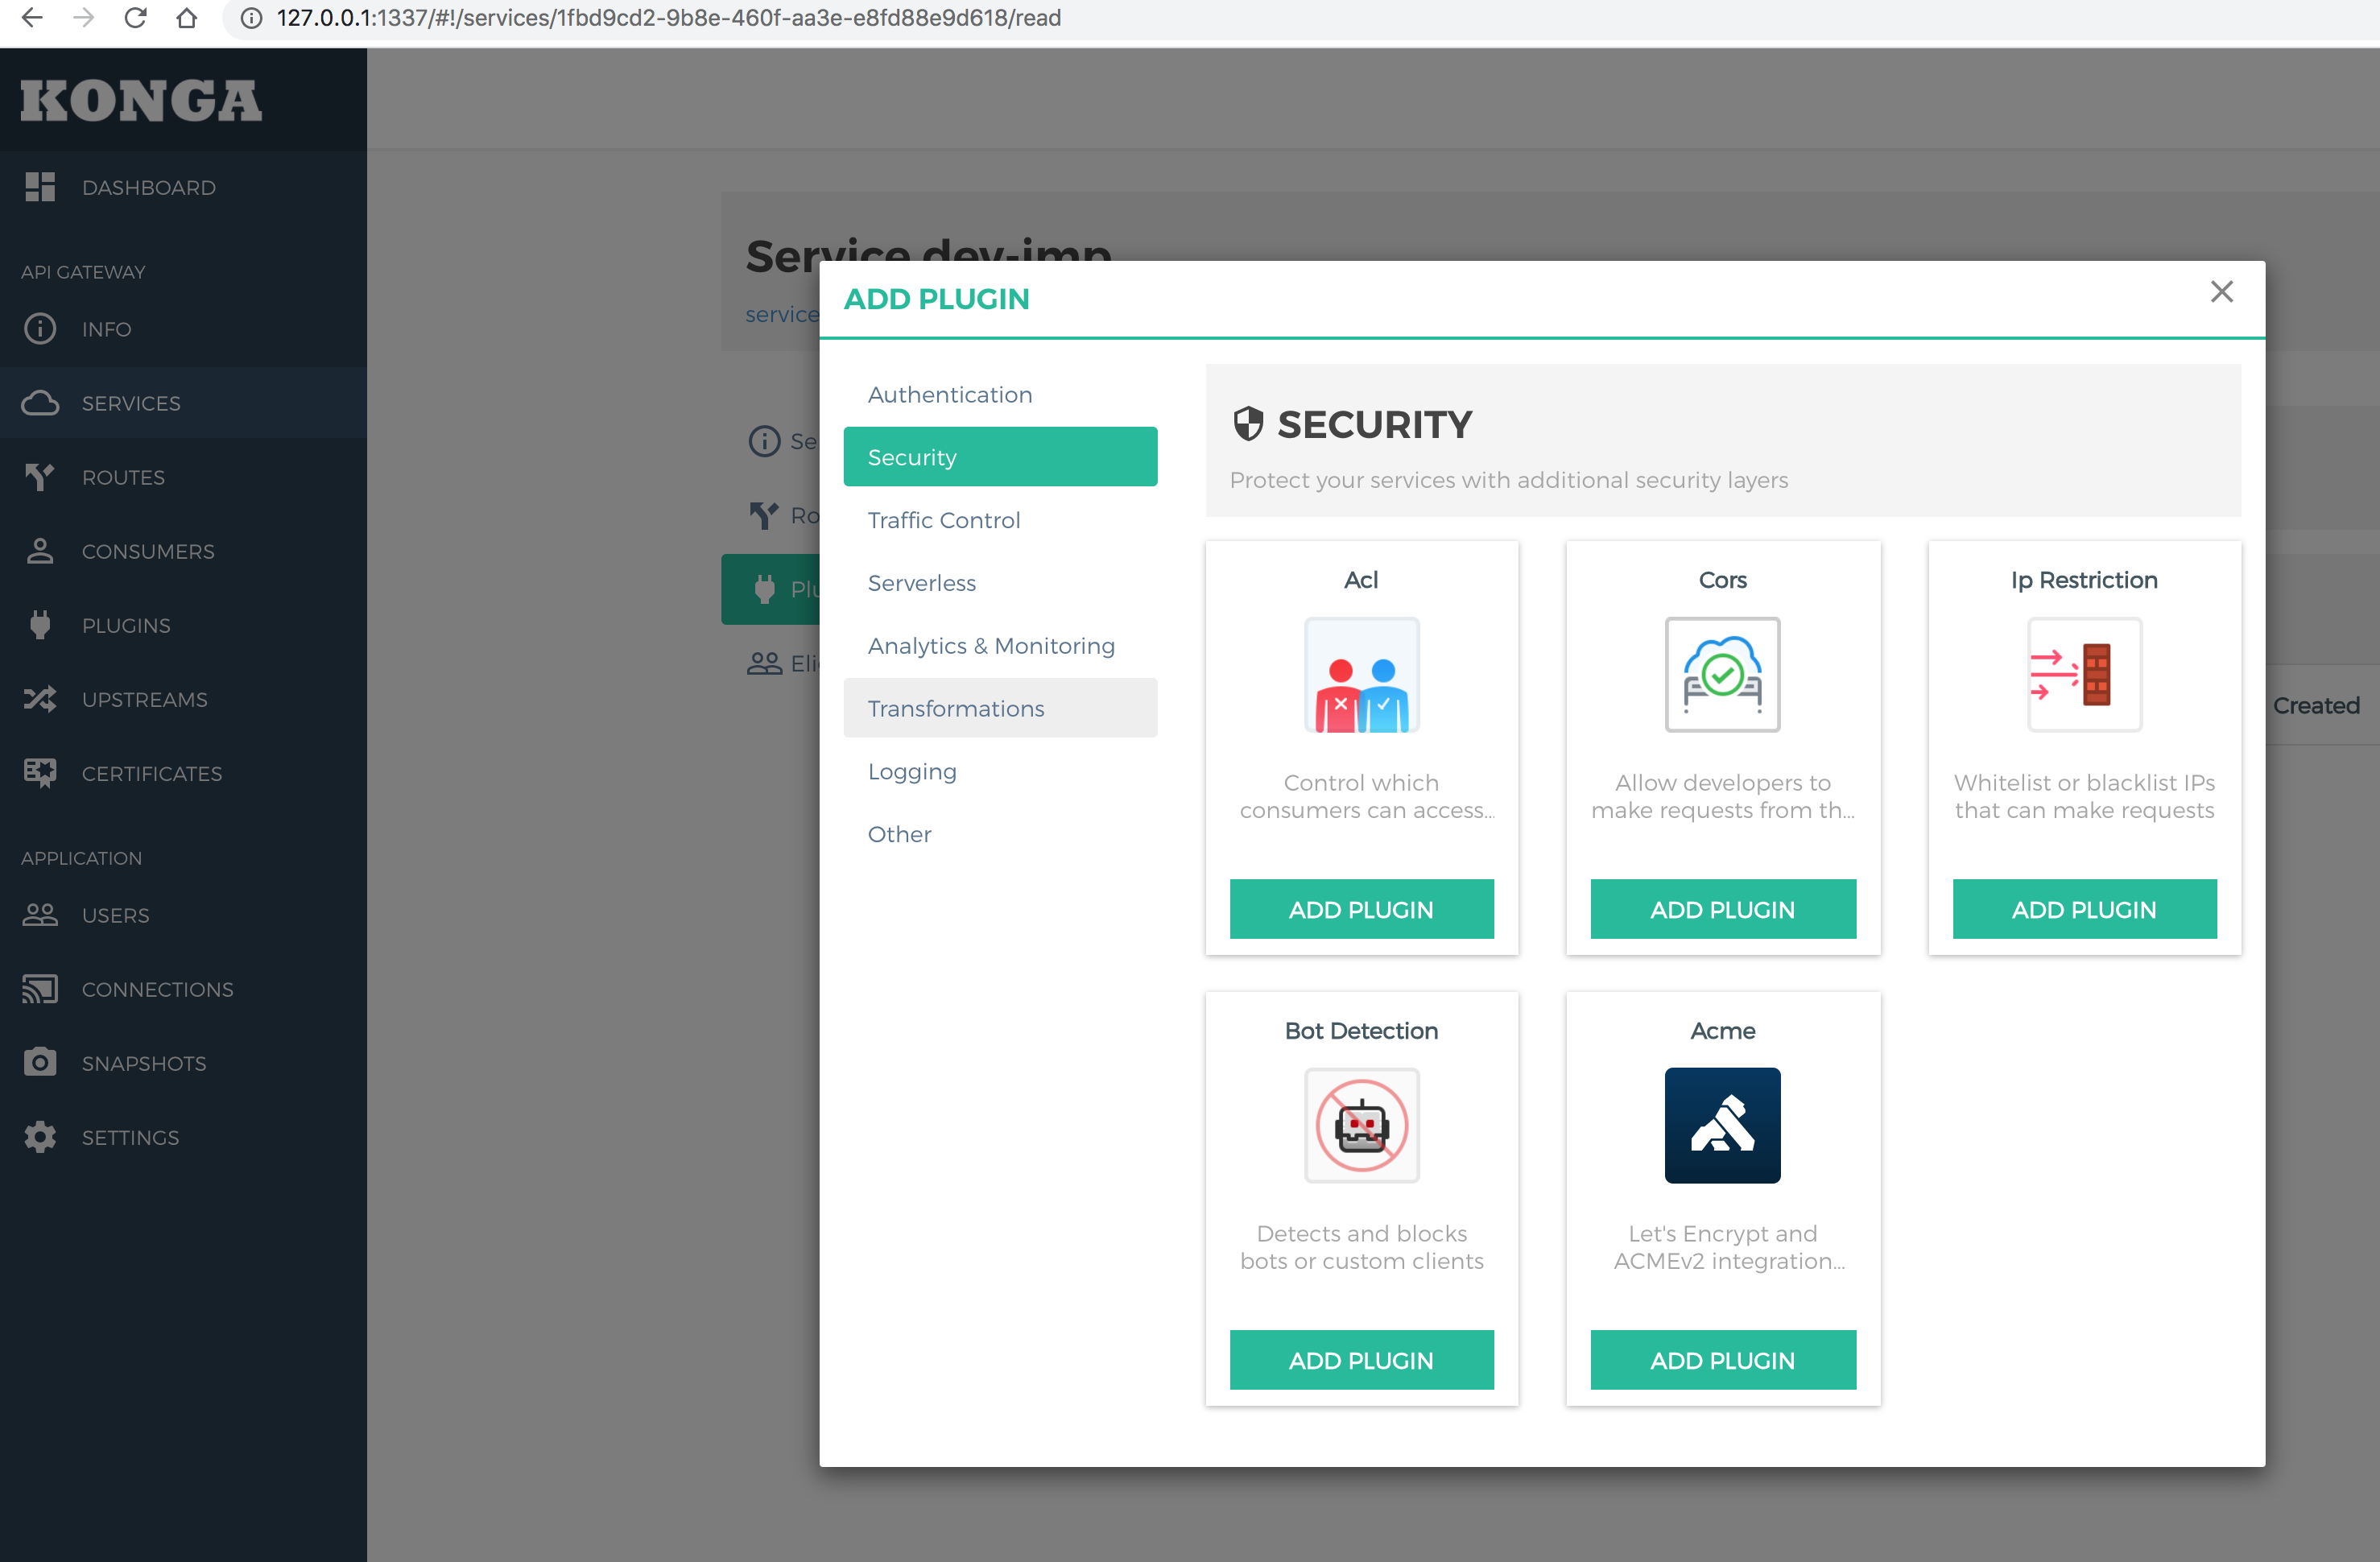
还可以为每个service绑定不同的插件进行处理,比如认证/安全/日志等等,这样就不用在不同的系统里面重复开发这些功能,使得各个团队更加专注也本业务开发
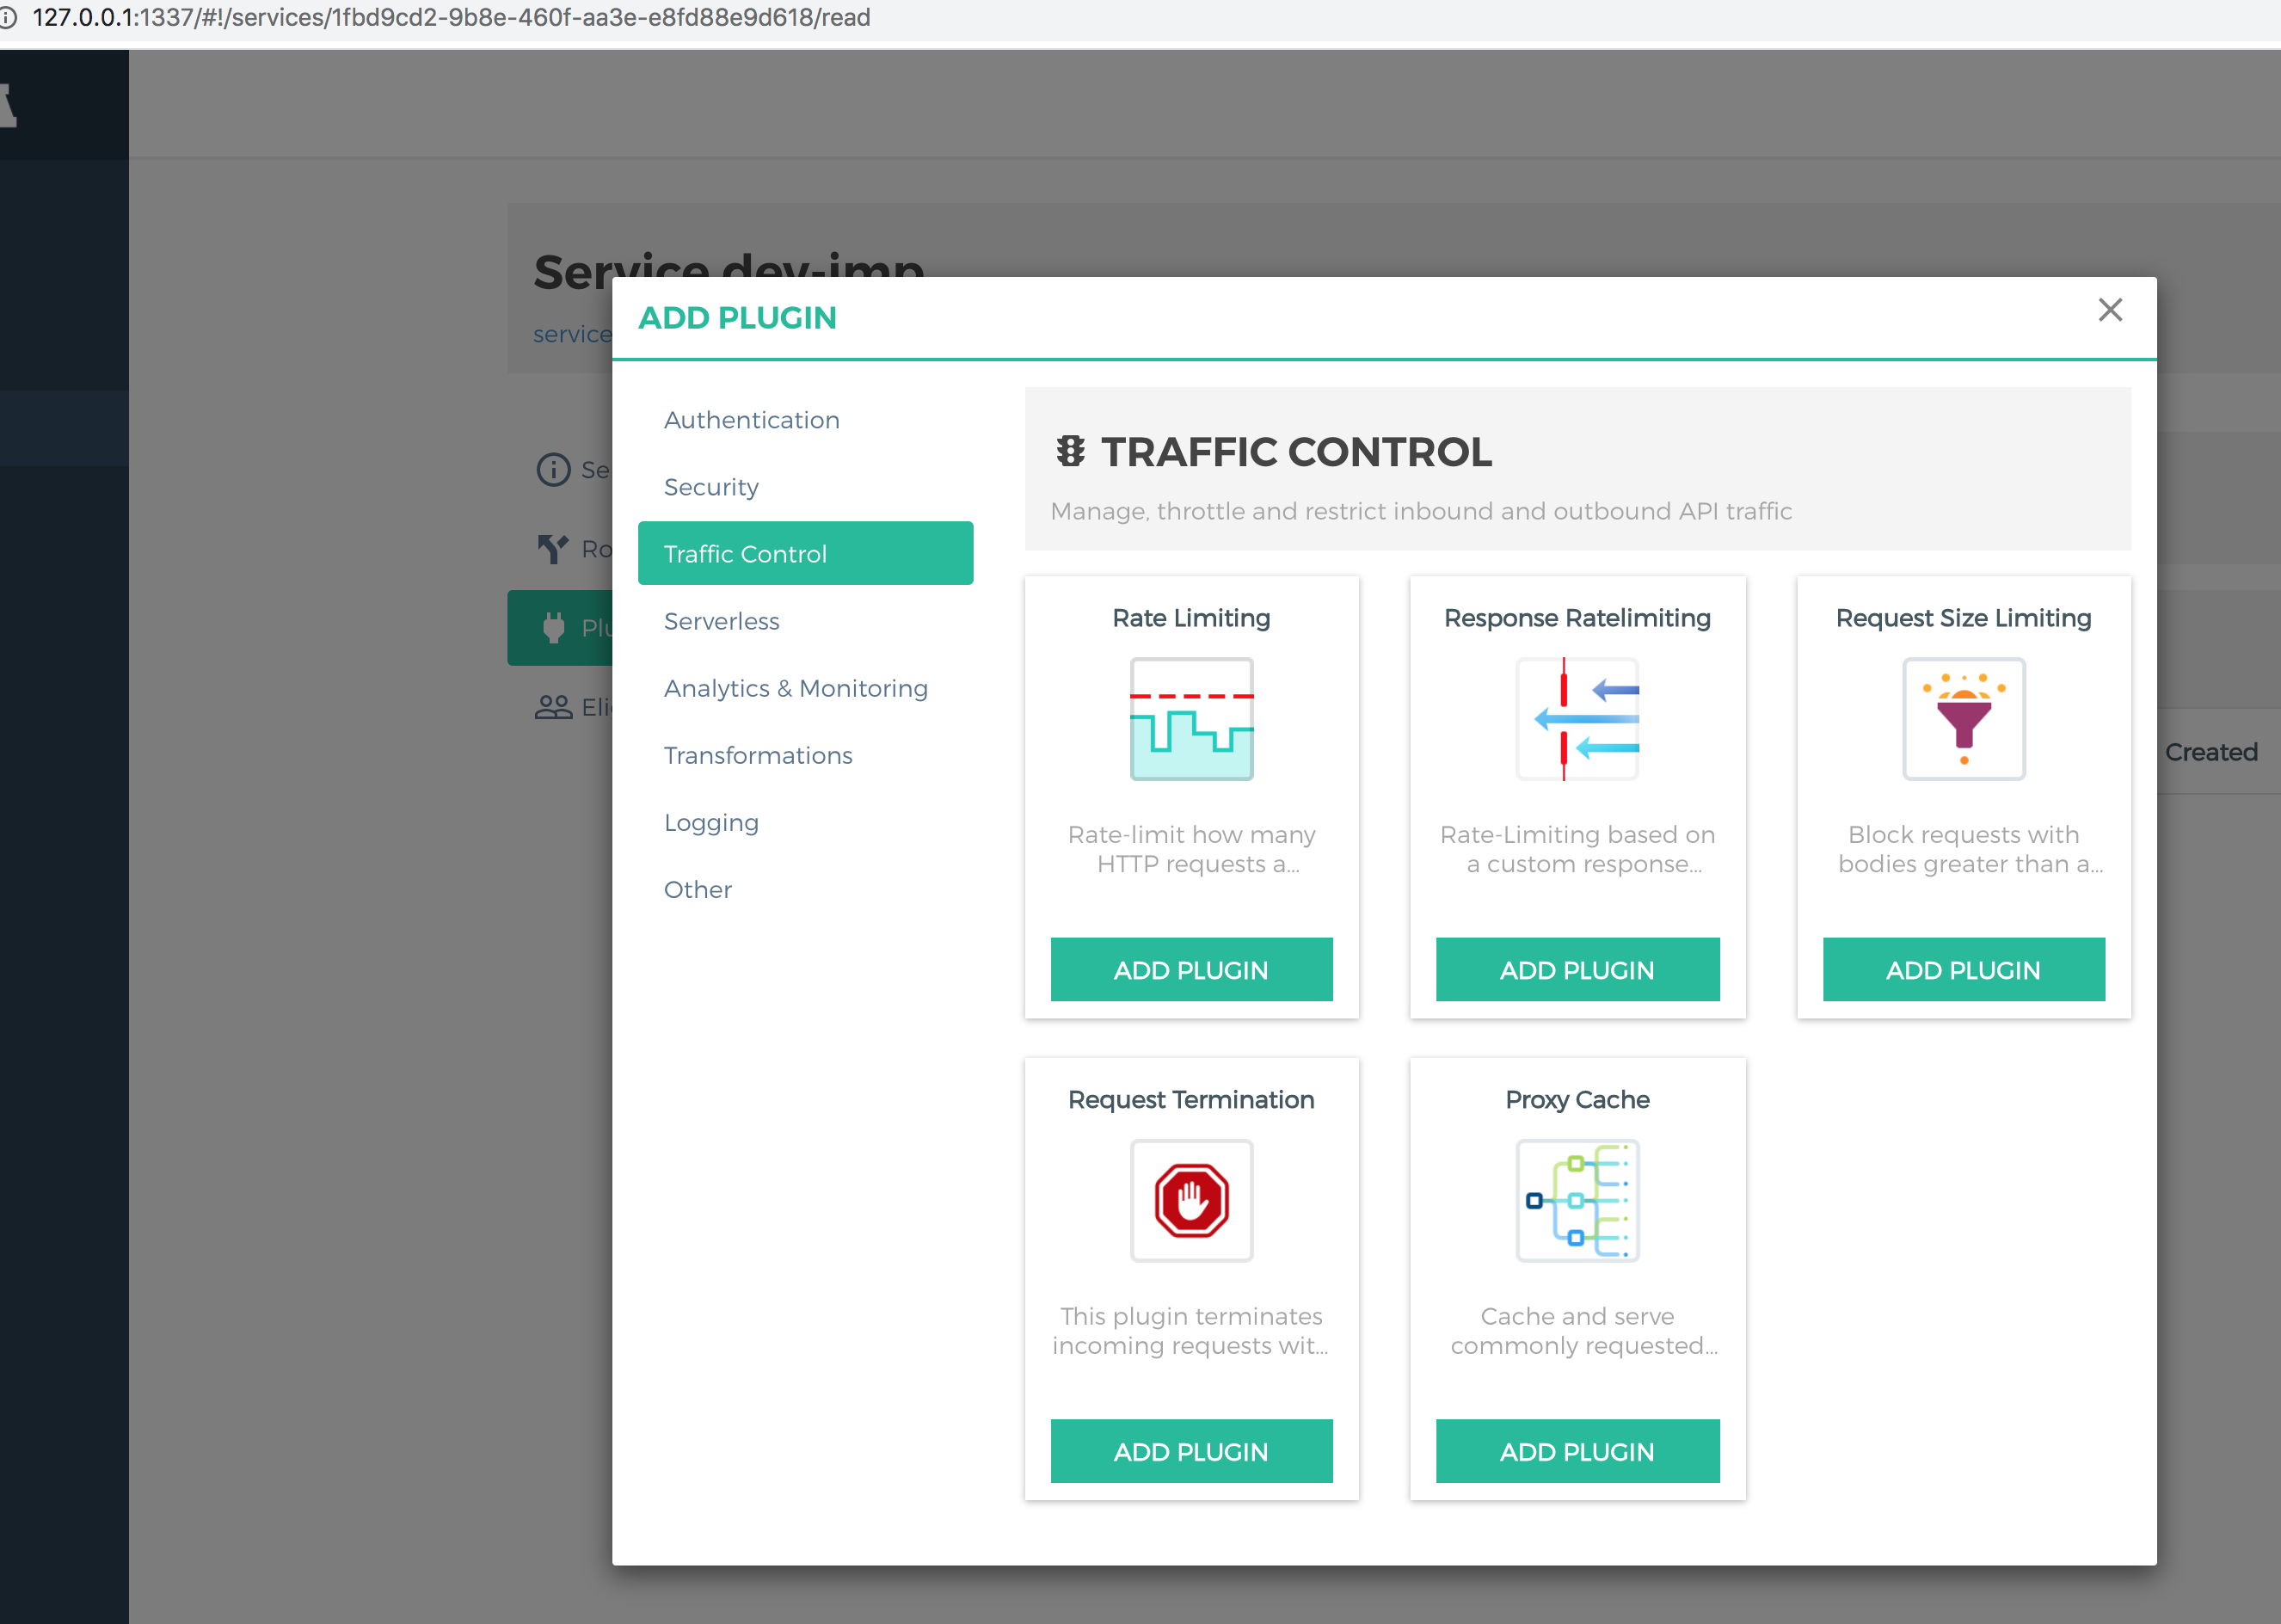
有效插件还可以进行流量限制、请求头/响应头修改等等。这些插件的功能需要基于consumer来开发管理,功能可以非常强大,详细可以参考文档。
Kong还有一项功能Upstream配置,与Nginx的ngx_http_upstream_module差不多,可以作为负载均衡、流量分发控制使用。可以用命令行测试基于hostname的路由,
➜  kong curl -i -X GET \
  --url http://localhost:8000/ \
  --header 'Host: dev1.example.com'
HTTP/1.1 404 Not Found
Date: Tue, 27 Oct 2020 08:41:58 GMT
Content-Type: application/json; charset=utf-8
Connection: keep-alive
Content-Length: 48
X-Kong-Response-Latency: 1
Server: kong/2.1.4

{"message":"no Route matched with those values"}                                                                                                                                                                                                                             ➜  kong curl -i -X GET \
  --url http://localhost:8000/ \
  --header 'Host: dev.example.com'

HTTP/1.1 200 OK
Content-Type: text/html; charset=UTF-8
Transfer-Encoding: chunked
Connection: keep-alive
Date: Tue, 27 Oct 2020 08:42:21 GMT
Server: Apache/2.2.15 (CentOS)
X-Powered-By: PHP/5.6.40
Set-Cookie: PHPSESSID=0uc3aoc735j21sk3ni5s72vjc1; path=/
Expires: Thu, 19 Nov 1981 08:52:00 GMT
Cache-Control: no-store, no-cache, must-revalidate, post-check=0, pre-check=0
Pragma: no-cache
Access-Control-Allow-Credentials: true
Access-Control-Allow-Methods: POST, GET, OPTIONS, PUT, DELETE
Access-Control-Allow-Headers: X-CSRF-Token,Authorization,X-Accept-Charset,X-Accept,Content-Type
X-Kong-Upstream-Latency: 8397
X-Kong-Proxy-Latency: 0
Via: kong/2.1.4

<!DOCTYPE html PUBLIC "-//W3C//DTD XHTML 1.0 Strict//EN" "http://www.w3.org/TR/xhtml1/DTD/xhtml1-strict.dtd">
...
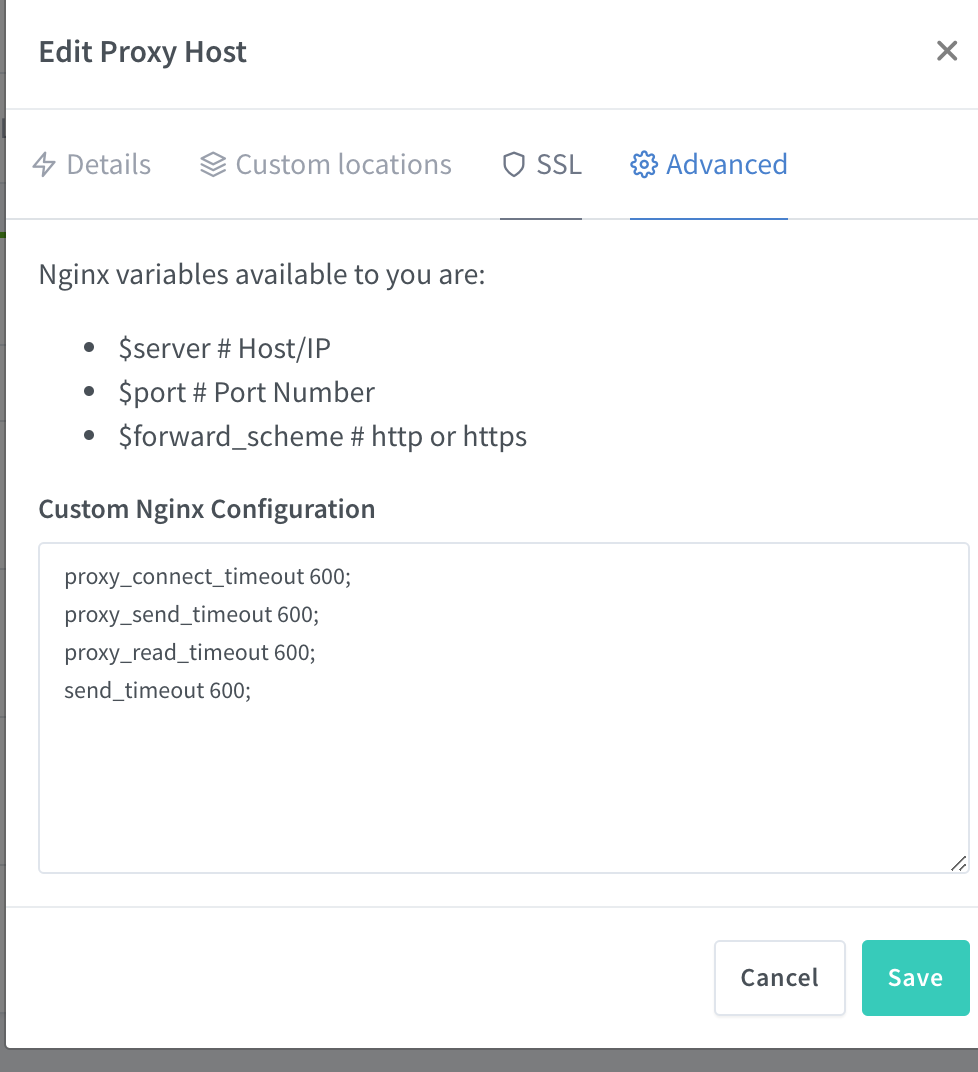
作为一个API网关,Kong能做的很多。如果只是在本地简单的做反向代理,可以使用nginx-proxy-manager,这也是一个基于Nginx开发的网关,根据WEB UI动态生成Nginx配置文件,然后执行/usr/sbin/nginx -s reload生效。有些参数不能通过UI配置(比如超时设置),可以直接写Nginx配置,upstream则支持直接转发tcp请求,支持websockets代理转发,甚至集成了Let’s encrypt自动申请SSL证书(需要验证域名)
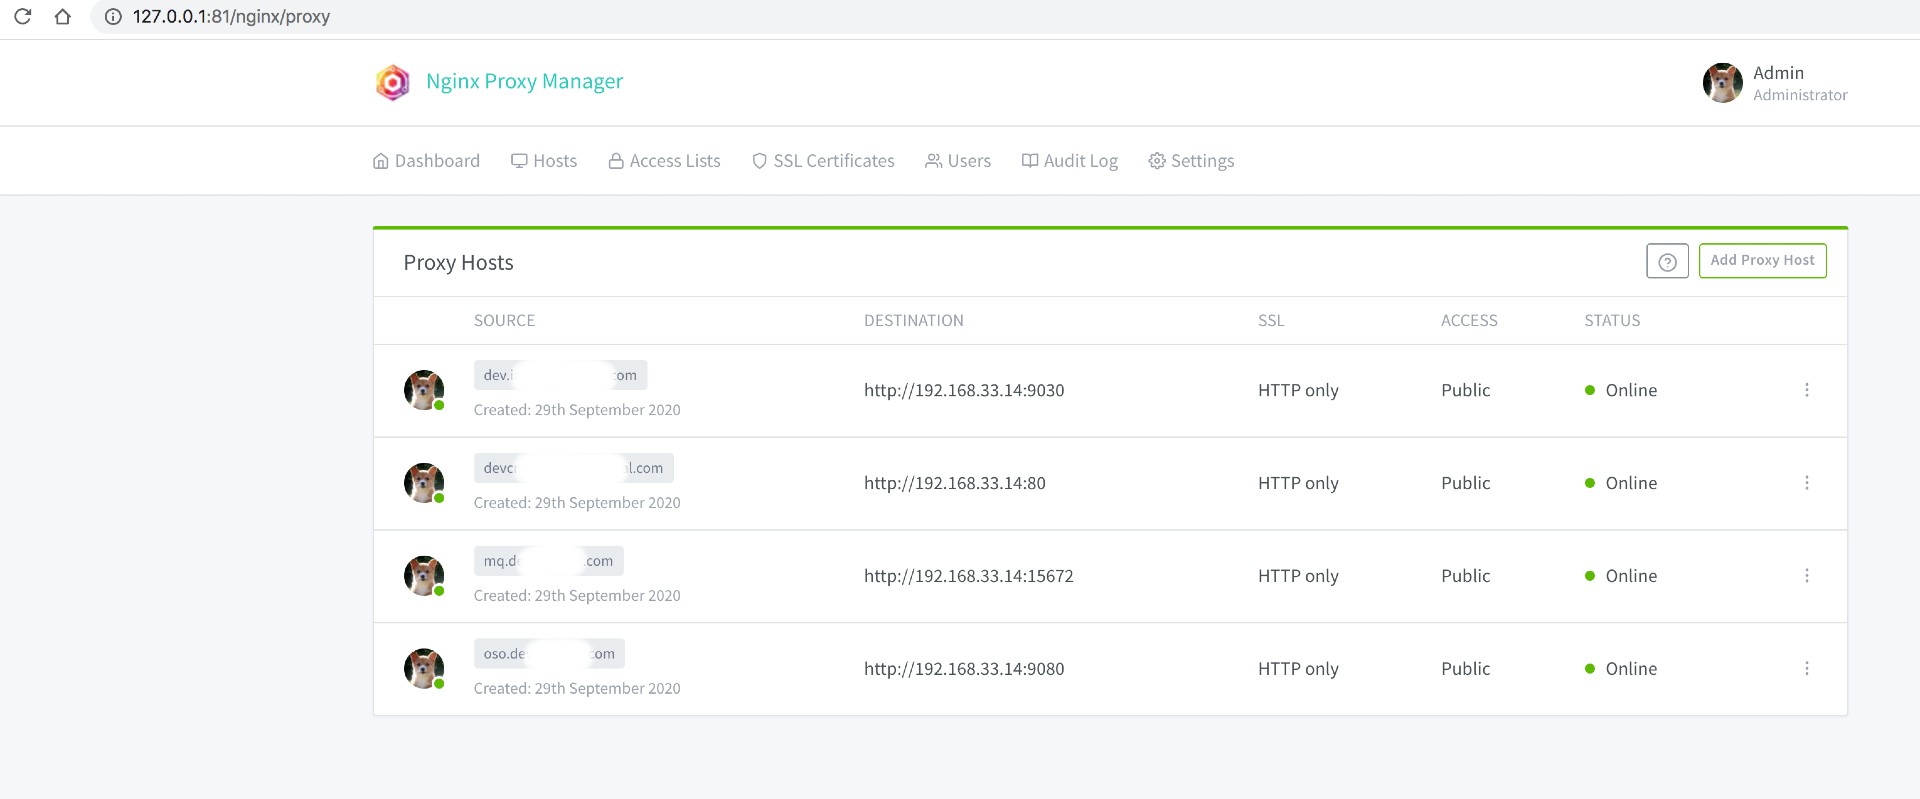
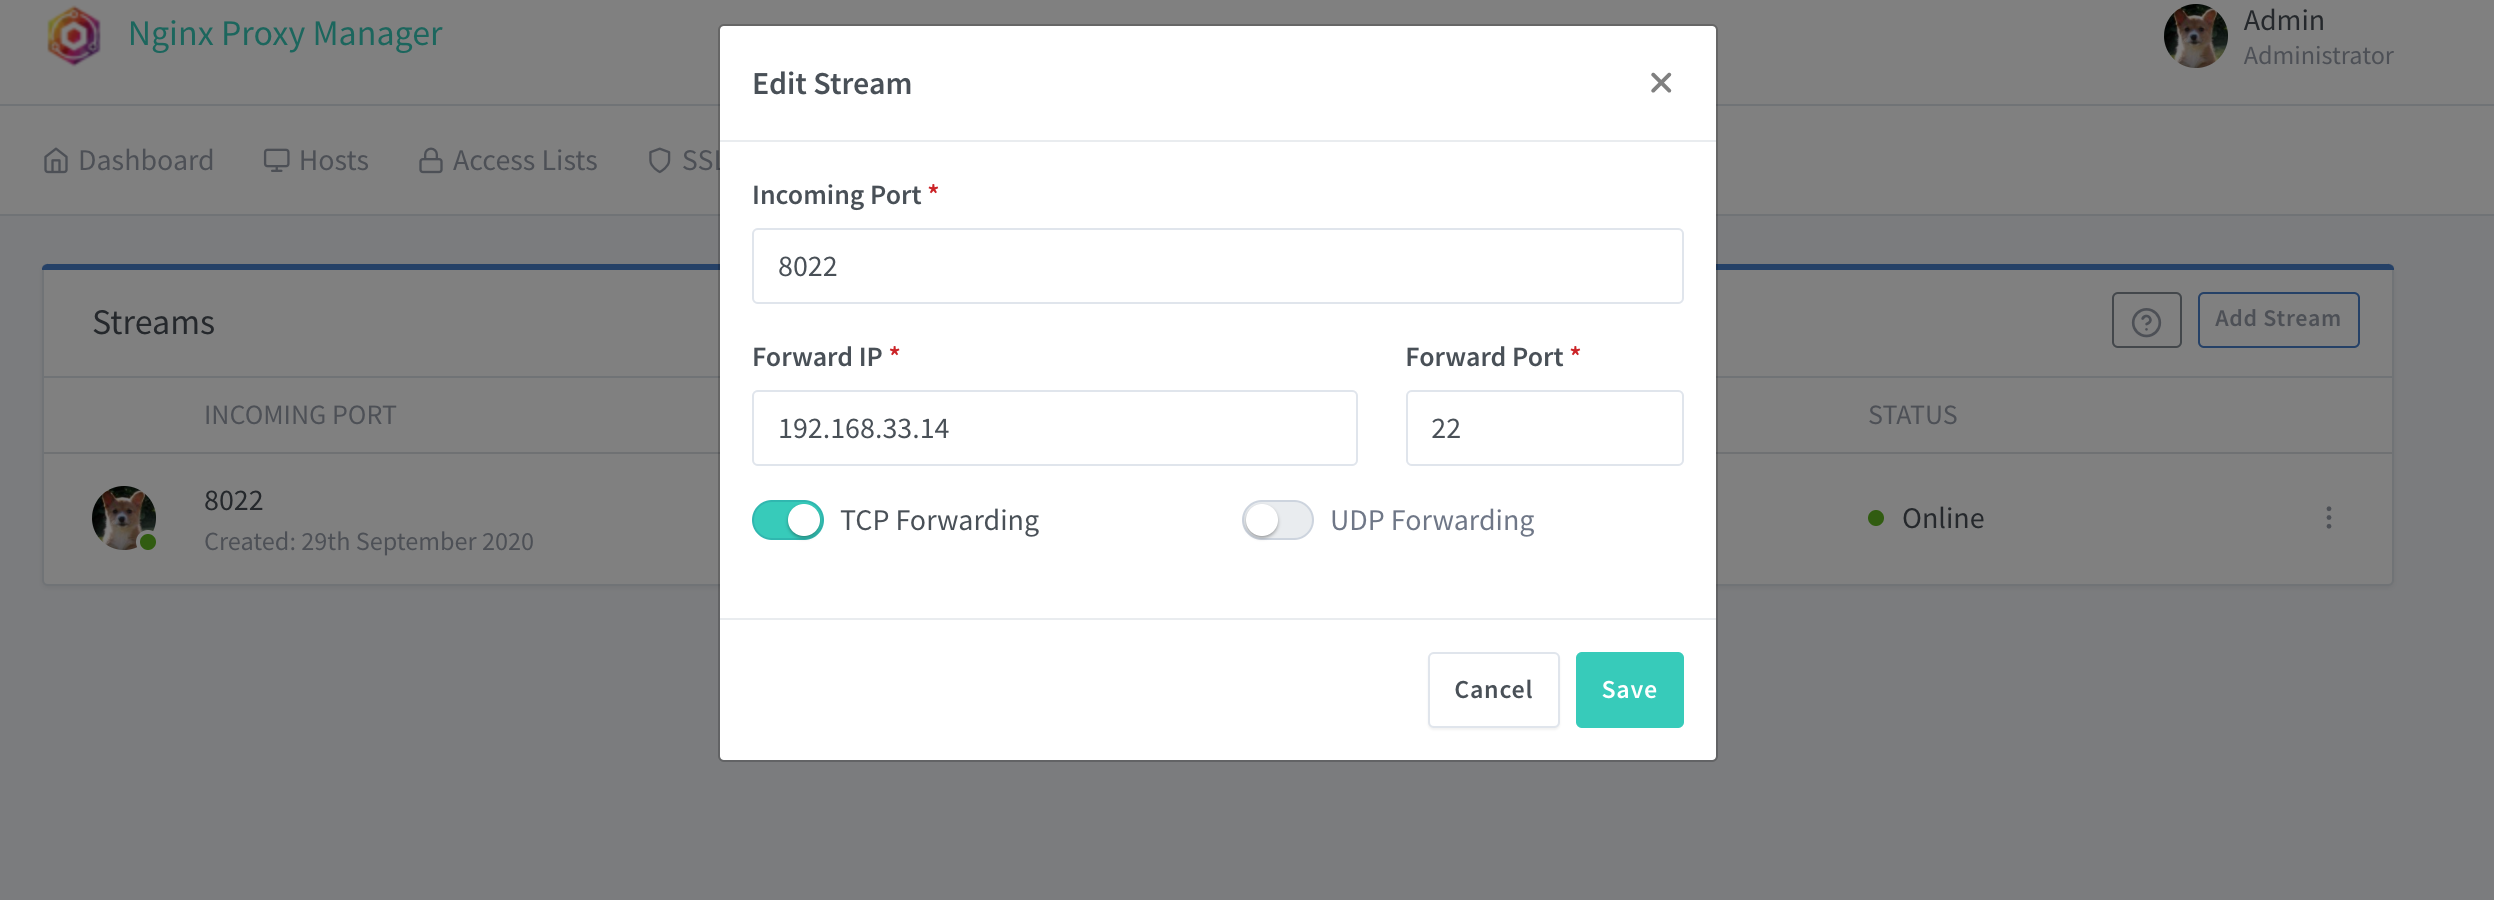
本地同样可以使用docker跑起来,默认监听80/443端口,81端口即管理界面
➜  nginx-proxy-manager ls -lah
total 16
drwxr-xr-x   6 xxxx domain users   192B Sep 29 10:24 .
drwxr-xr-x  15 xxxx domain users   480B Sep 29 09:15 ..
-rw-r--r--   1 xxxx domain users   2.3K Sep 29 09:42 config.json
drwxr-xr-x   8 xxxx domain users   256B Sep 29 09:31 data
-rw-r--r--   1 xxxx domain users   740B Sep 29 10:24 docker-compose.yml
drwxr-xr-x   3 xxxx domain users    96B Oct 27 16:38 letsencrypt
➜  nginx-proxy-manager cat docker-compose.yml
version: "3"
services:
  app:
    image: 'jc21/nginx-proxy-manager:latest'
    restart: always
    ports:
      # Public HTTP Port:
      - '80:80'
      # Public HTTPS Port:
      - '443:443'
      # Admin Web Port:
      - '81:81'
      # TCP Forward Example:
      - '8022:8022'
    volumes:
      # Make sure this config.json file exists as per instructions above:
      - ./config.json:/app/config/production.json
      - ./data:/data
      - ./letsencrypt:/etc/letsencrypt
    depends_on:
      - db
  db:
    image: jc21/mariadb-aria
    restart: always
    environment:
      MYSQL_ROOT_PASSWORD: 'npm'
      MYSQL_DATABASE: 'npm'
      MYSQL_USER: 'npm'
      MYSQL_PASSWORD: 'npm'
    volumes:
      - ./data/mysql:/var/lib/mysql
➜  nginx-proxy-manager docker ps
CONTAINER ID        IMAGE                             COMMAND             CREATED             STATUS                PORTS                                                                    NAMES
3dd58e9cff1f        jc21/nginx-proxy-manager:latest   "/init"             4 weeks ago         Up 7 days (healthy)   0.0.0.0:80-81->80-81/tcp, 0.0.0.0:443->443/tcp, 0.0.0.0:8022->8022/tcp   nginx-proxy-manager_app_1
a033151b28ed        jc21/mariadb-aria                 "/scripts/run.sh"   4 weeks ago         Up 7 days             3306/tcp                                                                 nginx-proxy-manager_db_1
nginx-proxy-manager会将配置写在data目录下面,可以直接编辑这些文件,Nginx reload之后便会生效,可以看到这些文件,具体的加载规则参考文档
➜ nginx-proxy-manager ls data/nginx
dead_host default_host default_www dummycert.pem dummykey.pem proxy_host redirection_host stream temp
➜ nginx-proxy-manager cat data/nginx/proxy_host/1.conf
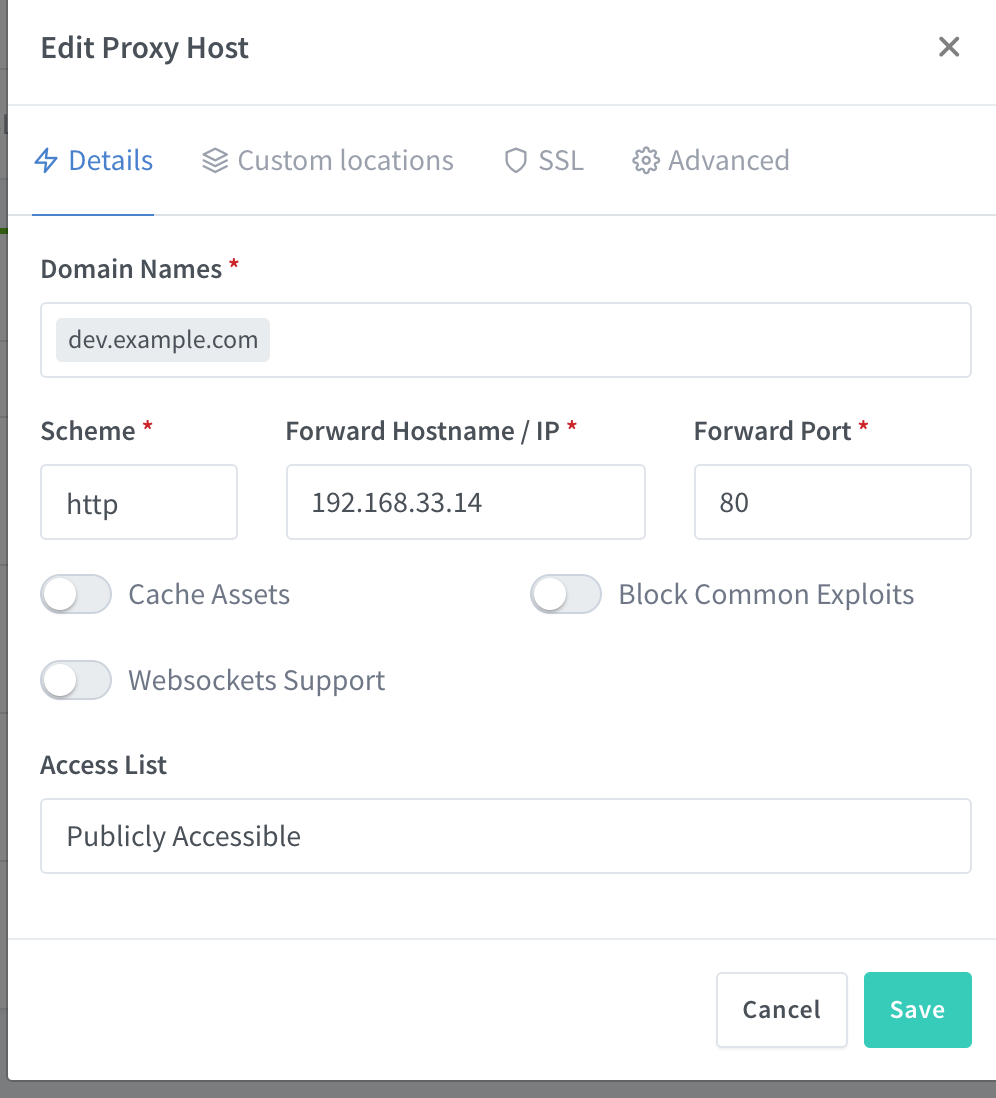
# ------------------------------------------------------------
# dev.example.com
# ------------------------------------------------------------
server {
set $forward_scheme http;
set $server "192.168.33.14";
set $port 80;
listen 80;
listen [::]:80;
server_name dev.example.com;
access_log /data/logs/proxy_host-1.log proxy;
proxy_connect_timeout 600;
proxy_send_timeout 600;
proxy_read_timeout 600;
send_timeout 600;
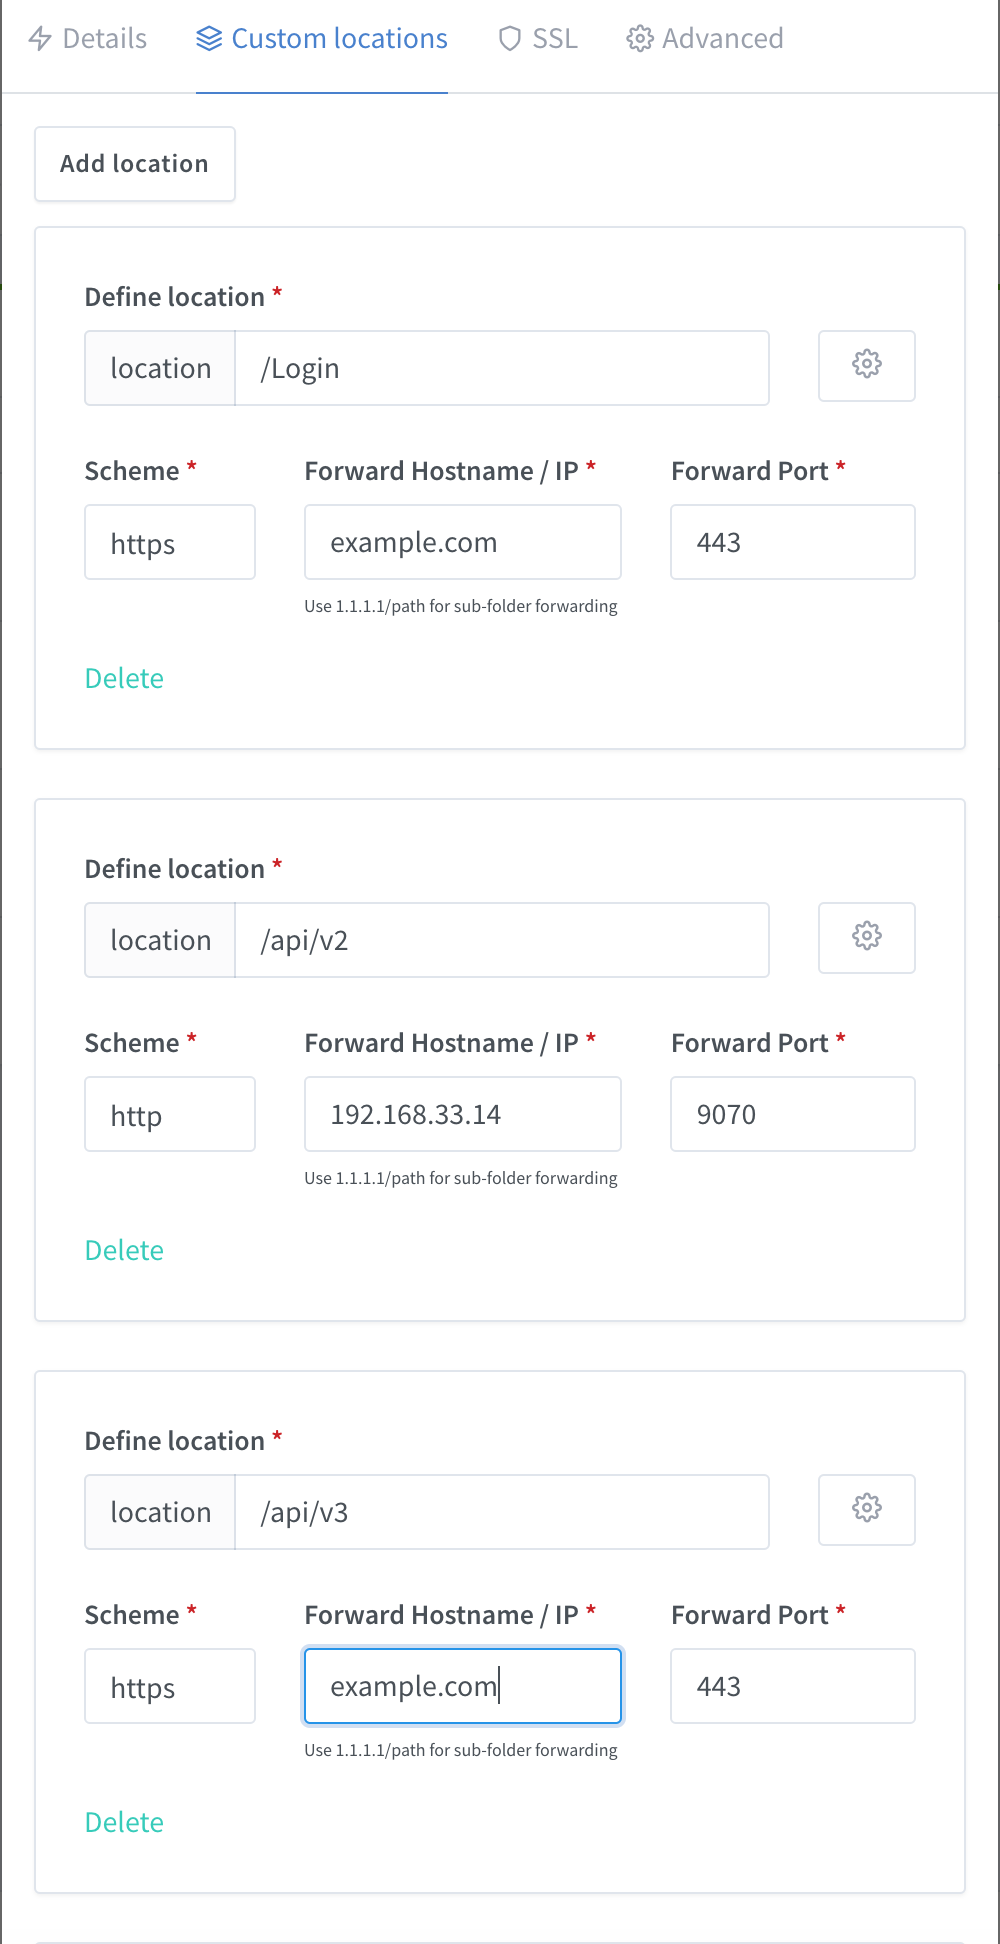
location /Login {
proxy_set_header Host $host;
proxy_set_header X-Forwarded-Scheme $scheme;
proxy_set_header X-Forwarded-Proto $scheme;
proxy_set_header X-Forwarded-For $remote_addr;
proxy_pass https://login.example.com:443;
}
location /api/v2 {
proxy_set_header Host $host;
proxy_set_header X-Forwarded-Scheme $scheme;
proxy_set_header X-Forwarded-Proto $scheme;
proxy_set_header X-Forwarded-For $remote_addr;
proxy_pass http://192.168.33.14:9070;
}
location /api/v3 {
proxy_set_header Host $host;
proxy_set_header X-Forwarded-Scheme $scheme;
proxy_set_header X-Forwarded-Proto $scheme;
proxy_set_header X-Forwarded-For $remote_addr;
proxy_pass https://dev.ops.example.com:443;
}
location /Chat {
proxy_set_header Host $host;
proxy_set_header X-Forwarded-Scheme $scheme;
proxy_set_header X-Forwarded-Proto $scheme;
proxy_set_header X-Forwarded-For $remote_addr;
proxy_pass https://dev.ops.example.com:443;
}
location /Catalog {
proxy_set_header Host $host;
proxy_set_header X-Forwarded-Scheme $scheme;
proxy_set_header X-Forwarded-Proto $scheme;
proxy_set_header X-Forwarded-For $remote_addr;
proxy_pass http://192.168.33.1:3000;
}
location /static {
proxy_set_header Host $host;
proxy_set_header X-Forwarded-Scheme $scheme;
proxy_set_header X-Forwarded-Proto $scheme;
proxy_set_header X-Forwarded-For $remote_addr;
proxy_pass http://192.168.33.1:3000;
}
location /css {
proxy_set_header Host $host;
proxy_set_header X-Forwarded-Scheme $scheme;
proxy_set_header X-Forwarded-Proto $scheme;
proxy_set_header X-Forwarded-For $remote_addr;
proxy_pass http://192.168.33.1:3000;
}
location / {
# Proxy!
include conf.d/include/proxy.conf;
}
# Custom
include /data/nginx/custom/server_proxy[.]conf;
}
➜ nginx-proxy-manager cat data/nginx/stream/1.conf
# ------------------------------------------------------------
# 8022 TCP: 1 UDP: 0
# ------------------------------------------------------------
server {
listen 8022;
listen [::]:8022;
proxy_pass 192.168.33.14:22;
# Custom
include /data/nginx/custom/server_stream[.]conf;
include /data/nginx/custom/server_stream_tcp[.]conf;
}
在docker-compose.yml里面设置一下upstream监听转发的端口,就可以通过8022端口访问192.168.33.14的22端口了
➜  nginx-proxy-manager telnet 127.0.0.1 8022
Trying 127.0.0.1...
Connected to localhost.
Escape character is '^]'.
SSH-2.0-OpenSSH_5.3
^C^C^C^C^C^C^CConnection closed by foreign host.
不论是Kong还是nginx-proxy-manager均有提供API,极大的增强服务网关的可编程性,为动态上线/弹性扩展/自动化运维提供了便利。
参考链接:
从IaaS到FaaS—— Serverless架构的前世今生
聊一聊微服务网关 Kong
KONG网关 — KongA管理UI使用
云原生架构下的 API 网关实践: Kong (二)
微服务 API 网关 -Kong 详解
Creating a web API with Lua using Nginx OpenResty
Nginx基于TCP/UDP端口的四层负载均衡(stream模块)配置梳理
Nginx支持TCP代理和负载均衡-stream模块
聊聊 API Gateway 和 Netflix Zuul
Envoy 是什么?