使用Phar打包发布PHP程序

上一遍介绍PHPUnit时,下载的PHPUnit是个Phar格式的文件并且可以独立运行。Phar归档是PHP 5.3增加的新特性,借鉴了JAVA中的JAR归档,可以将整个目录下的文件打包成单个可执行文件。虽然单个PHP文件也是可执行(Composer的install就是单个PHP文件执行创建对应的Phar),但是显得不方便。
Phar的创建、引用、解压、转换均可以在PHP中完成。要创建Phar需要更改php.ini如下

;phar.readonly = On
phar.readonly = Off

首先在swoole\server目录下创建一个需要打包的文件swoole.php

<?php
$serv = new swoole_server("127.0.0.1", 9002);
$serv->set(array(
    'worker_num' => 8,   //工作进程数量
    'daemonize' => true, //是否作为守护进程
));
$serv->on('connect', function ($serv, $fd){
    echo "Client:Connect.\n";
});
$serv->on('receive', function ($serv, $fd, $from_id, $data) {
    $serv->send($fd, 'Swoole: '.$data);
    $serv->close($fd);
});
$serv->on('close', function ($serv, $fd) {
    echo "Client: Close.\n";
});
$serv->start();

在swoole目录下面创建index.php

<?php
require 'server/swoole.php';

测试一下是否能正常运行

[root@vagrant-centos64 swoole]php index.php
[root@vagrant-centos64 swoole]# netstat  -apn | grep 9002
tcp        0      0 127.0.0.1:9002              0.0.0.0:*                   LISTEN      8436/php

在swoole目录下创建执行打包操作的文件build.php

<?php
$dir = __DIR__;             // 需要打包的目录
$file = 'swoole.phar';      // 包的名称, 注意它不仅仅是一个文件名, 在stub中也会作为入口前缀
$phar = new Phar(__DIR__ . '/' . $file, FilesystemIterator::CURRENT_AS_FILEINFO | FilesystemIterator::KEY_AS_FILENAME, $file);
// 开始打包
$phar->startBuffering();
$phar->buildFromDirectory($dir);
$phar->delete('build.php');
// 设置入口
$phar->setStub("<?php
Phar::mapPhar('{$file}');
require 'phar://{$file}/index.php';
__HALT_COMPILER();
?>");
$phar->stopBuffering();
// 打包完成
echo "Finished {$file}\n";

进行打包

[root@vagrant-centos64 swoole]$ php build.php
Finished swoole.phar

测试执行一下

[root@vagrant-centos64 swoole]$ php swoole.phar
[root@vagrant-centos64 swoole]# netstat  -apn | grep 9002
tcp        0      0 127.0.0.1:9002              0.0.0.0:*                   LISTEN      8635/php

到这里swoole.phar可以单独发布执行力。也可以在其他项目(比如WEB)里面引用,例如

<?php
include 'swoole.phar';
//引用里面的文件
//include 'phar://swoole.phar/server/swoole.php';

SegmentFault便是将PHP打包成Phar进行发布的。
打包完成后,也可以将Phar转成Zip格式或解压出来,比如解压PHPUnit

<?php
$phar = new Phar('phpunit.phar');
$phar->convertToExecutable(Phar::ZIP);
//$phar->extractTo('phpunit'); 

刚才我们这样运行的:php swoole.phar,就是还需要在PharP包前面还要加一个php。如果想做成直接可运行的Phar包,可以像单个PHP可执行文件那样在文件开头加上:#!/usr/bin/env php

$phar->setStub("#!/usr/bin/env php
<?php
Phar::mapPhar('{$file}');
require 'phar://{$file}/index.php';
__HALT_COMPILER();
?>");

运行一下

./swoole.phar

注意如果你在window下面编辑刚才段代码的话,可能会报错:-bash: ./swoole.phar: /usr/bin/env: bad interpreter: No such file or directory。解决办法便是更改换行符为Unix格式,参见这里

GitHub上有个项目:phar-composer可以利用Composer来打包相应的项目为单个可执行文件。

参考链接:
使用phar上线你的代码包
PHP的Phar简介
使用Phar来打包发布PHP程序
Packaging Your Apps with Phar
PHP V5.3 中的新特性,第 4 部分: 创建并使用 Phar 归档
rpm打包利器rpm_create简介

PHP测试框架初探:PHPUnit

最近开始一个新的项目,涉及到了网络通信的客户/端服务端,刚开始都是边写边调试,完成之后觉得有必要留下相关的测试示例,以便日后使用调试。一些PHP项目会把示例写在文件开头的注释里面,但这样又没办法验证是否能正确运行。
workerman是在文件最后留下的运行代码,如RpcClient.php

// ==以下调用示例==
if(PHP_SAPI == 'cli' && isset($argv[0]) && $argv[0] == basename(__FILE__))
{
    //这里是RpcClient的测试用例
}

PHPUnit则是这样的

#!/usr/bin/env php
<?php
if (__FILE__ == realpath($GLOBALS['_SERVER']['SCRIPT_NAME'])) {
    $phar    = realpath($GLOBALS['_SERVER']['SCRIPT_NAME']);
    $execute = true;
} else {
    $files   = get_included_files();
    $phar    = $files[0];
    $execute = false;
}

这有点像python

if __name__ == "__main__":
    //这里运行相关调用

这样就可以对单个文件的代码边看边测试,但是这会在相关的代码里面混入不必要的测试用例代码,当有依赖于外部文件又不是很方便,于是便想把这部分测例代码独立出来。
PHPUnit是xUnit测试家族的一员,可以方便对测试代码进行管理,还可以结合其他扩展。依照官网步骤开始:

wget https://phar.phpunit.de/phpunit.phar
chmod +x phpunit.phar
sudo mv phpunit.phar /usr/local/bin/phpunit
phpunit --version
#PHPUnit 4.7.7 by Sebastian Bergmann and contributors.

写一个测试代码(PHPUnit也可以自动生成对应的测试代码)

<?php
namespace Test\Client;
use Client\RPC;
class RPCTest extends \PHPUnit_Framework_TestCase{
	public $pClient = null;
	public $nMatchID = 567;
	public function __construct(){
		parent::__construct();
		
		$arrAddress = array(
				'tcp://127.0.0.1:9001'
		);
		// 配置服务端列表
		RPC::config($arrAddress);
		$this->nMatchID = 567;
		$this->pClient = RPC::instance('\Prize\Service');
	}
	public function testGet(){
		$mxRes = $this->pClient->get($this->nMatchID);
		$this->assertTrue(is_array($mxRes));
		$this->assertGreaterThan(0, count($mxRes));
	}
	public function testSendGet(){
		$this->assertTrue($this->pClient->send_get($this->nMatchID));
	}
	/**
	 * 使用依赖,以便保证在同一个socket链接之内
	 * @depends testSendGet
	 */
	public function testRecvGet(){
		$mxRes = $this->pClient->recv_get($this->nMatchID);
		$this->assertTrue(is_array($mxRes));
		$this->assertGreaterThan(0, count($mxRes));
	}
}

这边的使用了外部类RPC,于是在Bootstrap.php里面定义相关的自动加载规则,以便测试时自动加载

<?php
define('STIE_PATH', getcwd().'/');
define('ROOT_PATH', STIE_PATH);
define('LIB_PATH', ROOT_PATH.'Lib/');
define('TEST_PATH',	ROOT_PATH.'Test/');

spl_autoload_register(function($p_strClassName){
	$arrClassName = explode('\\', trim($p_strClassName, '\\'));
	if(!empty($arrClassName)){
		if($arrClassName[0] == 'Test'){
			$strPath = ROOT_PATH.implode(DIRECTORY_SEPARATOR, $arrClassName).'.php';
		}
		else{
			$strPath = LIB_PATH.implode(DIRECTORY_SEPARATOR, $arrClassName).'.php';
		}
	}
	if(is_file($strPath)){
		include $strPath;
	}
	else{
		throw new Exception("File not find : ".$strPath);
	}
});

现在运行测试代码

phpunit --bootstrap Test/Bootstrap.php Test/

出现了一些警报和错误。其中一个提示找不到PHPUnit_Extensions_Story_TestCase文件:

PHP Warning:  include(/usr/share/nginx/html/tutorial/mars/Lib/PHPUnit_Extensions_Story_TestCase.php): failed to open stream: No such file or directory in /usr/share/nginx/html/tutorial/mars/Test/Bootstrap.php on line 20

这文件是一个PHPUnit的基于故事的行为驱动开发(BDD)扩展,于是上网找了下想安装。

PHPUnit现在只支持Composer安装,如果用PEAR安装会提示失败

sudo pear channel-discover pear.phpunit.de
Discovering channel pear.phpunit.de over http:// failed with message: channel-add: Cannot open "http://pear.phpunit.de/channel.xml" (File http://pear.phpunit.de:80/channel.xml not valid (received: HTTP/1.1 410 Gone
))
Trying to discover channel pear.phpunit.de over https:// instead
Discovery of channel "pear.phpunit.de" failed (channel-add: Cannot open "https://pear.phpunit.de/channel.xml" (File https://pear.phpunit.de:443/channel.xml not valid (received: HTTP/1.1 410 Gone
)))

先安装Composer

curl -sS https://getcomposer.org/installer | php
mv composer.phar /usr/local/bin/composer
composer -V

创建一个composer.json,以便自动下载相关的库

{
    "require-dev": {
        "phpunit/phpunit": "4.7.*",
        "phpunit/phpunit-selenium": ">=1.4",
        "phpunit/dbunit": ">=1.3",
        "phpunit/phpunit-story": "*",
        "phpunit/php-invoker": "*"
    },
    "autoload": {
        "psr-0": {"": "src"}
    },
    "config": {
        "bin-dir": "bin/"
    }
}

运行composer,注意:composer在国内慢的要死,可以参照这里

composer install --dev

便会在同级目录下面生成一个vendor目录,各自的依赖库都下载在里面,并且生成了autolaod.php,用于加载相关的类库。编辑Bootstarp.php增加一行

include ROOT_PATH."vendor/autoload.php";

再次运行PHPUnit

[vagrant@vagrant-centos64 mars]$ phpunit --bootstrap Test/Bootstrap.php Test/KM/Client/RPCTest
PHPUnit 4.7.7 by Sebastian Bergmann and contributors.

EES

Time: 540 ms, Memory: 14.25Mb

There were 2 errors:

1) Test\KM\Client\RPCTest::testGet
stream_socket_client(): unable to connect to tcp://127.0.0.1:9001 (Connection refused)

/usr/share/nginx/html/tutorial/mars/Lib/Client/Stream.php:19
/usr/share/nginx/html/tutorial/mars/Lib/Client/Stream.php:16
/usr/share/nginx/html/tutorial/mars/Lib/Client/RPC.php:174
/usr/share/nginx/html/tutorial/mars/Lib/Client/RPC.php:141
/usr/share/nginx/html/tutorial/mars/Lib/Client/RPC.php:130
/usr/share/nginx/html/tutorial/mars/Test/Client/RPCTest.php:21

2) Test\KM\Client\RPCTest::testSendGet
stream_socket_client(): unable to connect to tcp://127.0.0.1:9001 (Connection refused)

/usr/share/nginx/html/tutorial/mars/Lib/Client/Stream.php:19
/usr/share/nginx/html/tutorial/mars/Lib/Client/Stream.php:16
/usr/share/nginx/html/tutorial/mars/Lib/Client/RPC.php:174
/usr/share/nginx/html/tutorial/mars/Lib/Client/RPC.php:141
/usr/share/nginx/html/tutorial/mars/Lib/Client/RPC.php:116
/usr/share/nginx/html/tutorial/mars/Test/Client/RPCTest.php:26

FAILURES!
Tests: 2, Assertions: 0, Errors: 2, Skipped: 1.

这下子没有警报了,只有详细的测试错误报告。刚才的测试代码里面testRecvGet方法依赖于testSendGet,一旦后者失败了,前者便会被跳过。
启动服务端再次运行测试代码

[vagrant@vagrant-centos64 mars]$ phpunit --colors --bootstrap Test/Bootstrap.php Test/
PHPUnit 4.7.7 by Sebastian Bergmann and contributors.

...

Time: 496 ms, Memory: 14.25Mb

OK (3 tests, 5 assertions)

这下子全部测试通过了。

前面运行测试是这样的:phpunit –bootstrap Test/Bootstrap.php Test/。–bootstrap是指在运行测试时首先加载的文件可以在这里面定义一些配置,自动加载规则,最后一个参数Test/是指要测试的目录,也可以指明运行某个测试用例,比如Test/Client/RPCTest,指运行RPCTest这个测试用例。

PHPUnit还有许多其他的命令行参数选项,如果每次这么输入也挺麻烦的,可以做成配置文件,加载运行就好了,比如phpunit.xml.dist

<?xml version="1.0" encoding="UTF-8"?>
<phpunit backupGlobals="false"
         backupStaticAttributes="false"
         colors="true"
         convertErrorsToExceptions="true"
         convertNoticesToExceptions="true"
         convertWarningsToExceptions="true"
         processIsolation="false"
         stopOnFailure="false"
         syntaxCheck="false"
         bootstrap="Test/Bootstrap.php"
>
    <testsuites>
        <testsuite name="Lib Test Suite">
            <directory>./Test/</directory>
        </testsuite>
    </testsuites>
</phpunit>

然后运行:phpunit -c phpunit.xml.dist 就可以了,更多XML配置参考这里。还可以在这基础上更改执行配置,比如phpunit -c phpunit.xml.dist Test/Client/RPCTest,便是依照配置仅运行RPCTest。

以前挺纠结要不要写测试代码,一方面有测试代码的话,每次变更可以自动检测是否通过,另一方面,详细的测试用例需要大量时间去考虑,并且多数情况下都是服务模块之间的互相调用,难以预估结果,超出单元测试范围。现在看来写的这部门测试代码除了验证程序是否准确外,还可以作为示例文档。

参考链接:
PHPUnit: Failed opening required `PHPUnit_Extensions_Story_TestCase.php`
Issues while installing pear.phpunit.de/PHPUnit
单元测试
“单元测试要做多细?”
我讨厌单元测试:滕振宇谈如何进行单元测试
自动化单元测试实践之路
Unit Testing Tutorial Part I: Introduction to PHPUnit

MySQL秒杀优化

今天学习了楼方鑫先生《基于SQL的秒杀解决方案》,讲解了如何定位和优化秒杀业务中问题。
首先介绍了库存业务,库存可以分为前端库存,后端库存,实体库存。秒杀时,存在的主要问题

  • 库存数据不准确,下单、付款后,得知零库存;超卖或少卖
  • 废单较多,只下单不付款,转化率低
  • 热点商品,拖垮整个站

秒杀过程中,需要解决的技术点包括

  • 余额减一
  • 操作明细,方便追溯对账,防止一个帐号多次参与
  • 完整事务,保障记录明细与扣减库存同时完成
  • 数据落地,内存数据不可靠

针对库存技术要求,做了多个库存解决方案,比如Mysql + Read /Write Cache 。Read Cache方案不足是读有延迟影响用户体验;Write Cache方案存在多个APP写数据不一致性。Mysql + Cache + NoSQL方案则太复杂未实现。

于是又重新回到优化Mysql上。Mysql优势在于事务机制成熟,程序稳定。存在技术难点:单行并发,热点商品,瞬间压力,前一分钟,千万用户,容易堵塞,拖垮网站。于是从以下几个方面进行优化

  • 事务优化,单行更新
  • 并发优化,最大并发数
  • 排队优化,抢同一商品

分析秒杀时的处理逻辑,扫描系统代码,发现大部分程序都在等待确认Update记录数,才提交事务。

  • 开启事务
  • Insert库存明细
  • Update库存余额
  • 提交事务

在良好设计下,Mysql的Insert操作,不使用自增列是不会阻塞请求。但是Mysql的Update同一条记录是串行的,需要等远程客户端发送提交命令后才能释放锁,让其他会话继续。简单的更新操作,不考虑IO和锁冲突,一条语句执行的时间大约是0.1ms,一般条件下的网络时延为0.4-0.8ms,即等待事务提交通知的时间比真正SQL执行的时间长数倍。
于是扩展了SQL语法(OneSQL),指定在Update执行完后自动提交,不需要等待客户端发送提交命令,从而节约这一个网络来回的事务等待时间,提升网络性能。

秒杀时如果遇到大量请求需要进行排队,以免太多的请求拖垮Mysql

  • 在应用层排队的缺点,应用需要改造,使用统一框架(需要考虑跨语言),应用集群扩容时,控制不准确(连接数分配)
  • 在Mysql排队的优点,应用改造极少,只需修改少量SQL语句,无需统一框架,排队精确,发挥InnoDB性能。

于是开发了兼容Mysql的分布式数据访问层(OneProxy),为并发请求进行排队。

另外,还对热点商品进行独立数据库拆分和优化。目前,双十一前商品便已挂出,用户可以收藏或预购,对于商家而言可以准备更多商品;对于平台而言可以预先发现热点商品做优化。

总结,对于业务优化,需要循序渐进,深入了解业务逻辑和技术点,比较不同的解决方案,就算是平常的update操作也有优化空间;同时需要从其他方面进行特定优化,如高并发排队,热点数据分离等。

除了后端数据库优化,对于秒杀抽奖业务,问题的解决核心就是控制单位时间内的流量,使其不超过后端的处理能力。前端的做法包括

  • 分批次(少量多次)进行秒杀
  • 先玩游戏再抢购,如抽奖
  • 随机过滤掉部分请求,仅部分进入系统,如1/10
  • 阈值控制,一旦达到阈值,不再接收新请求
  • 预约排号,未排号用户返回失败(用户分类)
  • 验证码验证

另外,OneProxy 提供的连接池功能对于PHP非常有用。PHP运行在CGI下面,每一个请求到来便需要重新创建一个数据库连接与Mysql进行交互,并发量大量的情况下便会出现:too many connetion,乃至拖垮数据库:mysql server has gone away,影响其他业务。因此Mysql连接池,对于PHP显得非常重要。

更新:小米网在开发抢购系统的时候,最早使用PHP + Mysql碰到了一些问题,例如并发性能,数据一致性,在OneSQL上面都已经做了改进优化,只是小米自己使用Go语言重构,开发大秒系统(BigTap)。

参考链接:
限量秒杀等高并发活动的正确性如何保证?
MySQL 5.6.17/Percona5.6.16/MariaDB 10.0.11/OneSQL 5.6.16 TpmC测试
由12306.cn谈谈网站性能技术
“米粉节”背后的故事——小米网抢购系统开发实践
Web系统大规模并发——电商秒杀与抢购
OneProxy : 如何给PHP页面以及其他Ruby/Python/Go程序添加连接池功能?
基于Swoole实现的Mysql连接池

PHP ZeroMQ开发

ZeroMQ的名字有点巧妙,看起来是个MQ却加了个0,变得不是MQ。ZeroMQ是一个面向消息传递的网络通信框架,支持程序在进程内部部通信,进程之间通信,网络间通信,多播等。ZeroMQ对Socket进行了封装,支持多种网络结构范式如Request/Reply,Pub/Sub,Pull/Push,中介,路由等,还可以在这些模式再次扩展,动态扩容程序和分布式任务开发,能够轻易搭建服务程序集群。

ZeroMQ与支持AMQP的消息中间件不一样,ZeroMQ是一个网络通信库,需要自行实现中间节点和消息的管理。

在CentOS安装ZeroMQ4

git clone https://github.com/zeromq/zeromq4-x.git
cd zeromq4-x
./autogent.sh
./configure
sudo make
sudo make install

#声明libzmq库的位置
sudo vim /etc/ld.so.conf.d/libzmq.conf
#内容:/usr/local/lib

sudo ldconfig

ZeroMQ支持多种编程语言,也包括PHP。php-zmq安装

git clone https://github.com/mkoppanen/php-zmq.git
cd php-zmq
phpize
./configure
sudo make
sudo make install

sudo vim /etc/php.ini

编辑PHP.ini增加扩展信息

[zeromq]
extension = zmq.so

查看扩展是否加载成功:php -m | grep php。
先写一个简单请求-应答,首先是服务端reply.php

<?php
$pContext = new ZMQContext();
$pServer  = new ZMQSocket($pContext, ZMQ::SOCKET_REP);
$pServer->bind("tcp://*:5559");
while (true){
	$strMessage = $pServer->recv();
	echo $strMessage."\r\n";
	$pServer->send("From Server1:".$strMessage);
}

然后是客户端request.php

<?php
$pContext = new ZMQContext();
$pClient  = new ZMQSocket($pContext, ZMQ::SOCKET_REQ);
$pClient->connect("tcp://localhost:5559");
$pClient->send("Hello From Client:".uniqid());
var_dump($pClient->recv());

分别在不同终端预先一下程序

#请求者可以先启动
php request.php
#另一个终端
php reply.php

使用ZeroMQ进行通信的步骤

  • 使用ZMQContext创建一个上下文
  • 使用上下文初始化ZMQSocket,这里需要指明socket类型(ZMQ::SOCKET_开头),组合模式包括
    • PUB,SUB
    • REQ,REP
    • REQ,ROUTER (take care, REQ inserts an extra null frame)
    • DEALER,REP (take care, REP assumes a null frame)
    • DEALER,ROUTER
    • DEALER,DEALER
    • ROUTER,ROUTER
    • PUSH,PULL
    • PAIR,PAIR

    分类包括

    • 轮询,REQ,PUSH,DEALER
    • 多播,PUB
    • 公平排队,REP,SUB,PULL,DEALER
    • 明确寻址,ROUTER
    • 单播,PAIR
  • 如果是服务端就bind,如果是客户端就conncet,这里的连接信息支持
    • 进程内部通信,inproc://
    • 进程间通信,ipc://
    • 网络间通信,tcp://
    • 多播,pgm://
  • 使用send/recv发送/接收消息

使用ZeroMQ创建通信比socket简单多了,与stream_socket差不多。但是使用ZeroMQ,客户端可以先启动而不用管服务端是否已经启动了,等服务端连接上了便会自动传递消息,还可以维持节点之间的心跳。

ZeroMQ与socket通信是不一样的。ZeroMQ是无状态的,对socket的细节进行了封装,不能知道彼此的socket连接信息,仅能接收和发送消息;ZeroMQ能够使用一个socket与多个节点进行通信,具有极高的性能。

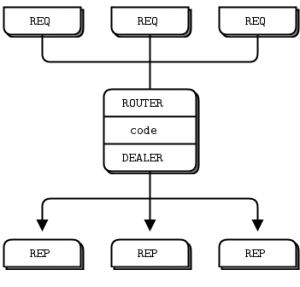
再回头看一下服务端程序,这里采用while循环来处理,亦即同一时刻只能处理一个请求,多个请求排队直到被轮询到,客户端的发送和接收都是同步等待。由于不知道客户端信息,也不能在子进程内处理完成再返回。这里就需要用到ZeroMQ各种范式的组合,比如下面这个
fig16
这里使用ROUTER和DEALER作为中介,转发请求,客户端可以异步发送求,不用等待服务端响应。

<?php
$pContext = new ZMQContext();
$pFrontend = new ZMQSocket($pContext, ZMQ::SOCKET_ROUTER);
$pBackend = new ZMQSocket($pContext, ZMQ::SOCKET_DEALER);
$pFrontend->bind("tcp://*:5559");
$pBackend->bind("tcp://*:5560");

$pPoll = new ZMQPoll();
$pPoll->add($pFrontend, ZMQ::POLL_IN);
$pPoll->add($pBackend, ZMQ::POLL_IN);


$arrRead = $arrWrite = array();
while(true){
	$nEvent = $pPoll->poll($arrRead, $arrWrite);
    if ($nEvent > 0) {
		foreach($arrRead as $pSocket){
			if($pSocket === $pFrontend){
				while (true){
					$strMessage = $pSocket->recv();
					$nMore = $pSocket->getSockOpt(ZMQ::SOCKOPT_RCVMORE);
					$pBackend->send($strMessage,$nMore ? ZMQ::MODE_SNDMORE : null);
					if(!$nMore){
						break;
					}
				}
			}
			else if ($pSocket === $pBackend){
				while (true){
					$strMessage = $pSocket->recv();
					$nMore = $pSocket->getSockOpt(ZMQ::SOCKOPT_RCVMORE);
					$pFrontend->send($strMessage,$nMore ? ZMQ::MODE_SNDMORE : null);
					if(!$nMore){
						break;
					}
				}
			}
		}
    }
}

然后更改服务端reply.php,不再绑定监听,而不是连接到DEALER上

<?php
$pContext = new ZMQContext();
$pServer  = new ZMQSocket($pContext, ZMQ::SOCKET_REP);
//$pServer->bind("tcp://*:5555");
$pServer->connect("tcp://localhost:5560");
while (true){
	$strMessage = $pServer->recv();
	echo $strMessage."\r\n";
	$pServer->send("From Server1:".$strMessage);
}

这里使用ZMQPoll对ZMQSOcket的输入输出事件进行轮询,将ROUTER收到的REQ转发给服务端,将DEALER收到的REP转发给客户端。事实上,还有更简便的方法:使用ZMQDevice将ROUTER和DEALER组合起来

<?php
$pContext = new ZMQContext();
$pFrontend = new ZMQSocket($pContext, ZMQ::SOCKET_ROUTER);
$pBackend = new ZMQSocket($pContext, ZMQ::SOCKET_DEALER);
$pFrontend->bind("tcp://*:5559");
$pBackend->bind("tcp://*:5560");

$pDevice = new ZMQDevice($pFrontend, $pBackend);
$pDevice->run();

ZeroMQ的Pub/Sub的通信模型支持一个发布者发布消息给多个订阅者,也支持一个订阅者从多个发布者订阅消息。首先写一个发布者

<?php
$pContext = new ZMQContext();
$pPublisher = new ZMQSocket($pContext, ZMQ::SOCKET_PUB);
$pPublisher->bind("tcp://*:5563");

while (true) {
    $pPublisher->send("A", ZMQ::MODE_SNDMORE);
    $pPublisher->send("1:We don't want to see this");
    $pPublisher->send("B", ZMQ::MODE_SNDMORE);
    $pPublisher->send("1:We would like to see this");
    sleep (1);
}

然后是订阅者

$pContext = new ZMQContext();
$pSubscriber = new ZMQSocket($pContext, ZMQ::SOCKET_SUB);
$pSubscriber->connect("tcp://localhost:5563");
#可以连接多个发布者
$pSubscriber->connect("tcp://localhost:5564");
$pSubscriber->setSockOpt(ZMQ::SOCKOPT_SUBSCRIBE, "B");

while (true) {
    //  Read envelope with address
    $address = $pSubscriber->recv();
    //  Read message contents
    $contents = $pSubscriber->recv();
    printf ("[%s] %s%s", $address, $contents, PHP_EOL);
}

Pub/Sub模型,发布者只能发布消息,要求发布消息前,先声明主题(地址),然后发布消息内容;订阅者只能接收消息,先设置订阅主题,然后两次接收,第一次为消息主题,第二次为消息内容。
Pub/Sub模型通消息为单向流动,可以结合其他模型让订阅者与发布者互动,比如REQ\REP。

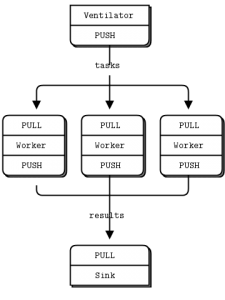
ZeroMQ的Push/Pull模型,生产者负责推送消息,消费者负责拉取消息。初看之下Pull/Push模型与Pub/sub模型类似,但是Pull/Push下生产者产生的消息只会投递给一个消费者,并不会发布给全部消费者,适合用于任务投递分配
fig5
Push和Pull都既可作为服务端,也可作为客户端。服务端Push.php

<?php
$pContext = new ZMQContext();
$pPush = new ZMQSocket($pContext, ZMQ::SOCKET_PUSH);

$pPush->bind("tcp://*:5558");
//$pPush->connect("tcp://localhost:5558");
//$pPush->connect("tcp://localhost:5559");

$pPush->send("Hello Client 1");

客户端Pull.php

<?php
$pContext = new ZMQContext();
$pPull = new ZMQSocket($pContext, ZMQ::SOCKET_PULL);

//$pPull->bind("tcp://*:5558");
$pPull->connect("tcp://localhost:5558");
$pPull->connect("tcp://localhost:5559");

var_dump($pPull->recv());

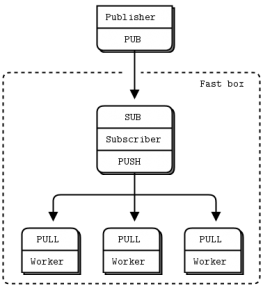
如果同时启动了两个客户端Pull.php,而只启动一个服务端Push.php,那么一次只会有一个客户端接收到消息。也可以以Pull作为主动监听,Push作为被动连接。可以同时接可以Pub/Sub和Pull/Push来处理任务
fig56
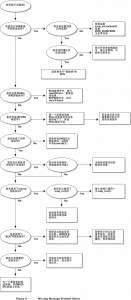
如果是用ZeroMQ传递消息收不到,可以按下面这个流程查问题
chapter1_9
除了客户端可以连接多个服务端,服务端同样可以绑定多个地址。在REQ/REP模型里,让服务端同时使用IPC(进程间通信)来处理本机的连接

<?php
$pContext = new ZMQContext();
$pServer  = new ZMQSocket($pContext, ZMQ::SOCKET_REP);
$pServer->bind("tcp://*:5556");
$pServer->bind("ipc:///tmp/req.ipc");
while(true){
	$message = $pServer->recv();
	echo $message . PHP_EOL;
	$pServer->send("Hello from server1:".$message);
}

客户端可以选择走TCP或者IPC进行消息通信

<?php
$pContext = new ZMQContext();
$pClient  = new ZMQSocket($pContext, ZMQ::SOCKET_REQ);
$pClient->connect("ipc:///tmp/req.ipc");
//$pClient->connect("tcp://localhost:5556");
$pClient->send("Hello From Client1:".uniqid());
$strMessage = $pClient->recv();
echo $strMessage,PHP_EOL;

使用ZeroMQ的进程内部消息通信也很简单

$pServer  = new ZMQSocket(new ZMQContext(), ZMQ::SOCKET_REP);
$pServer->bind("inproc://reply");


$pClient  = new ZMQSocket(new ZMQContext(), ZMQ::SOCKET_REQ);
$pClient->connect("inproc://reply");;
$pClient->send("Hello From Client1:".uniqid());

var_dump($pServer->recv());

ZeroMQ为消息传递的提供极简的方法,提供了各种连接模型,可以自由扩展。zguide更像是一个网络编程指南,指导大家如何利用ZeroMQ搭建各种网络通信模式,提高程序扩展性和健壮性。虽然ZeroMQ解决了进程间和网络间的通信问题,但是各个组件本身进程控制仍然需要自行实现。

更新:ZeroMQ的作者用C语言创建了另外一个支持多种通用通信范式的socket库:nanomsg,可以用来代替ZeroMQ做的那些事,提供了更好的伸缩性,也有对应的PHP扩展

参考链接:
ZMQ 指南
ZeroMQ in PHP
zeromq is the answer
ZeroMQ + libevent in PHP
Europycon2011: Implementing distributed application using ZeroMQ
Getting Started with ‘nanomsg’
A Look at Nanomsg and Scalability Protocols (Why ZeroMQ Shouldn’t Be Your First Choice)

PHP Socket通信

前一篇介绍了跨语言的服务调用框架Thrift,模块与模块之间调用,网络通信必不可少。这里具体介绍下如何使用PHP socket客户端与服务端进行通信。

PHP 的Socket扩展是基于流行的BSD sockets,实现了和socket通讯功能的底层接口,它可以和通用客户端一样当做一个socket服务器。这里的通用客户端是指stream_socket_*系列封装的函数。

首先写一个socket服务端

<?php
class ServerSocket{
	protected $strHost = "127.0.0.1";
	protected $nPort = 2015;
	protected $nProtocol = SOL_TCP;
	protected $pSocket = null;
	protected $pClient = null;

	public $strErrorCode = "";
	public $strErrorMsg  = "";
	public function __construct($p_strHost = "127.0.0.1", $p_nPort =2015, $p_nProtocol = SOL_TCP){
		//参数验证
		$this->strHost = $p_strHost;
		$this->nPort = $p_nPort;
		$this->nProtocol = $p_nProtocol;
		if($this->_create()&&$this->_bind()){
			$this->_listen();
		}
	}
	protected function _create(){
		$this->pSocket = socket_create(AF_INET, SOCK_STREAM, $this->nProtocol);
		if(!$this->pSocket){
			$this->_log();
		}
		return $this->pSocket;
	}
	protected function _bind(){
		$bRes = socket_bind($this->pSocket, $this->strHost, $this->nPort);
		if(!$bRes){
			$this->_log();
		}
		return $bRes;
	}
	protected function _listen(){
		$bRes  = socket_listen($this->pSocket, 10) ;
		if(!$bRes){
			$this->_log();
		}
		return $bRes;
	}
	public function accept(){
		$this->pClient = socket_accept($this->pSocket);
		if(!$this->pClient){
			$this->_log();
		}
		return $this->pClient;
	}
	protected function _connect(){
		$this->accept();
			
		if(socket_getpeername($this->pClient, $address, $port)){
			echo "Client $address : $port is now connected to us. \n";
		}
		$this->write("hello world from server\n");
	}
	protected function _reply(){
		$mxData = $this->read();
		var_dump($mxData);
		if ($mxData == false) {
			socket_close($this->pClient);

			echo "client disconnected.\n";
			return false;
		}
		else{
			$strMessage = "Client: ".trim($mxData)."\n";
			$this->write($strMessage);
			return true;
		}
	}
	public function run(){
		$this->_connect();
		$this->_reply();
	}
	public function read(){
		$mxMessage = socket_read($this->pClient, 1024, PHP_BINARY_READ);
		if($mxMessage === false){
			$this->_log();
		}
		return $mxMessage;
	}
	public function write($p_strMessage){
		$bRes = socket_write($this->pClient, $p_strMessage, strlen ($p_strMessage));
		if(!$bRes){
			$this->_log();
		}
		return $bRes;
	}
	public function close(){
		$bRes = socket_close($this->pSocket);

		$this->pSocket = null;
	}
	protected function _log(){
		$this->strErrorCode = socket_last_error();
		$this->strErrorMsg = socket_strerror($this->strErrorCode);
		//throw new Exception("exception:".$this->strErrorMsg , $this->strErrorCode);
	}
	public function __destruct(){
		if($this->pSocket){
			$this->close();
		}
	}
}
$strHost     = "127.0.0.1";
$nPort       = 25003;
$strProtocol = "tcp";
$pServer = new ServerSocket($strHost, $nPort);
$pServer->run();

这里对socket_*系列函数进行了包装,创建socket服务端的步骤

  • 使用socket_create创建socket(套接字)。第一个参数AF_INET指IPV4网络协议,TCP和UDP均可使用,对应IPV6网络协议为AF_INET6,也可以使用UNIX socket协议AF_UNIX,作进程间通信
  • 。第二个参数对应套接字类型,SOCK_STREAM对应TCP协议使用,SOCK_DGRAM对应UDP协议使用,还有SOCK_SEQPACKET,SOCK_RAW,SOCK_RDM等类型。第三个为协议类型,TCP协议对应常量SOL_TCP,UDP协议对应常量SOL_UDP,其他协议可以从getprotobyname函数获取。

  • 使用socket_bind将套接字绑定到对应的主机端口或者UNIX socket上
  • 使用socket_listen监听该套接字上的连接
  • 使用socket_accept接收套接字上的请求连接,返回一个新的套接字用于与客户端通信。如果没有连接接入,将会阻塞住;如果有多个连接,使用第一个达到的连接。
  • 开始通信,使用socket_read获取请求信息,使用socket_write返回响应结果
  • 使用socket_close关闭连接,包括原始的和socket_accept产生的套接字

这个过程中,可以使用socket_last_error和socket_strerror获取错误信息。接着创建客户端

<?php
class ClientSocket{
	protected $strHost = "127.0.0.1";
	protected $nPort = 2015;
	protected $nProtocol = SOL_TCP;
	private $pSocket = null;
	public $strErrorCode = "";
	public $strErrorMsg  = "";

	public function __construct($p_strHost = "127.0.0.1", $p_nPort =2015, $p_nProtocol = SOL_TCP){
		//参数验证
		$this->strHost = $p_strHost;
		$this->nPort = $p_nPort;
		$this->nProtocol = $p_nProtocol;
		if($this->_create()){
			$this->_connect();
		}
	}
	private function _create(){
		$this->pSocket = socket_create(AF_INET, SOCK_STREAM, $this->nProtocol);
		if(!$this->pSocket){
			$this->_log();
		}
		return $this->pSocket;
	}
	private function _connect(){
		$pSocket = $this->_create();
		$bRes = socket_connect($pSocket, $this->strHost, $this->nPort);
		if(!$bRes){
			$this->_log();
		}
		return $bRes;
	}
	public function read(){
		$strMessage = "";
		$strBuffer = "";
		while ($strBuffer = socket_read ($this->pSocket, 1024, PHP_BINARY_READ)) {
			$strMessage .= $strBuffer;
		}
		return $strMessage;
	}
	public function write($p_strMessage){
		$bRes = socket_write($this->pSocket, $p_strMessage, strlen($p_strMessage));
		if(!$bRes){
			$this->_log();
		}
	}
	public function send($p_strMessage){
		$bRes = socket_send($this->pSocket , $p_strMessage , strlen($p_strMessage) , 0);
		if(!$bRes){
			$this->_log();
		}
		return true;
	}
	public function recv(){
		$strMessage = "";
		$strBuffer = "";
		$bRes = socket_recv($this->pSocket, $strBuffer, 1024 , MSG_WAITALL);
		if(!$bRes){
			$this->_log();
		}
		$strMessage .=$strBuffer;
		return $strMessage;
	}
	public function close(){
		$bRes = socket_close($this->pSocket);

		$this->pSocket = null;
	}
	private function _log(){
		$this->strErrorCode = socket_last_error();
		$this->strErrorMsg = socket_strerror($this->strErrorCode);
		//throw new Exception("exception:".$this->strErrorMsg , $this->strErrorCode);
	}
	public function __destruct(){
		if($this->pSocket){
			$this->close();
		}
	}
}

$strHost     = "127.0.0.1";
$nPort       = 25003;
$strProtocol = "tcp";
//$nProtocol   = getprotobyname($strProtocol);

$pClient = new ClientSocket($strHost, $nPort);

var_dump($pClient->read());
$strMessage = 'Some Thing :'.uniqid();
var_dump($strMessage);
$pClient->write($strMessage);
var_dump($pClient->read());

/*
 var_dump($pClient->recv());
$pClient->send('hello');
var_dump($pClient->recv());
*/
$pClient->close();

客户端的创建步骤:

  • 使用socket_create创建socket套接字,与服务端对应
  • 使用socket_connect连接到服务端的地址或UNIX socket
  • 开始通信,可以使用socket_write和socket_read向套接字写入和读取信息,也可以使用socket_send和socket_recv发送和接收信息
  • 使用socket_close关闭连接

运行服务端程序

php serversocket.php

在另一个终端里运行

[root@vagrant socket]# netstat -apn | grep 25003
tcp        0      0 127.0.0.1:25003             0.0.0.0:*                   LISTEN      12139/php

如果运行服务端失败,提示 socket_bind(): unable to bind address [98]: Address already in use ,则是端口绑定失败。查看端口占用

[root@vagrant socket]# netstat -apn | grep 25003
tcp        0      0 127.0.0.1:25003             127.0.0.1:36618             TIME_WAIT   -

该端口处于TIME_WAIT状态,需要再等一会儿才会释放。这是因为TCP连接关闭需要四次握手,服务端主动关闭了连接,但是未收到客户端发过来的关闭确认,导致处于等待状态,具体原因见火丁笔记《再叙TIME_WAIT》

如果服务端已经运行成功,在另一个终端里运行客户端程序

php clientsocket.php

这是一个简单服务端/客户端请求应答模型,通常服务端会一直处于监听状态,处理新的请求,重新写一个循环监听的服务端

class SelectServerSocket extends ServerSocket{
	public function run(){
		$this->loop();
	}
	public function loop(){
		$arrRead = array();
		$arrWrite = $arrExp = null;
		$arrClient = array($this->pSocket);
	
		while(true){
			$arrRead = $arrClient;
			if (socket_select($arrRead, $arrWrite, $arrExp, null) < 1){
				continue;
			}
			foreach ($arrRead as $pSocket){
				if($pSocket == $this->pSocket){
					$this->_connect();
						
					$arrClient[] = $this->pClient;
				}
				else{
					$bRes = $this->_reply();
					if($bRes === false){
						$nKey = array_search($this->pClient, $arrClient);
						unset($arrClient[$nKey]);
						continue;
					}
				}
	
			}
		}
		//usleep(100);
	}
}
$strHost     = "127.0.0.1";
$nPort       = 25003;
$strProtocol = "tcp";
$pServer = new SelectServerSocket($strHost, $nPort);
$pServer->run();

在循环里面使用socket_select查询有可以读的套接字,如果套接字为原始监听的套接字,则使用socket_accept获取新接入的通信套接字进行通信;如果是通信套接字,则与客户端进行交互。

这里socket_select($arrRead, $arrWrite, $arrExp, null)的第四个参数为null,表示可以无限阻塞,如果为0则不阻塞立即返回,其他大于0值则等待超时。
socket_recv($this->pSocket, $strBuffer, 1024 , MSG_WAITALL)的第四个参数为MSG_WAITALL,表示阻塞读取结果。
socket_read ($this->pSocket, 1024, PHP_BINARY_READ )的第三个参数PHP_BINARY_READ表示读取以\0结束,PHP_NORMAL_READ表示读取以\n或\r结束

在终端里运行服务端,会一直在那里等待新的连接。这时候运行客户端,客户端确也阻塞住了。解决的办法有两种:超时设置和非阻塞设置。给ClientSocket类增加超时和阻塞设置的方法

	public function setTimeOut($p_nSendTimeOut = 1, $p_nRecvTimeOut = 1){
		$nSend = (int)$p_nSendTimeOut;
		$nRecv = (int)$p_nRecvTimeOut;

		$arrSend = array('sec' => $nSend, 'usec' => (int)(($p_nSendTimeOut - $nSend) * 1000 * 1000));
		$arrRecv = array('sec' => $nRecv, 'usec' => (int)(($p_nRecvTimeOut - $nRecv) * 1000 * 1000));

		socket_set_option($this->pSocket, SOL_SOCKET, SO_RCVTIMEO, $arrSend);
		socket_set_option($this->pSocket, SOL_SOCKET, SO_SNDTIMEO, $arrRecv);
	}
	public function setBlock($p_bType = true){
		if($p_bType){
			socket_set_block($this->pSocket);
		}
		else{
			socket_set_nonblock($this->pSocket);
		}
	}

客户端端运行前,先设置一下超时或非阻塞即,此时程序不会再阻塞了

$pClient = new ClientSocket($strHost, $nPort);

$pClient->setTimeOut(1, 1);
//$pClient->setBlock(false);

//do request here

同样在服务端设置超时和非阻塞也是可以的,给ServerSocket增加超时和非阻塞设置的方法

	protected function _setNoBlock($p_pSocket){
		socket_set_nonblock($p_pSocket);
	}
	protected function _setTimeOut($p_pSocket, $p_nSendTimeOut = 1, $p_nRecvTimeOut = 1){
		$nSend = (int)$p_nSendTimeOut;
		$nRecv = (int)$p_nRecvTimeOut;

		$arrSend = array('sec' => $nSend, 'usec' => (int)(($p_nSendTimeOut - $nSend) * 1000 * 1000));
		$arrRecv = array('sec' => $nRecv, 'usec' => (int)(($p_nRecvTimeOut - $nRecv) * 1000 * 1000));

		socket_set_option($p_pSocket, SOL_SOCKET, SO_RCVTIMEO, $arrSend);
		socket_set_option($p_pSocket, SOL_SOCKET, SO_SNDTIMEO, $arrRecv);
	}

将SelectServerSocket的socket_accept后产生的连接设置为非阻塞

	public function loop(){
		$arrRead = array();
		$arrWrite = $arrExp = null;
		$arrClient = array($this->pSocket);
		$this->_setNoBlock($this->pSocket);
	
		while(true){

再次运行服务端,客户端也不会阻塞了。

在while循环里面使用socket_select进行查询,效率比较低下,有先的连接要等下次循环才能处理;有时候并没有连接需要处理,也一直在循环。可以结合前面介绍过的PHP Libev扩展进行监听

class EvServerSocket extends ServerSocket{
	protected function _onConnect(){
		$this->_connect();
	
		$pReadClient = new EvIo($this->pClient, Ev::READ, function ($watcher, $revents) {
			$this->_reply();
		});
		Ev::run();
	}
	public function run(){
		$pReadWatcher = new EvIo($this->pSocket, Ev::READ, function ($watcher, $revents) {
			$this->_onConnect();
		});
		Ev::run();
	}
}

$strHost     = "127.0.0.1";
$nPort       = 25003;
$strProtocol = "tcp";
$pServer = new EvServerSocket($strHost, $nPort);
$pServer->run();

代码看起来简单了很多。当原始套接字监听到可读事件时,便为新的套接字也创建可读事件监听 ,在事件里面处理新的连接。

通常的服务端程序是一个进程监听原始套接字,然后交由其他进程/线程处理新的连接套接字,与客户端进行交互,提升服务端性能。这样子又涉及到了多进程/多线程的控制、通信,需要一套完善的体系才行。


class MulProcessServerSocket extends EvServerSocket{
	protected function _execute(){
		if(!$this->_reply()){
			//子进程执行完毕,通知父进程
			exit();
		}
	}
	protected function _onConnect(){
		$pid = pcntl_fork();
		//父进程和子进程都会执行下面代码
		if ($pid == -1) {
			//错误处理:创建子进程失败时返回-1.
			die('could not fork');
		} else if ($pid) {
			//父进程会得到子进程号,所以这里是父进程执行的逻辑
			pcntl_wait($status); //等待子进程中断,防止子进程成为僵尸进程。
		} else {
			//子进程得到的$pid为0, 所以这里是子进程执行的逻辑。
			$this->_connect();

			$pReadClient = new EvIo($this->pClient, Ev::READ, function ($watcher, $revents) {
				$this->_execute();
			});
			Ev::run();
		}

	}
}

还可以使用stream_socket_*系列函数来创建sockt服务端和客户端。类似的创建一个客户端与之前的服务端进行交互

<?php
class ClientStreamSocket{
	private $pConnetion = null;
	protected $strAddress = "tcp://127.0.0.1:2016";
	protected $nTimeOut   = 3;
	protected $nFlag      = STREAM_CLIENT_CONNECT;
	public $strErrorCode = "";
	public $strErrorMsg  = "";
	const BLOCK   = 1;
	const NOBLOCK = 0;
	public function __construct($p_strAddress, $p_nTimeOut = 3, $p_nFlag = STREAM_CLIENT_CONNECT){
		$this->strAddress = $p_strAddress;
		$this->nTimeOut   = $p_nTimeOut;
		$this->nFlag      = $p_nFlag;
		$this->_connect();
	}
	private function _connect(){
		$this->pConnetion = stream_socket_client($this->strAddress, $this->strErrorCode, $this->strErrorMsg, $this->nTimeOut, $this->nFlag);
		if(!$this->pConnetion){
			throw new Exception("connect exception:".$this->strErrorMsg, $this->strErrorCode);
		}
		return $this->pConnetion;
	}
	public function write($p_strMessage){
		if(fwrite($this->pConnetion, $p_strMessage) !== strlen($p_strMessage))
		{
			throw new Exception('Can not send data');
		}
		return true;
	}
	public function read(){
		//接收一行,阻塞至\n结束
		//$strMessage = fgets($this->pConnetion);
		//指定长度读取
		//$strMessage = fread($this->pConnetion, 1024);
		$strMessage = stream_socket_recvfrom($this->pConnetion, 1024);
		//$strMessage = stream_get_contents($this->pConnetion);

		return $strMessage;
	}
	public function close(){
		fclose($this->pConnetion);
		$this->pConnetion = null;
	}
	public function setContext(){

	}
	public function setTimeOut($p_nTimeOut = 1){
		$bRes = stream_set_timeout($this->pConnetion, $p_nTimeOut);
	}
	public function setBlock($p_nMode = ClientStreamSocket::BLOCK){
		$bRes = stream_set_blocking($this->pConnetion, $p_nMode);
	}
	public function __destruct(){
		if($this->pConnetion){
			$this->close();
		}
	}
}

$strHost     = "127.0.0.1";
$nPort       = 25003;
$strProtocol = "tcp";
//$nProtocol   = getprotobyname($strProtocol);

$strAddress = $strProtocol."://".$strHost.":".$nPort;

$pStream = new ClientStreamSocket($strAddress);
//$pStream->setBlock(ClientStreamSocket::NOBLOCK);
//$pStream->setTimeOut(1);
var_dump($pStream->read());
$pStream->write("hello from client\n");
var_dump($pStream->read());
$pStream->close();

使用stream_socket_*系列函数创建客户端要简单不少

  • 首先使用stream_socket_client创建一个socket操作流(stream)
  • 然后就可以像操作流式文件那样造成socket stream,使用fread和fwrite进行读写操作,也可以使用stream_socket_recvfrom和stream_socket_sendto进行操作
  • 使用fclose或stream_socket_shutdown关闭连接

使用stream_socket_*系列函数创建一个服务端来与之前的客户端进行交互,同样很简单,也与ServerSocket类似

<?php
class ServerStreamSocket{
	protected $pServer = null;
	protected $pClient = null;
	protected $strAddress = "tcp://127.0.0.1:2016";
	protected $nFlag      = STREAM_SERVER_LISTEN;
	
	const BLOCK   = 1;
	const NOBLOCK = 0;
	
	public $strErrorCode = "";
	public $strErrorMsg  = "";
	public function __construct($p_strAddress, $p_nFlag = STREAM_SERVER_LISTEN){
		$this->strAddress = $p_strAddress;
		$this->nFlag = $p_nFlag;
		$this->_create();
	}
	protected function _create(){
		$this->pServer = stream_socket_server($this->strAddress, $this->strErrorCode, $this->strErrorMsg);
		if(!$this->pServer ){
			throw new Exception("create exception:".$this->strErrorMsg, $this->strErrorCode);
		}
		return $this->pServer ;
	}
	public function accept(){
		$this->pClient = stream_socket_accept($this->pServer);
		if(!$this->pClient ){
			return false;
		}
		return $this->pClient ;
	}
	protected function _connect(){
		$this->accept();
		echo "Client". stream_socket_get_name($this->pClient, true)." is now connected to us. \n";
		$this->write("hello world from server\n");
	}
	protected function _reply(){
		$mxData = $this->read();
		var_dump($mxData);
		if($mxData == false){
			fclose($this->pClient);
				
			echo "client disconnected.\n";
			return false;
		}
		else{
			$strMessage = "Client:".trim($mxData)."\n";
			$this->write($strMessage);
			return true;
		}
	}
	public function run(){
		$this->_connect();
		$this->_reply();
	}
	public function write($p_strMessage){
		//$nLen = fwrite($this->pClient, $p_strMessage);
		$nLen = stream_socket_sendto($this->pClient, $p_strMessage);
		if($nLen !== strlen($p_strMessage))
		{
			throw new Exception('Can not send data');
		}
		return true;
	}
	public function read(){
		//接收一行,阻塞至\n结束
		//$strMessage = fgets($this->pClient);
		//指定长度读取
		//$strMessage = fread($this->pClient, 1024);
		$strMessage = stream_socket_recvfrom($this->pClient, 1024);
		//$strMessage = stream_get_contents($this->pClient);

		return $strMessage;
	}
	public function close(){
		fclose($this->pServer);
		
		$this->pServer = null;
	}
	public function setContext(){

	}
	public function setTimeOut($p_pConnetction, $p_nTimeOut = 1){
		$bRes = stream_set_timeout($p_pConnetction, $p_nTimeOut);
	}
	public function setBlock($p_pConnetction, $p_nMode = ServerStreamSocket::BLOCK){
		$bRes = stream_set_blocking($p_pConnetction, $p_nMode);
	}
	public function __destruct(){
		if($this->pServer){
			$this->close();
		}
	}
}
class SelectServerStreamSocket extends ServerStreamSocket{
	public function run(){
		$this->loop();
	}
	public function loop(){
		$arrRead = array();
		$arrWrite = $arrExp = null;
		$arrClient = array($this->pServer);
		while(true){
			$arrRead = $arrClient;
			if (stream_select($arrRead, $arrWrite, $arrExp, null) < 1){
				continue;
			}
			if(in_array($this->pServer, $arrRead)){
				$this->_connect();
	
				$arrClient[] = $this->pClient;
	
				$nKey = array_search($this->pServer, $arrRead);
				unset($arrRead[$nKey]);
			}
			foreach($arrRead as $pConnetcion){
				$bRes = $this->_reply();
				if($bRes === false){
					$nKey = array_search($this->pClient, $arrClient);
					unset($arrClient[$nKey]);;
					continue;
				}
			}
		}
		//usleep(100);
	}
}
class EvServerStreamSocket extends ServerStreamSocket{
	protected function _onConnect(){
		$this->_connect();
		
		$pReadClient = new EvIo($this->pClient, Ev::READ, function ($watcher, $revents) {
			$this->_reply();
		});
		Ev::run();
	}
	public function run(){
		$pReadWatcher = new EvIo($this->pServer, Ev::READ, function ($watcher, $revents) {
			$this->_onConnect();
		});
		Ev::run();
	}
}
class MulProcessServerStreamSocket extends EvServerStreamSocket{
	protected function _execute(){
		if(!$this->_reply()){
			//子进程执行完毕,通知父进程
			exit();
		}
	}
	protected function _onConnect(){
		$pid = pcntl_fork();
		if ($pid == -1) {
			die('could not fork');
		} else if ($pid) {
			pcntl_wait($status);
		} else {
			$this->_connect();

			$pReadClient = new EvIo($this->pClient, Ev::READ, function ($watcher, $revents) {
				$this->_execute();
			});
			Ev::run();
		}

	}
}
$strHost     = "127.0.0.1";
$nPort       = 25003;
$strProtocol = "tcp";
//$nProtocol   = getprotobyname($strProtocol);

$strAddress = $strProtocol."://".$strHost.":".$nPort;

$pServer = new EvServerStreamSocket($strAddress);

$pServer->run();

这里演示客户端与服务端交互,都是两步走,先发送一个请求再获取结果。在Thrift RPC远程调用中,既可先发送请求,过一会儿再来获取结果,达到异步交互的目的;也可发送完请求后立即获取结果,达到同步请求的目的。

参考链接:
Socket Programming in PHP
Socket programming with streams in php
PHP Socket programming tutorial
php 实例说明 socket通信机制
Mpass – PHP做Socket服务的解决方案
How to forcibly close a socket in TIME_WAIT?