大部分业务都需要一个唯一标识ID,比如订单ID、消息ID,通常使用的ID就是数据库的自增ID,比如MySQL的AUTO_INCREMENT;有时候这个ID还需要在不同系统里面传递、保存,又要保证唯一性。单机MySQL在高并发请求下面又可能存在锁/性能问题,于是Flicker使用两台MySQL来生成ID,一台从0开始,一台从1开始,步长为2,这样两台生成的ID不会互相重复,这个方案也可以扩展成N台,自增步长为N即可。
作为一个分布式ID应当避免在不同节点同步ID信息,通常都是基于时间戳和机器信息来生成。比如MongoDB的ObjectId是提前生成的为12字节=4字节UNIX时间戳+3字节机器码+2字节进程ID+2字节计数序列。
如果不需要访问数据库即能生成ID,性能可以更高。比如UUID V1,基于时间戳和网卡,采用128位,可以生成范围非常广的ID,但是生成的16进制值的36位字符串不好排序。在MySQL里面可以通过调整机器码(MAC)和时间戳位置顺序,并采用binary来存储以提高性能。
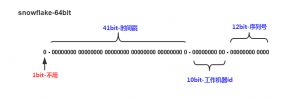
Twitter开源的Snowflake则生成64位数字ID,包括41时间戳,10位机器码/节点码,12位计数序列,另外1位保留。采用基于时间戳的数字ID的好处是这个ID可以当作主键,并且已经粗略按时间排好序,可以直接分页读取,省去在时间字段上建立索引。

分布式ID通常需要用到机器信息(节点ID或MAC),一个机器通常只运行一个服务进程,所以通常不采用Nginx/Apache + PHP。参考这里实现一个基于Swoole和Zookpeer的64位ID生成器。基于Swoole可以快速开发一个Web/Socket server,不同于Apache/Nginx,它的PHP进程启动后是常驻运行的,资源初始化后可以重复使用,使用Zookpeer来获取当前进程的节点ID,一旦PHP进程退出后便会销毁对应的节点ID。
首先是生成ID
<?php

declare(strict_types=1);

namespace Dig\Ticket;

use Dig\Ticket\Exception\IllegalTimeException;

class Number
{
    public const TOTAL_BIT = 64;
    public const EPOCH_BIT = 42;
    public const NODE_BIT = 10;
    public const SEQUENCE_BIT = 12;

    public const MAX_NODE_ID = 2 ** self::NODE_BIT - 1;
    public const MAX_SEQUENCE_NUMBER = 2 ** self::SEQUENCE_BIT - 1;
    public const CUSTOM_EPOCH = 1262332800000;

    private $lastTimestamp = 0;
    private $sequence = 0;

    private $nodeId = 0;

    public function __construct(int $nodeId)
    {
        $this->nodeId = $nodeId;
    }

    public function getNodeId(): int
    {
        return $this->nodeId;
    }

    public function getTimestamp(): int
    {
        return (int) (\microtime(true) * 1000) - self::CUSTOM_EPOCH;
    }

    public function generate(): int
    {
        $current = $this->getTimestamp();
        if ($current < $this->lastTimestamp) {
            throw new IllegalTimeException('current timestamp cannot less than before');
        }
        if ($current === $this->lastTimestamp) {
            $this->sequence = ($this->sequence + 1) & self::MAX_SEQUENCE_NUMBER;
            if (0 === $this->sequence) {
                $current = $this->_waitNextTimestamp($current);
            }
        } else {
            $this->sequence = 0;
        }
        $this->lastTimestamp = $current;
        $id = $current << (self::TOTAL_BIT - self::EPOCH_BIT);
        $id = $id | ($this->getNodeId() << (self::TOTAL_BIT - self::EPOCH_BIT - self::NODE_BIT));
        $id = $id | $this->sequence;

        return $id;
    }

    private function _waitNextTimestamp($current)
    {
        while ($current === $this->lastTimestamp) {
            $current = $this->getTimestamp();
        }

        return $current;
    }
}
这里只涉及到ID生成,包括时间戳,序列号获取,而节点ID由其他对象生成并传入。2的42次方减1等于4398046511103,大概就是2109年5月15日,可以使用(2^42-1)/(365*24*60*60*1000)≈139年,距离现在还有90年可以用,仍然是一个非常大的可使用范围。CUSTOM_EPOC是自定义的时间戳偏移量,以便选取合适的ID生成下限和上限。距离现在节点生成的接口定义
<?php

declare(strict_types=1);

namespace Dig\Ticket;

interface NodeInterface
{
    public const MAX_NODE_ID = 2 ** Number::NODE_BIT - 1;

    public function getId(): int;
}
这里定义了最大节点序号不能超过1023,可以依据自己的需求更改范围。节点ID的实现可以是基于网卡/进程ID/文件配置等等实现,但是不同机器或多进程之间需要不一样的ID或者需要锁保证上面的generate函数。
<?php

declare(strict_types=1);

namespace Dig\Zookeeper;

class Client extends \Zookeeper
{
    public function makePath(string $path, string $value = ''): bool
    {
        $arrPath = \explode('/', $path);
        if (!empty($arrPath)) {
            $arrPath = \array_filter($arrPath);
            $subpath = '';
            $flag = true;
            foreach ($arrPath as $p) {
                $subpath .= '/'.$p;
                if (!$this->exists($subpath)) {
                    if (!$this->makeNode($subpath, $value)) {
                        $flag = false;
                        break;
                    }
                }
            }

            return $flag;
        }

        return false;
    }

    public function makeNode(string $path, string $value, array $acls = [], int $flag = 0): bool
    {
        if (empty($acls)) {
            $acls = [
                [
                    'perms' => \Zookeeper::PERM_ALL,
                    'scheme' => 'world',
                    'id' => 'anyone',
                ],
            ];
        }
        if ($this->create($path, $value, $acls, $flag)) {
            return true;
        }

        return false;
    }

    public function deletePath(string $path): bool
    {
        $children = $this->getChildren($path);
        if (!empty($children)) {
            foreach ($children as $child) {
                $subpath = $path.'/'.$child;
                $this->deletePath($subpath);
            }
        }

        return $this->delete($path);
    }
}
这里使用Zookeeper实现
<?php

declare(strict_types=1);

namespace Dig\Ticket\Node;

use Dig\Ticket\Exception\UnavailableNodeIdException;
use Dig\Ticket\NodeInterface;
use Dig\Zookeeper\Client;

class Zookeeper implements NodeInterface
{
    private $zk;
    private $dsn;
    private $pool;
    private $basePath = '/dig/ticket';
    private $acls = [
        [
            'perms' => \Zookeeper::PERM_ALL,
            'scheme' => 'world',
            'id' => 'anyone',
        ],
    ];
    private $id;

    public function __construct(string $dsn, string $path = '/sim/ticket')
    {
        $this->dsn = $dsn;
        $this->pool = new \SplQueue();
        if (!empty($path)) {
            $this->basePath = $path;
        }
    }

    public function getZookeeper(): Client
    {
        if (null === $this->zk) {
            $this->zk = new Client($this->dsn);
        }

        return $this->zk;
    }

    public function getId(): int
    {
        if (null === $this->id) {
            if (!$this->getZookeeper()->exists($this->basePath)) {
                $this->getZookeeper()->makePath($this->basePath);
            }
            $i = 1;
            $length = \mb_strlen((string) self::MAX_NODE_ID);
            $nodeId = \sprintf('%0'.$length.'d', $i);
            $children = $this->getZookeeper()->getChildren($this->basePath);
            $children = empty($children) ? [] : $children;
            for (; $i <= self::MAX_NODE_ID; ++$i) {
                $nodeId = \sprintf('%0'.$length.'d', $i);
                if (!\in_array($nodeId, $children)) {
                    $path = $this->basePath.'/'.$nodeId;
                    if ($this->getZookeeper()->exists($path)) {
                        //throw new UnavailableNodeIdException('node already exist: '.$path);
                        continue;
                    }
                    try {
                        $this->getZookeeper()->makeNode($path, $nodeId, $this->acls, \Zookeeper::EPHEMERAL);
                        break;
                    } catch (\ZookeeperException $e) {
                        //throw new UnavailableNodeIdException('cannot create node in zookeeper: '.$e->getMessage());
                        continue;
                    }
                }
            }
            if (self::MAX_NODE_ID === $i) {
                throw new UnavailableNodeIdException('cannot create node in zookeeper: reach max node limit '.self::MAX_NODE_ID);
            }
            $this->id = $i;
        }

        return $this->id;
    }
}
这里遍历查询1-1023之间的节点是否都已在Zookeeper上注册,如果没有则注册,Zookeeper会保证只有一个客户端注册成功。注册的节点类型位Zookeeper::EPHEMERAL,在客户端退出时,该节点会被自动删除,方便其他机器/进程申请。在这篇文章里面我们也使用Zookeeper::EPHEMERAL配合Zookeeper::EPHEMERAL,生成序列号,用来确定进程的master/slave。
初始化并运行Swoole Web server,需要传入Zookeeper的连接字符串,可以使用docker快速部署
<?php
include __DIR__.'/../vendor/autoload.php';
use Dig\Ticket\Number;
use Dig\Ticket\Node\Zookeeper as ZookeeperNode;


/**
 * swoole - zookeeper tick dispatch issue: https://github.com/php-zookeeper/php-zookeeper
*/
$host = getenv("ZOOKEEPER_CONNECTION");
$host = empty($host) ? "192.168.33.1:2181" : $host;
$node = new ZookeeperNode($host);

$http = new \Swoole\Http\Server("0.0.0.0", 9501);

$http->on("start", function ($server) {
    echo "Swoole http server is started at http://0.0.0.0:9501\n";
});

$http->on("WorkerStart", function ($server, $workerId) use($node) {
    // https://wiki.swoole.com/wiki/page/325.html
    // https://wiki.swoole.com/wiki/page/852.html
    // https://wiki.swoole.com/wiki/page/865.html
    // use lazy initial zk here, so that each worker can hold its own zk resource
    // if we only run swoole http server in 1 worker process (1 CPU), then no need to consider this
    $id = $node->getId();
    $server->nodeId = $id;
    $server->number = new Number($server->nodeId);
});

$http->on("request", function ($request, $response) use ($http) {
    $data = $http->number->generate();
    $response->end($data);
});

$http->start();
访问本机的9501端口即可以得到ID了,完整代码在这里。Swoole默认运行与CPU核数量相同的worker进程数,注意这里需要WorkerStart里初始化获取Node节点ID,如果只是运行一个Swoole worker进程,也可以在外面获取节点ID。可以将Swool\Htpp\Server替换成React\Http\Server或者Amp\Http\Server,它们在单个进程里面loop,每个进程分别持有自己的节点序号,可以保证生成的ID不冲突,性能方面Swoole > Amp > ReactPHP。
可以采用Swoole\Server + thrift/gRPC改造这些代码,提供RPC服务。
注意ID的生成是随时间递增的,依赖于时间戳,如果出现了时间回拨,将会抛出异常。一般解决方案包括:
- 等待重试
- 使用Int64原子自增量代替时间戳,跳过时间戳判断
- 使用预留的节点ID
- 关闭时钟同步
- 使用备选自增量方案
生成的ID并不是严格递增的,只是千分一秒递增,对于微博、Twiter的Timeline够用;但也有好处,比如别人不能通过ID相减了解美团的订单量。
参考链接:
如何设计一个分布式ID生成器(Distributed ID Generator),并保证ID按时间粗略有序?
生成全局唯一ID的3个思路,来自一个资深架构师的总结
Distributed unique id generation
Unique ID generation in distributed systems
Optimised UUIDs in mysql
Storing UUID Values in MySQL Tables
Mysql 8.0: UUID support
How to store a 128 bit number in a single column in MySQL?
Generating unique IDs in a distributed environment at high scale
Leaf——美团点评分布式ID生成系统
分布式ID增强篇–优化时钟回拨问题
Ticket Servers: Distributed Unique Primary Keys on the Cheap
Sharding & IDs at Instagram
